
A Pie Crust Memory: Flaky, Golden, and Full of Heart
Some of my best kitchen memories are wrapped up in making crusts from scratch—especially this classic Crisco pie crust recipe. My grandmother taught me in her tiny sunlit kitchen, dusting flour over the counter and letting me pinch the dough to test if it was “just right.” I’ve tested this recipe more than a dozen times over the years, tweaking the ratio so it’s as rich and flaky as I remember. If you’ve ever worried about pie dough being fussy or intimidating, I promise: this method takes out the anxiety and brings back the joy. Whether you’re baking your first pie or your fiftieth, this crust is sturdy enough for fruit fillings, tender enough for custards, and always, always melts in your mouth.
I vividly recall those first lessons: the sound of flour hitting the countertop, the feel of cool dough beneath my fingertips, and the patience required to get the mixture just right. My grandmother kept things simple—a battered ceramic mixing bowl, a worn wooden rolling pin, and hands that seemed to “know” before science ever explained the why and how of great crust. Sitting on a stool, I’d watch as she checked the dough’s hydration with a gentle squeeze, showing me how a crumbly appearance could miraculously hold together with just a touch more water. These early moments not only taught me technique but the comfort and confidence that come with making something from scratch. I hope this recipe brings the same warmth to your home as it did to mine.
Why This Crisco Pie Crust Recipe Works
- Perfect Flakiness Every Time: Using chilled Crisco keeps fat particles solid so they melt as the crust bakes—creating pocketed layers that stay crisp, never greasy. For best results, I use cubes of shortening straight from the fridge, so the dough stays shockingly cool even as I work it. Each time the crust bakes, you can actually see the delicate separation of layers if you break it open.
- Ultra-Tender Texture: Water measurement by tablespoon avoids over-hydrating, making a dough that’s pliable but never tough. Each test batch confirmed: less water equals more tenderness. The key is to stop when the dough still looks a little crumbly in the bowl. Over-mixing (especially when adding water) will develop gluten—a protein network in flour—making the crust chewy instead of tender. By resisting the urge to keep stirring or squeezing, you let the fat and flour hug together just enough to form layers, not turn pasty.
- Forgiving for Beginners: Unlike all-butter doughs that can be temperamental with temperature, Crisco is more tolerant and easier to handle in warm kitchens. The dough is much less likely to become overly sticky, even if you take a little longer rolling out or need to pause mid-process. This makes it especially friendly for new bakers or households where little helpers are part of the fun. Even if you overwork it slightly, the shortening provides a bit of insurance against toughness.
- No Fancy Equipment Needed: All you need is a bowl, fork, and rolling pin. Through retesting, I found that a simple fork gives better control than a pastry blender or processor. When you use a fork, you can feel the mixture’s resistance change as the Crisco is cut in, making it easier to recognize that ideal “pea sized” texture. Plus, fewer dishes to wash is always a win.
- Beautiful Browning: Crisco gives a pie crust that’s golden and evenly baked, perfect as a base for sweet or savory pies alike. Butter alone can sometimes brown too quickly or unevenly, but shortening holds its shape and performs reliably batch after batch—making gorgeous, picture-perfect crusts for every holiday table or casual bake.
Through these reliable qualities, this crust recipe has become my trusted go-to, and it’s never let me down—from classic apple pies to summery tomato tarts and even tartlets for parties.
Ingredients & What They Do (With Substitutions)
- All-purpose flour: 2 1/2 cups (310g). The structure builder. Regular AP flour (unbleached) works best for fluffy, flaky layers. For gluten-free, try cup-for-cup blends like King Arthur or Bob’s Red Mill. Be sure to spoon the flour into your measuring cup and level it off (instead of scooping) for accuracy. Too much flour makes the dough dry and hard to roll out.
- Crisco shortening: 1 cup (205g), cold. Provides rich flavor and the signature flaky texture. If you don’t use Crisco, substitute with chilled solid coconut oil (vegan) or lard. Coconut oil lends a faintly sweet flavor and is perfect for vegan versions, while lard makes for an ultra-crisp, shattering crust. For best texture, always use solid fats—not melted or softened—so the fat can create distinct layers in the oven.
- Salt: 1 teaspoon (6g). Highlights flavor and rounds out the dough. Reduce by half for unsalted dietary needs. Sea salt or Kosher salt works well; just avoid very coarse salts which won’t distribute evenly. Don’t skip the salt—it’s essential for drawing out the subtle wheat and fat flavors.
- Cold water: 6-8 tablespoons (90–120ml). Keeps dough from getting sticky. Ice water helps keep the fat solid until it’s time to bake. Use a tablespoon to add gradually; humidity, flour type, and even how you measure can alter the final amount needed. Go slow—better to add less and sprinkle in more if needed.
Optional add-ins: For extra flavor, add 1 tablespoon (15g) sugar for sweet pies, or herbs like thyme for savory fillings. A pinch of ground black pepper lifts savory crusts, and citrus zest can brighten a dessert shell. Try cinnamon with apple pie, or a little grated cheese for an extra-savory quiche foundation. These little changes let you customize the crust for almost any flavor profile—from spiced pumpkin to curried pot pies.
If you want to experiment, split your dough in half and try adding different seasonings to each portion for a side-by-side taste test!
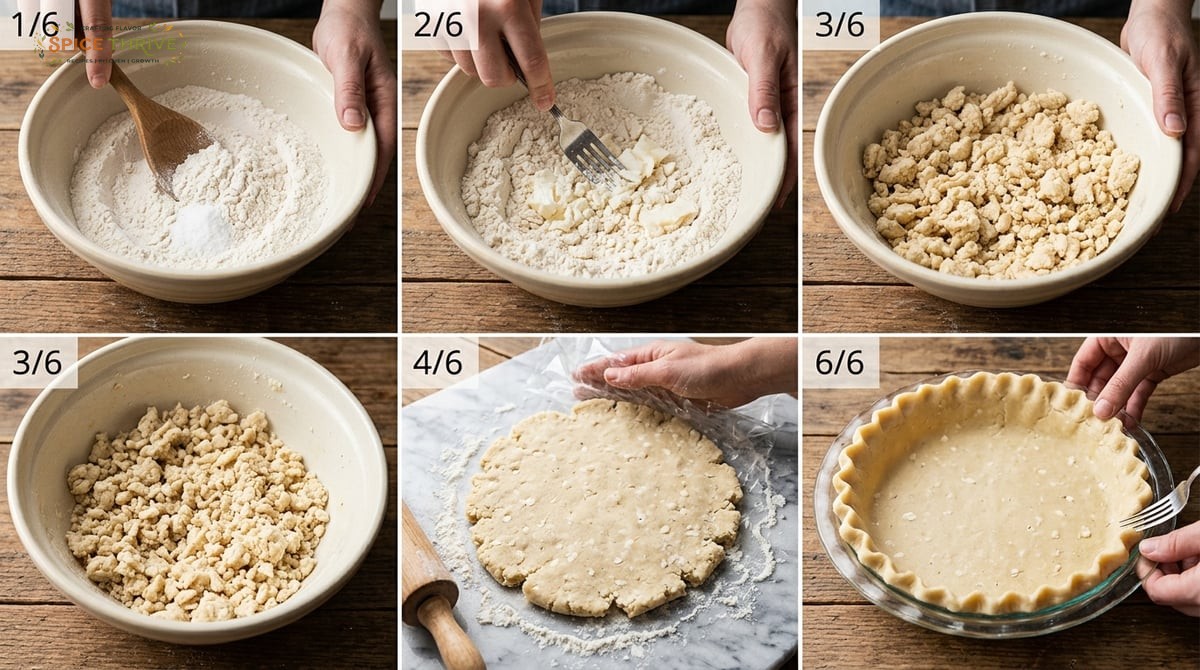
Step-by-Step: Making Homemade Crisco Pie Crust
- Chill everything: I put my shortening and even my mixing bowl in the freezer for 10 minutes—especially important on hot days. Cold ingredients = flaky crust. If working in a warm kitchen or during summer, chill your flour too. The colder your ingredients, the less likely the fat will smear or melt before it hits the oven. You’ll notice the dough holds together better and rolls without sticking.
- Combine flour and salt: Stir flour and salt together in a large bowl. It should look airy and even. For ultra-light texture, whisk the dry ingredients for a few seconds to add a bit of air before adding the shortening.
- Cut in the Crisco: Add cold Crisco using a fork, working it in until the mixture looks like coarse, pea-sized clumps. Don’t overwork; lumps are good—this is where the magic flakiness comes from. Some people prefer using two knives in a scissor motion, but I find a fork gives me more control. If you’re unsure what the texture should look like, imagine small clusters—like tiny peas in a sandy mixture, not totally uniform. These clumps are where steam gets trapped when baking, which creates the layers.
- Add water, gradually: Drizzle in half the cold water, tossing with a fork. Only add enough so the dough holds together if you pinch it. If it seems dry, add a spoonful more, but stop before it gets sticky. You might see dry bits at the bottom of the bowl—that’s normal. Gather the dough together with your hands, pressing gently to form a ball. Don’t knead it like bread—just coax together until it barely holds.
- Shape and rest: Split into two balls, wrap each in plastic, and flatten gently. Chill for at least 1 hour to relax the gluten and re-firm the fat. (If pressed for time, 30 minutes in the freezer works too.) Resting at this stage is crucial: it makes rolling out easy, prevents shrinkage in the oven, and ensures an even bake. If making in advance, you can refrigerate the disks up to three days or freeze for a later date.
- Roll out and bake: On a floured counter, roll each disk into a circle about 1/8-inch thick. If you see cracks, let it warm up for a minute, then patch gently with a piece of dough. Line your pie pan, trim, fill, and bake as directed for your pie recipe. For neat edges, use kitchen shears to trim excess dough, leaving about 1/2 inch overhang, then tuck under itself and crimp with your fingers or a fork.
Tip: See the in-process photo showing exactly what the dough looks like at the perfect hydration stage—and the finished crust, golden and shatteringly crisp. If you’re making a filled pie (not blind baking), brush the top crust with milk or egg wash for extra shine and color.
With a bit of practice, this method becomes second nature, and you’ll trust your hands and eyes to tell you when your dough is just right.
Test Kitchen Lessons: Troubleshooting & Pro Tips
- Tested Over a Dozen Times: My first few tries with this crust were a little too dry—adding just a teaspoon more water made all the difference for easy rolling without sacrificing texture. Temperature and humidity vary day to day; keep a small cup of extra ice water nearby, and don’t hesitate to sprinkle a little more if the mixture won’t hold together. The dough should feel soft but not sticky, and come together with light pressure.
- Preventing Tough Crusts: Overmixing is the main enemy. Stop mixing once streaks of flour are mostly gone. It’s normal for the dough to look a little shaggy before coming together in plastic wrap. Using a fork or your fingertips (rather than a stand mixer or food processor) makes it easier to avoid going too far. If the dough turns greyish or resists rolling, it’s overworked—next time, handle less.
- Keep It Cold: If your dough starts feeling greasy, pop it back in the fridge for a few minutes. The colder, the flakier. During assembly, I sometimes keep only half the dough out at once, so the other can stay chilled until I’m ready for it. If you live somewhere hot, chill your rolling pin too! Cold tools really work wonders for stress-free dough management.
- Easy Repairs: If a crack forms while rolling out, patch with an extra pinch of dough and a dab of water. Imperfect edges bake up just as delicious. Frayed rims can be trimmed and reshaped, or turned into rustic crimp patterns. Pie is all about character, and a slightly uneven crust always draws smiles at the table.
- Tender, Crisp Bottoms: Blind baking with pie weights helps avoid soggy bottoms, especially for juicy pies. See my related post: How to Blind Bake a Pie Crust. I use parchment paper and dried beans as weights (which I reuse over and over). Let the crust cool for a few minutes before adding the filling for the ultimate crispness.
I’ve learned not to stress—it’s just dough, and every homemade pie looks a little different. That’s the beauty! When in doubt, take a deep breath and give yourself grace. My favorite pies are always the ones that look a little wild and homemade—they taste the best and remind us of the loving, imperfect hands that made them.
Variations & Dietary Swaps
- Gluten-Free: Sub in a cup-for-cup gluten-free blend (I like King Arthur). The dough won’t be quite as stretchy and needs gentle handling, but the flakes still form beautifully with Crisco. Chill the dough well before rolling, and use parchment to help keep it from sticking. You might need a spoon or two less water—GF flour absorbs moisture differently, so go slow.
- Vegan: Use solid coconut oil (chilled) instead of Crisco. Add a squeeze of lemon juice with the water for tang like butter crust. Coconut oil crusts are especially good for tropical and fruit pies. Be sure the coconut oil is firm, not liquid, for best layering.
- Dairy-Free: This recipe is already dairy free! Double-check your fillings if needed. For creamy fillings, look for coconut-based custards or soy options—no need to alter your crust recipe.
- Sweet or Savory: Add 1 tablespoon sugar for fruit pies or 1 teaspoon dried thyme or rosemary for quiche. This crust is a blank canvas. Sesame seeds or a hint of smoked paprika in the dough are wonderful for savory empanadas or galettes. For extra sparkle, sprinkle coarse sugar over the top before baking fruit pies.
- Mini Tarts or Hand Pies: Cut rolled dough into circles and bake freeform or in muffin tins for adorable, portable treats. Use a biscuit cutter or glass to get even rounds. For appetizers, fill with jam or soft cheese for a quick party bite. For miniature pies, reduce baking time and watch closely—they’ll brown more quickly than full-sized pies.
Tell me in the comments how you adapt this classic to make it yours! Don’t be afraid to experiment: pie crust is one of those rare recipes that’s both precise and forgiving, allowing for delightful twists and family traditions.
Storage, Make-Ahead, and Reheating Tips
- Make Ahead: Form dough into disks, wrap well, and refrigerate for up to 3 days. Or freeze up to 2 months. Thaw overnight in the fridge before rolling out. If freezing, I like to double-wrap in plastic and place in a freezer bag to avoid freezer burn or picking up off smells.
- Storing Baked Crusts: Leftover pie shell (baked and cooled) will keep at room temperature (wrapped) for 2 days or refrigerated for 5 days. For crispness, let cool uncovered, then wrap. You can refresh a pre-baked shell in a low oven for a few minutes before filling if it’s gotten soft.
- Reheating Slices: Warm individual pie slices in a 325°F (160°C) oven for 10 minutes. The crust re-crisps nicely. For best results, place slices on a baking sheet and avoid microwaves, which can make crust rubbery.
- Freezing Filled Pies: Most fruit pies freeze well before baking—assemble, freeze solid, wrap, then bake from frozen, adding extra time until golden. Custard pies (pumpkin, chess, etc.) don’t freeze as well unbaked, but leftover baked slices can be individually frozen and reheated. Always cool baked pies completely before freezing to avoid ice crystals and sogginess.
Homemade pie dough is one of the best make-ahead secrets for stress-free holidays! If baking for a crowd or special event, consider making several crusts ahead and keeping them frozen—having dough ready to go means quick, fresh pies at a moment’s notice.
Printable Crisco Pie Crust Recipe Card
Classic Crisco Pie Crust
- Prep time: 20 minutes
- Chill time: 1 hour
- Yield: 2 (9-inch) crusts
- Allergens: Wheat, gluten
Ingredients:
2 1/2 cups (310g) all-purpose flour
1 cup (205g) chilled Crisco
1 teaspoon (6g) salt
6–8 tablespoons (90–120ml) ice water
Optional: 1 tablespoon (15g) sugar for sweet pies
Instructions:
- Chill Crisco and bowl. Stir together flour and salt. Whisk for 10 seconds to combine and aerate. Cube shortening if needed for faster cutting in.
- Cut in cold Crisco with a fork until coarse crumbs form (pea-size pieces are good). Work quickly in warm kitchens, and use fingertips to finish any large clumps if needed.
- Add water, 1 tablespoon at a time, until dough just comes together when pinched. Gather up dough and press gently into two balls (it may look slightly crumbly at first, but holds together when pressed).
- Form into 2 disks, wrap, and chill 1 hour. For longer storage, freeze at this stage for up to 2 months.
- Roll out on a floured surface to 1/8-inch thickness. Line pie pan, trim, and finish the crust as your recipe directs. For filled pies, don’t forget to cut air vents in the top crust.
Nutrition (per 1/8 pie shell): 190 calories, 12g fat, 20g carbs, 2g protein. (May vary.)
Update, June 2024: Retested with lower water amount for flakier results; new photos added above are from my kitchen.
See the in-process photos above for key texture and visual cues during mixing. I recommend printing out the card for easy reference at baking time!
Bake, Share, and Celebrate (Let’s See Your Pies!)
There’s something deeply comforting about a homemade pie—especially when the crust shatters into buttery layers with each forkful. I hope this Crisco pie crust recipe brings you a crumb or two of the satisfaction it’s given me and my family. If you try it, let me know how it turned out, or share a photo over on our community page. Happy baking—and don’t forget, your kitchen is a place for experiments and happy accidents. Every pie tells a story!
My own favorite moments happen after the baking is done: the quiet snap as the knife sinks through crisp pastry, steam rising from a bubbling fruit filling, and laughter as slices are imperfectly portioned and devoured. Some pies vanish faster than others, but every crust I’ve pulled from the oven tells the story of family gatherings, holidays, and simple weeknight joys. If this recipe becomes part of your traditions, I’d be thrilled to hear about it. Tag your photos or drop a comment—let’s inspire each other and make this kitchen classic a community favorite!
Written by Juliana Chen, home cook & food writer for Spice Thrive. See my cooking credentials here.
Common Questions
Can I use butter instead of Crisco in this recipe?
Yes, you can substitute an equal amount of cold unsalted butter for Crisco for a richer, slightly less flaky result. Or try half butter and half Crisco for the best of both textures. Butter adds flavorful depth, but the dough may soften faster, so keep everything cold and work quickly.
What if my dough cracks when rolling out?
This is normal, especially in drier kitchens. Patch cracks gently with extra dough and a dab of water, or let the dough rest for a minute to soften. You can also roll the dough between two sheets of parchment to help prevent sticking and breaking.
How do I blind bake a Crisco pie crust?
Line your rolled-out crust with parchment, fill with pie weights or dried beans, and bake at 400°F (205°C) for 15 minutes. Remove weights and bake 5-8 minutes more for a crisp shell. Let cool before adding fillings, especially for cream or custard pies.
Is this recipe suitable for sweet and savory pies?
Absolutely! Just add a spoonful of sugar for fruit pies or some herbs for savory fillings. The basic dough adapts easily, making it a great all-around option for everything from apple pie to chicken pot pie.
Is Crisco pie crust safe for people with dairy or nut allergies?
This pie crust is dairy free and nut free, depending on your flour blend. Double-check all package labels to be sure. For those with gluten issues, use a certified gluten-free blend instead of regular flour.
How can I keep my bottom crust from getting soggy?
Blind baking and cooling the shell before filling is the best way to prevent sogginess, especially for wet fillings. For extra insurance with juicy fruits, sprinkle a thin layer of ground nuts or bread crumbs on the bottom before filling.
This article was created with the help of AI. Images may also be AI-generated.

