
Oven-Baked Beef Short Ribs: A Family Sunday Ritual
Every family has that special Sunday meal that everyone gets excited about. For me, it’s always been beef short ribs, oven-baked low and slow until the meat is silky, shreds easily, and the smell fills every corner of my house. I first learned this recipe from my grandfather, who insisted the oven was better than any stovetop or grill for meltingly tender beef ribs. Since then, I’ve tinkered and retested my recipe at least five times, learning something new each round— from skimpy seasoning, to overly dry results, to sauce that needed more depth. This is the version that finally gets everything right. It’s become my ultimate comfort dish for home cooking, and I’m delighted to finally share it with you!
There’s something ritualistic about preparing these short ribs: the rhythmic chopping of vegetables, the sizzle of beef meeting hot oil, and the savory aroma that builds in the kitchen as the hours pass. Across generations, this recipe has gathered memories—the kind made after a long walk in cold weather, or when welcoming friends for a celebratory dinner. Cooking them in the oven means you aren’t glued to the stovetop; you’re free to set the table, toss a green salad, or simply enjoy a quiet hour as the house fills with the promise of a hearty, home-cooked meal. Over the years, these short ribs have marked anniversaries, chilly winter evenings, and quiet Sunday afternoons, always delivering warmth and togetherness to the table.
Why You’ll Love These Oven Baked Beef Short Ribs
- Fall-off-the-bone texture: Slow baking gives the beef time to become fork-tender and juicy without a pressure cooker or fancy equipment. The gentle, consistent heat lets collagen break down slowly, yielding unforgettable tenderness. Even the toughest cuts transform with this method—no need to fret about chewy meat.
- Deep, layered flavors: The braising liquid—aromatics, beef broth, a splash of soy sauce—builds a beautifully developed sauce as it cooks down around the ribs. As the liquid reduces, it infuses each bite with layers of sweet, salty, and umami, and the natural juices from the meat marry into a complex, savory gravy. Compared to stovetop braises, the oven environment evenly envelops the pot, preventing scorching and encouraging maximum flavor extraction. For an extra-rich sauce, use homemade stock or finish with a small knob of butter.
- Foolproof method: After multiple tests, I’ve nailed down times and steps so you get predictable, restaurant-level results. The detailed instructions prevent common pitfalls—like dry or stringy beef—and the flexibility lets cooks of any level succeed.
- Hands-off after prep: The oven does all the work. Once you assemble, you have hours to relax or prep a side—no constant babysitting required. I often use the downtime to whip up creamy mashed potatoes, garlicky green beans, or even a dessert. This ease makes it perfect for entertaining or for lazy weekends.
- Flexible ingredients: Swap herbs, use bone-in or boneless ribs, and it still turns out rich and comforting every time. You can add a bay leaf, switch in parsnips or celery root for carrots, or even toss in a dried chili for gentle heat. The recipe adapts to small changes without sacrificing texture or depth.
The result: a dish that feels both special enough for a celebration and comforting enough for an ordinary Sunday. Many readers tell me the leftovers—shredded over rice or stuffed in crusty rolls—might be even better the next day!
Ingredient List & Key Substitutions (Tested in My Kitchen)
Yield: Serves 4 to 5 generously
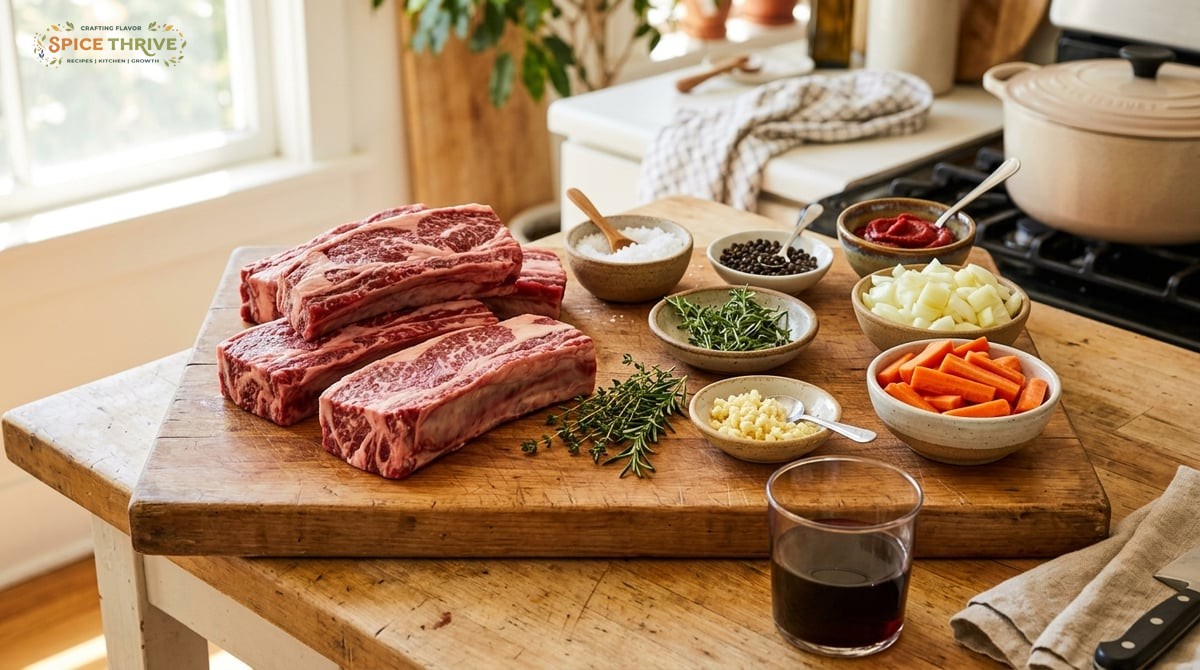
- Beef short ribs: 3 lbs (about 1.3 kg). Bone-in preferred for maximum flavor, but boneless works. Bone-in ribs give the most unctuous, full-bodied sauce due to marrow and connective tissue, and are generally easier to find at the butcher. Choose ribs that are well-marbled for the best results—look for thick, meaty pieces with visible fat streaks.
- Kosher salt: 2 tsp (10 g). Brings moisture out and seasons deeply. Always season ribs on all sides to ensure even flavor—it also helps create a delicious crust during searing.
- Freshly cracked black pepper: 1 1/2 tsp (4 g).
- Yellow onion: 1 large (about 200 g), sliced. Sweet base for the sauce. For more nuance, you can use a mix of yellow and red onion, or even shallots for subtle sweetness.
- Carrots: 2 medium (120 g), cut into chunks. Natural sweetness and body. Thick slices hold up through hours of cooking, adding both depth and color to the final dish.
- Garlic: 5 cloves (20 g), smashed. Deep aroma and flavor. Smashing releases more flavor than slicing and ensures it melds fully with the braising liquid.
- Tomato paste: 3 tbsp (45 g). Adds umami and thickness. Sauté tomato paste until it darkens—it amps up savory notes and gives the sauce a robust backbone.
- Beef broth: 2 cups (480 ml). Supports braising and flavor; chicken or vegetable broth works in a pinch. Avoid low-sodium broth unless adjusting seasoning elsewhere; the sauce relies on full-bodied liquid.
- Dry red wine: 1 cup (240 ml). Optional but adds depth. Substitute with more broth if needed. A hearty cabernet or merlot works well, enriching sauce without overpowering beef’s flavor. Alcohol mostly evaporates but leaves complexity behind.
- Soy sauce: 2 tbsp (30 ml). Boosts savory notes (can sub with tamari or coconut aminos for gluten free). It’s a flavor enhancer here, not an Asian twist, introducing subtle salt and umami. Tamari keeps things gluten-free while maintaining complexity.
- Fresh thyme: 4 sprigs (or 2 tsp/2 g dried). Robust aromatic element. Thyme pairs beautifully with beef and tomatoes, complementing both earthy and sweet notes. Use dried only if fresh isn’t available.
- Fresh rosemary: 2 sprigs (or 1 tsp/1 g dried). Woodsy fragrance. Rosemary stands up to long cooking and perfumes the sauce. Strip leaves from the stem if using dried; a little goes a long way.
- Olive oil: 3 tbsp (45 ml). For searing and roasting. If you prefer, use canola or grapeseed oil, which tolerate high heat and neutral flavor.
Allergen note: Contains soy (from soy sauce). For gluten-free, use tamari or coconut aminos. Ask your local butcher to cut ribs into uniform pieces, which helps them cook evenly and present beautifully.
Step By Step: How To Make Oven Baked Beef Short Ribs
- Prep and Season: Remove the ribs from the fridge 30 minutes ahead. Pat dry. Season all sides liberally with salt and pepper. Let them rest—it helps the seasoning penetrate and prevents steaming in the oven. For even deeper flavor, some cooks season ribs several hours ahead or overnight, uncovered in the fridge; the air dries the surface slightly, which boosts browning.
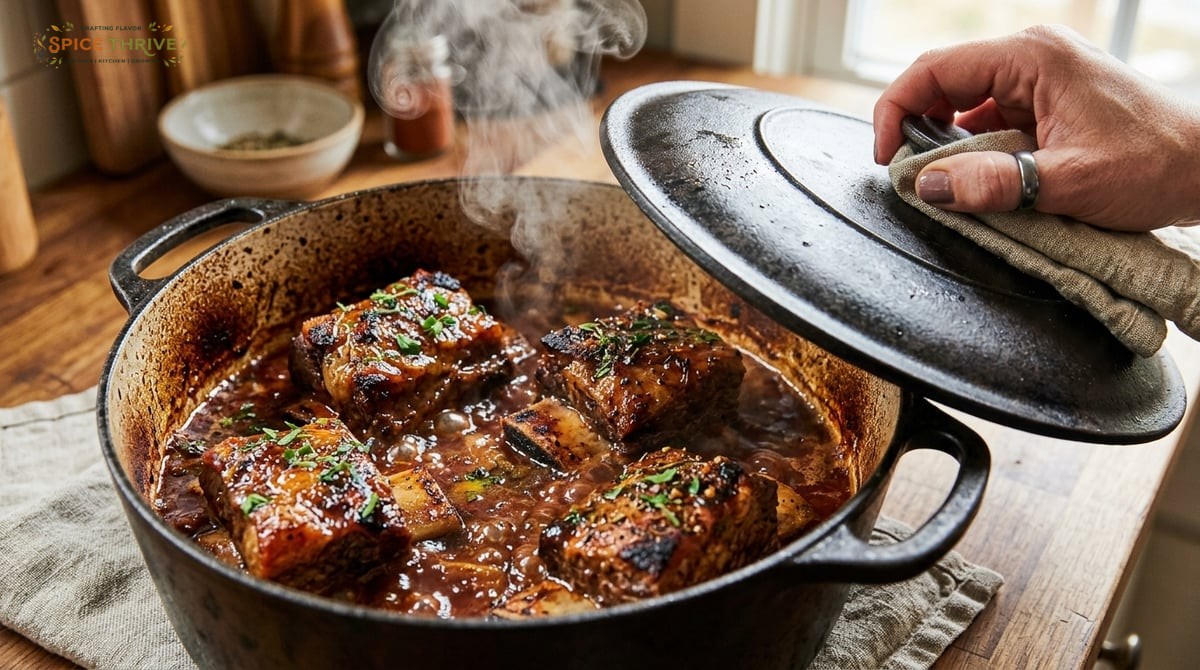
- Sear for Flavor: Heat 2 tbsp olive oil in a large, oven-safe Dutch oven over medium-high. Sear ribs in batches, 2–3 minutes per side, until browned. Don’t crowd the pan or the meat will steam instead of brown. Transfer seared ribs to a plate. This crucial Maillard reaction creates hundreds of flavor compounds, so patience here is rewarded with richer taste and color. After searing, a dark, caramelized pan bottom is perfect for flavoring your sauce.
- Sauté Aromatics: In the same pot, add onions and carrots. Sauté until onions are tender and golden, about 6 minutes. Stir in garlic and tomato paste; cook until tomato paste darkens and caramelizes, 2–3 minutes. The tomato paste should stick a little and turn brick-red, intensifying sweetness and umami without burning.
- Deglaze and Braise: Pour in red wine. Scrape brown bits off the bottom—these add tons of flavor. Simmer for 3 minutes, then add broth, soy sauce, thyme, and rosemary. Return the ribs and collected juices to the pot, meaty side up; nestle them in the sauce. The liquid should come at least halfway up the sides of the meat. Arrange the carrots around the meat for even exposure. This layering ensures every rib benefits from the aromatics and braising liquid.
- Oven Bake: Cover tightly with a heavy lid or foil. Bake at 325°F (165°C) for 2.5 to 3 hours, until the meat is fork-tender and bones slide out clean or with gentle pull. After 2 hours, check occasionally—if the liquid drops below halfway up the ribs, add a little water or broth. As they bake, the fat renders and flavors concentrate; resist the urge to uncover too often, which reduces moisture.
- Finish Sauce: Remove ribs when done. Skim off fat. If you’d like a thicker sauce, simmer the pot over medium heat uncovered for 10 minutes until rich and glossy. Taste for salt and balance. Serve ribs hot, spooning sauce over top. Optionally, strain sauce for a refined look, or leave chunky for rustic appeal. Sprinkle with fresh herbs just before serving to add brightness that cuts the dish’s richness.
Visual checkpoint: The meat should be soft, barely holding together, with dark mahogany edges and a shiny, slightly sticky sauce.
Serving suggestion: Spoon the ribs and sauce over creamy mashed potatoes, polenta, or soft egg noodles to soak up every drop. Roasted root vegetables or buttered peas make an excellent fresh contrast to the unctuous meat.
Pro Tips, Mistakes I Made, and What I Changed
- Don’t rush searing: One round I skipped proper browning—result: bland, gray ribs. High heat, patience, and working in batches makes all the difference for flavor and color. Even a minute or two per batch changes the outcome dramatically, lending the sauce its signature richness with only a few extra minutes.
- Seal the pot tightly: The first time, my lid was loose. The liquid evaporated too quickly, and the ribs dried out. Use foil under your lid if it’s not heavy, or wrap tightly to keep moisture in. If your lid vents too much, check the level of braising liquid after 90 minutes and top up with a splash of broth if needed. An enameled Dutch oven with a heavy lid is ideal, but improvising with foil and a covered casserole dish works surprisingly well, too.
- Sauce adjusting: My early attempts had a watery sauce. Now, I simmer to reduce at the end for a concentrated, spoon-coating finish. If your sauce is very thin despite reduction, stir in a slurry of 1 tsp cornstarch and 2 tsp cold water, then simmer for a minute or two until thickened. Conversely, if it’s overly thick, whisk in a little extra broth or water and test again for taste.
- Don’t skip resting: Let ribs rest 10 to 15 minutes after baking. It makes them juicier and easier to serve. Resting allows juices to redistribute throughout the meat for maximum moistness—resist slicing right away, as it can cause dryness. You can tent them lightly with foil to preserve heat.
- Troubleshooting dry ribs: If you overcook and they seem dry, shred and toss the meat back in the sauce—it absorbs flavor and moisture quickly. This method turns a potential mishap into a delicious, saucy ragu perfect for piling onto garlic toast or swirling into pasta for an instant crowd-pleaser.
Remember: practice brings confidence! Each batch has made my technique—and results—better. Use what works best for your kitchen setup, and don’t be afraid of small improvisations as you gain experience.
Variations & Dietary Swaps
- Gluten-free version: Switch soy sauce for tamari or coconut aminos. Always confirm your beef broth or stock is gluten-free—many commercial brands add wheat or malt flavoring. This swap keeps the savory depth while avoiding gluten issues.
- No alcohol? Replace wine with more broth, plus 2 tsp balsamic vinegar for complexity. A little pomegranate or grape juice can also add that missing fruitiness. The vinegar brings brightness and depth, so you don’t miss the wine’s subtle acidity in the finished sauce.
- Vegetarian adaptation: Try the same braising base with portobello mushrooms or jackfruit—use vegetable broth, add smoked paprika for depth, and keep the aromatics and slow oven bake. Portobello caps, cut thick, absorb the braising flavor beautifully and develop a meaty texture. Jackfruit shreds nicely after a long braise, making a hearty, sauce-soaked filling for sandwiches or bowls.
- More global flair: For a Korean-inspired take, add 2 tbsp gochujang or 1/4 cup pear juice to the braising liquid and top with scallions and sesame seeds before serving. The spicy-sweet notes pair spectacularly with fatty beef. For a Mediterranean twist, stir in chopped olives and lemon zest for the last 20 minutes of baking. The briny, citrusy finish brings a whole new character to this classic preparation. A spoonful of preserved lemon or a handful of fresh parsley can also brighten the final flavor profile.
These flexible variations make the recipe endlessly customizable, allowing you to make it your own or adapt it to hands-on guests, dietary needs, or just what’s on hand in your pantry.
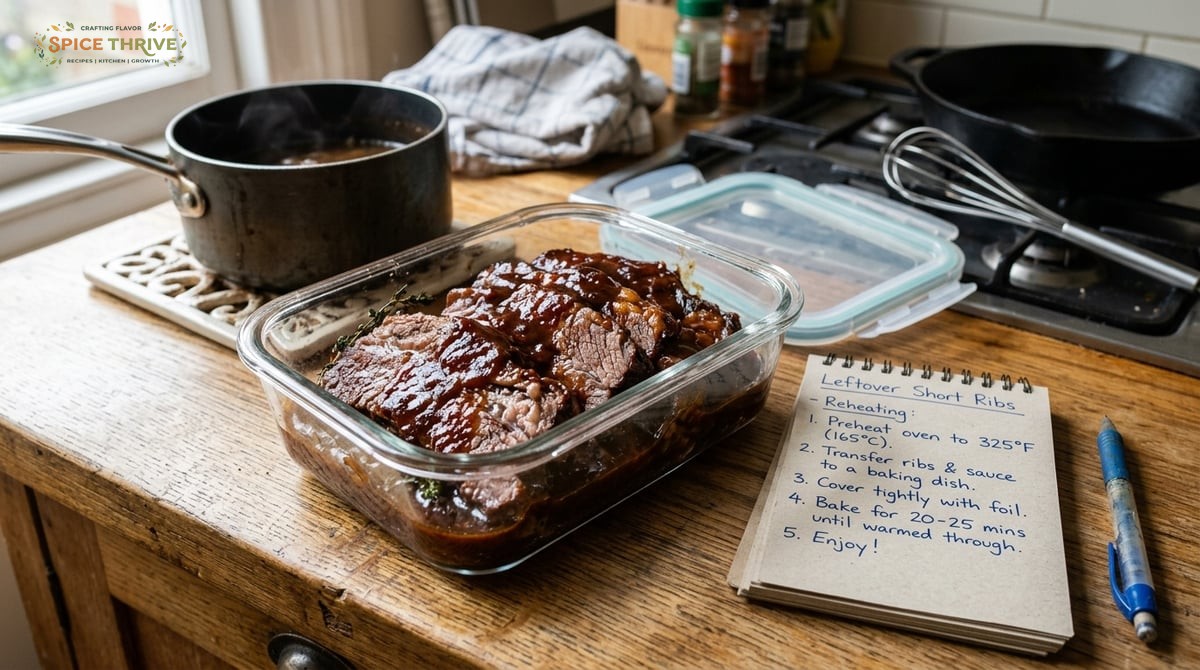
Storage, Reheating & Make Ahead (My Tested Notes)
- Fridge: Ribs and sauce keep up to 4 days in an airtight container. The flavors deepen overnight for an even richer result. Storing in sauce prevents the meat from drying out, and the aromatics continue to infuse flavor during chilling.
- Freezer: Cooled ribs store well for 2 months. Thaw overnight in the fridge for best texture. Freeze in portioned containers with just enough sauce to keep the meat moist—this makes quick meals or lunch boxes a breeze. The sauce may separate a little upon thawing; stirring and reheating brings it right back together.
- Reheating: Place ribs and sauce in a baking dish, cover, and warm at 300°F (150°C) until hot and tender (about 25 minutes). Microwave works for small servings, but stovetop gently with sauce gives best moisture. Avoid high heat, which can toughen the meat. If the sauce thickens too much after chilling, whisk in a spoonful of broth or water while reheating to restore a silky texture.
- Make ahead: Prep up to the end of baking the day before, store in sauce, and reheat gently as above. Skim excess fat after chilling if desired for a lighter sauce. Making ahead also lets you serve stress-free—simply reheat, garnish, and plate when ready to eat. I often find the rested, reheated version even more flavorful than freshly baked. For entertaining, this make-ahead flexibility is hard to beat.
Label and date containers, especially when freezing, so you always know how long your batch has been stored. Plan to serve with fresh sides for largest contrast and best presentation, turning leftovers into a brand-new meal with different grains or vegetables.
Printable Recipe Card: Oven Baked Beef Short Ribs
Oven Baked Beef Short Ribs
Author: Jamie Lin, Spice Thrive (about)
- Prep time: 30 minutes
- Cook time: 2.5–3 hours
- Total time: about 3.5 hours
- Yield: 4–5 servings
Ingredients
- 3 lbs (1.3 kg) bone-in beef short ribs
- 2 tsp (10 g) kosher salt
- 1½ tsp (4 g) black pepper
- 1 large yellow onion (200 g), sliced
- 2 medium carrots (120 g), cut into chunks
- 5 garlic cloves (20 g), smashed
- 3 tbsp (45 g) tomato paste
- 2 cups (480 ml) beef broth
- 1 cup (240 ml) dry red wine (or more broth)
- 2 tbsp (30 ml) soy sauce (or tamari/coconut aminos)
- 4 sprigs fresh thyme (or 2 tsp dried)
- 2 sprigs rosemary (or 1 tsp dried)
- 3 tbsp (45 ml) olive oil
Instructions
- Take ribs out of the fridge 30 minutes ahead. Pat dry and season liberally all over with salt and pepper.
- Heat olive oil in an oven-safe pot over medium-high. Sear ribs on all sides (2–3 minutes per side) until deep brown. Work in batches for best browning. Set aside.
- Add onions and carrots to pot. Sauté until onion softens and starts to caramelize, about 6 minutes. Stir in garlic and tomato paste, cooking until tomato paste darkens, 2–3 minutes.
- Deglaze with wine, scraping up browned bits. Let simmer 3 minutes. Pour in broth and soy sauce. Add herbs. Nestle ribs back, bone side down.
- Cover tightly. Bake at 325°F (165°C), 2.5–3 hours, until meat is tender and bones pull away easily.
- Transfer ribs to platter. Skim fat from sauce. Simmer sauce uncovered on stovetop 10 minutes to thicken, if desired. Spoon over ribs to serve.
Nutrition Estimate (per serving, 1/5th recipe):
Calories: ~670 | Carbs: 12g | Protein: 42g | Fat: 38g | Sodium: ~1120mg
Allergen note: Contains soy (from soy sauce). Gluten free if using tamari or coconut aminos.
Recipe tips: For extra sauce clarity, strain through a sieve before serving. Pair with mashed potatoes, creamy polenta, or crusty baguette to soak up every drop. Leftovers are delicious in sandwiches or shredded into pasta.
Let’s Cook Together: Share Your Ribs!
I hope you’ll give these oven-baked beef short ribs a try—my family’s favorite, now with years of tweaks and testing baked in. If you make this recipe, I’d love to see your results or hear about your personal twists! Leave a comment, rate the recipe, or tag #SpiceThrive on Instagram so our whole cooking community can celebrate your kitchen wins. And don’t forget to explore my other savory recipes like crispy pork belly or braised chicken thighs for your next comfort meal.
Cooking and sharing what you make connects us across kitchens and continents—every batch made is another story added to the pot. I’d love to see how you plate your ribs, what sides you choose, and any creative twists you come up with. Did your family love it? Did you add a secret ingredient or a new herb from your garden? Share photos and tips with the hashtag so new cooks can find inspiration and confidence, too!
Common Questions
Can I use boneless beef short ribs?
Yes, boneless ribs work just as well. Reduce the baking time by about 20–30 minutes, as they cook faster. Watch for fork-tender texture. Boneless cuts are also easier to slice and serve in sandwiches or tacos with leftover sauce.
What’s the best pan to use if I don’t have a Dutch oven?
Use a deep roasting pan tightly covered with heavy foil. Cast iron or oven-safe pots with a snug lid work well too. If possible, choose pans with high sides and always ensure a tight seal to prevent moisture loss—this is key for tender results.
Can I make this recipe in advance for a dinner party?
Absolutely. Oven baked beef short ribs taste even better made a day ahead and reheated slowly. Much of the prep can be done in advance. Serve with fresh herbs and bright sides for contrast. Reheat gently in oven or on stovetop to preserve tenderness and moisture.
How do I lessen the fat in the dish?
Short ribs are rich, but you can refrigerate the finished ribs, then skim off solidified fat before reheating and serving. Removing fat after chilling makes for a lighter sauce. Choose well-trimmed ribs at the butcher or trim excess fat before cooking to further reduce greasiness in the final dish.
Is there a dairy or gluten allergen in this recipe?
No dairy. Gluten may be present in some soy sauces—use tamari or coconut aminos for a gluten-free version. Always double-check your ingredient labels, especially broth and sauces, if cooking for those with food sensitivities.
This article was created with the help of AI. Images may also be AI-generated.

