
Gluten Free Bread for Bread Makers: My Go-To Recipe After Many Tries
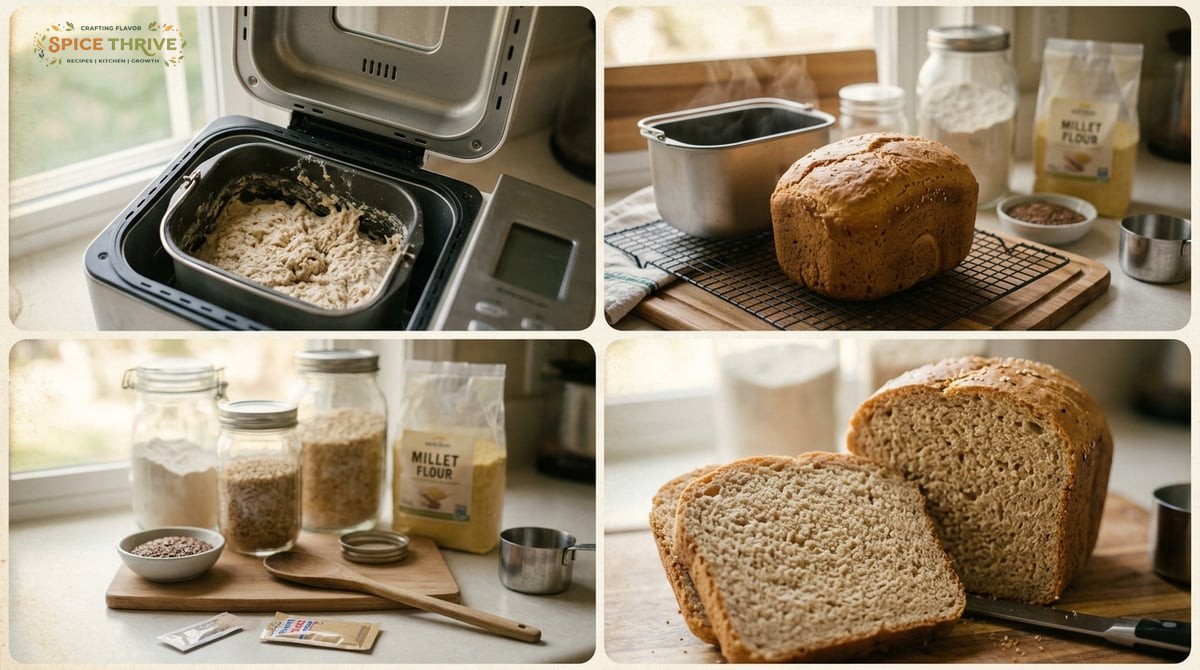
Baking gluten free bread at home once felt like chasing the perfect loaf—a little too dense one time, crumbly the next. But after countless test batches, flour-dusted counters, and plenty of taste tests, this bread maker recipe finally delivers what I crave: a golden, soft loaf with a gorgeous aroma and a pillowy, tender crumb. I make this for my wheat-avoiding aunt and my carb-loving partner, and we can barely tell it’s gluten free. Real photos in this post show each stage right from my own kitchen.
Let me walk you through my trial-and-error experiments, what went wrong at first (think dry edges!), and the tips that turned everything around. Get ready for game-changing homemade gluten free bread that fits neatly into your bread maker pan—no cracks, no craters, just pure comfort. Let’s get baking!
Why This Gluten Free Bread Recipe Works Every Time
- Custom Flour Blend: A balance of brown rice flour, sorghum, and tapioca starch gives a fluffy, moist texture without gumminess or grit. Commercial gluten free loaves can often taste bland, but this pairing brings both substance and delicate crumb. Using the right ratio prevents the rubbery mouthfeel that store-bought gluten free breads sometimes have.
- Careful Hydration: Gluten free dough loves more moisture. This recipe uses a higher liquid ratio for a tender, evenly risen crumb. No dry edges! Unlike gluten doughs, which rely on kneading and gluten development to create chew, gluten free bread needs precise hydration to fill in the structure. More liquid not only prevents dryness but helps the bread rise properly and stay soft as it cools. When experimenting, I noticed a mere two tablespoon shift was the difference between a chalky slice and one that stayed springy for days.
- Temperature & Bread Maker Tips: Milk (dairy or plant-based) warmed to room temp, and eggs straight from the fridge, help the bread lift efficiently in any machine. Lower temperature ingredients can inhibit yeast activity and cause the loaf to rise unevenly. For best results, I set out my milk 30 minutes ahead, and pop cold eggs in a bowl of lukewarm water for a couple of minutes—this simple step can yield a taller, fluffier loaf every time. Many bread makers have their own quirks, so monitoring the dough after the first mixing cycle is key to adapting to your specific machine.
- Real Testing—Not Just Theory: After six test runs, I adjusted xanthan gum, yeast, and mixing order for a loaf that rises tall and slices without falling apart. For example, putting the yeast in direct contact with liquid before starting sometimes caused the rise to peak and then collapse, while distributing the yeast atop the dry mix led to a more controlled rise. Xanthan gum, too, took tweaking—a little too much and the bread becomes gummy, too little and it falls apart. These fine-tuned changes really sealed the recipe’s dependability.
- Versatile for Diets: See the swaps below to make vegan, dairy-free, or nut-free versions. It’s a recipe that fits whatever your table needs. If you’re hosting friends with multiple dietary needs, you can adapt the basic recipe for everyone. Many readers have sent notes that their families—even the gluten eaters—love this bread, especially with the vegan swaps. A few have baked it with coconut milk and flax eggs for potlucks, reporting the crumb stayed moist even after reheating. It’s flexibility at its most delicious.
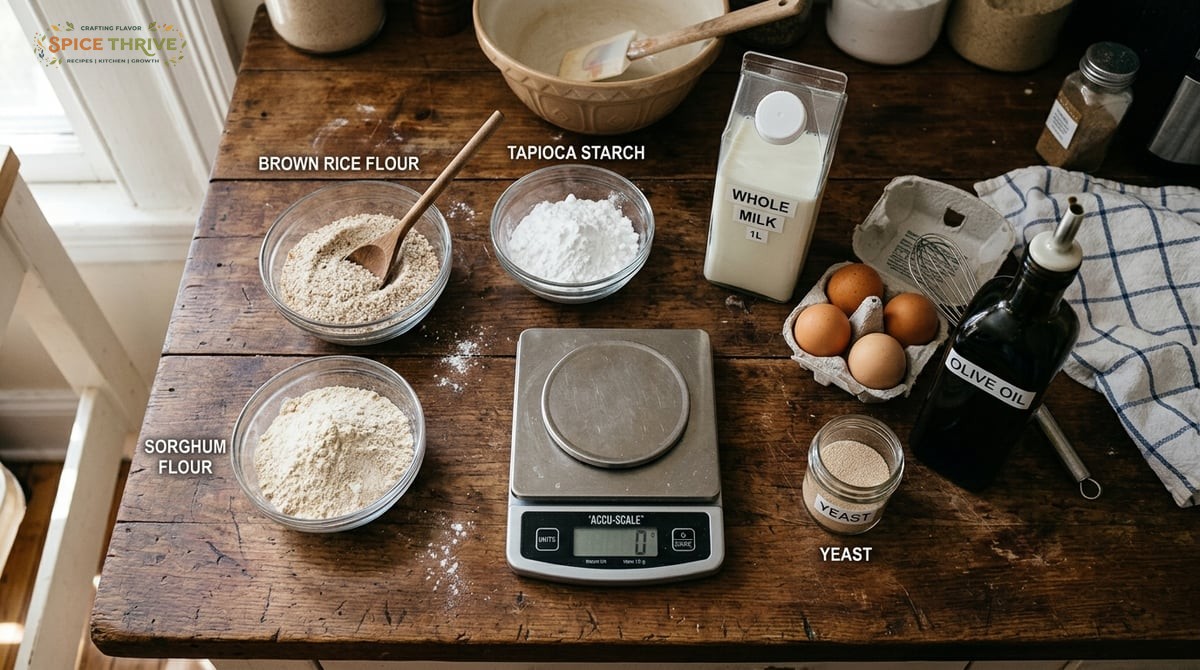
Ingredients & What They Do (Plus Easy Swaps)
- Brown Rice Flour: 1 cup (135g) – Base flavor and structure. Brown rice flour has a mild, toasty taste, offering gentle sweetness and a sturdy framework. It’s less gritty than white rice flour and forms the backbone of gluten free blends. For even lighter bread, you can use a blend of 2/3 brown and 1/3 white rice flour if desired.
- Sorghum Flour: 3/4 cup (96g) – Adds softness and tender crumb (swap: millet flour). Sorghum provides natural sweetness and protein, which helps the dough mimic the springy structure of wheat. Millet flour, the suggested swap, produces a slightly earthier flavor and gives a creamy color to the loaf. Sorghum is also higher in fiber than many GF flours.
- Tapioca Starch: 3/4 cup (94g) – Stretch and light texture (swap: potato starch for chewier crumb). Tapioca is the secret to achieving a soft, elastic structure without gluten. If you use potato starch instead, expect the loaf to be a little chewier, with a thicker crust that many find perfect for sandwiches.
- Milk or Oat Milk: 1 cup (240ml) – Moisture and softness (swap: almond/cashew milk for nutty note). The milk hydrates the starches and makes the crumb plush. Oat milk keeps the flavor neutral, while nut milks add aroma. For a richer loaf, choose soy milk, which enhances browning and shelf life.
- Eggs: 2 large (100g) – Lift and moist crumb (swap: 2 flax eggs for vegan version—see below). Eggs give gluten free bread its rise and keep the interior moist. If you go vegan, flax eggs (see next section) give a slightly earthier flavor and denser crumb, but still cohesive and tender enough to toast or sandwich.
- Olive Oil: 3 tablespoons (36g) – Rich flavor and tenderness. Neutral oils like grapeseed or canola will also work, giving a soft and light crust. Avocado oil is a premium swap for those wanting an extra boost of monounsaturated fats and a subtle buttery note.
- Cider Vinegar: 2 teaspoons (10ml) – Activates baking powder and supports rise. A small amount of vinegar balances the flavors and reacts with baking powder or soda if used, improving loft and crumb.
- Sugar: 2 tablespoons (24g) – Feeds yeast and aids golden crust (swap: honey or maple syrup). Sugar speeds up the yeast fermentation and gives the bread that signature golden finish. For richer, more aromatic bread, swap in a natural sweetener like maple syrup or honey—just reduce liquid by a teaspoon to balance moisture.
- Active Dry Yeast: 2 1/4 teaspoons (7g, 1 packet) – Ensures a full rise. Instant yeast is also suitable and requires no proofing; just add directly to the flour layer. Make sure yeast is fresh by checking expiration; stale yeast leads to unhappy, dense bread.
- Xanthan Gum: 1 1/2 teaspoons (5g) – Holds it all together; essential for sliceable bread. Without xanthan gum, gluten free bread can crumble when cut. Don’t substitute with guar gum unless you’ve tested it—guar can make bread dense or even slimy if overused.
- Salt: 1 teaspoon (6g) – Enhances flavor. Salt not only boosts the taste but regulates yeast, ensuring an even rise and a nicely browned, aromatic crust.
See below for substitution tips and what each swap changes in the finished bread! To make reading easier, I’ve included notes on texture, flavor, and moisture with every swap so you can confidently adapt based on your pantry or tastes. Substitutions let you customize the loaf without sacrificing quality: for example, using sweet rice flour for a more tender, slightly sticky crumb (like Japanese milk bread), or adding half a teaspoon of psyllium husk for extra binding if skipping eggs.
Step-by-Step: How to Make Gluten Free Bread in a Bread Maker
- Prep Your Pan: Lightly grease the bread maker pan with oil or nonstick spray. Line the paddle if your machine tends to stick. In older machines, a small square of parchment under the paddle helps with loaf removal, especially when working with sticky gluten free dough.
- Add Liquids First: Pour milk, eggs, olive oil, and vinegar directly into the pan. This helps hydrate the dry mix evenly. If using a machine with a delayed start, add the vinegar separately to ensure freshness; it can sometimes react prematurely with leaveners over several hours.
- Add Dry Ingredients: In a bowl, whisk brown rice flour, sorghum flour, tapioca starch, sugar, salt, and xanthan gum. Sprinkle this over the liquid layer in your pan—keeping yeast separate (direct contact with liquid can reduce its lift early). For best results, I pre-mix the dry blend thoroughly in a separate bowl before layering. This avoids any clumping and ensures xanthan gum is evenly distributed, preventing gummy pockets.
- Top with Yeast: Make a shallow well in the dry layer, then add yeast. This prevents it activating too soon during the cycle. For additional rise insurance, some bakers add a pinch of sugar right atop the yeast to turbo-charge activation once the mixing begins.
- Select the Right Setting: Choose “gluten free” if your machine has it, or “basic white” for 2 lb loaf with light crust. Set for 2 hours if manual is available. The gluten free setting typically features just one mix and rise, preserving the airy, cake-batter texture needed for a great crumb. Consult your manual; some bread makers let you customize cycles for ultimate precision.
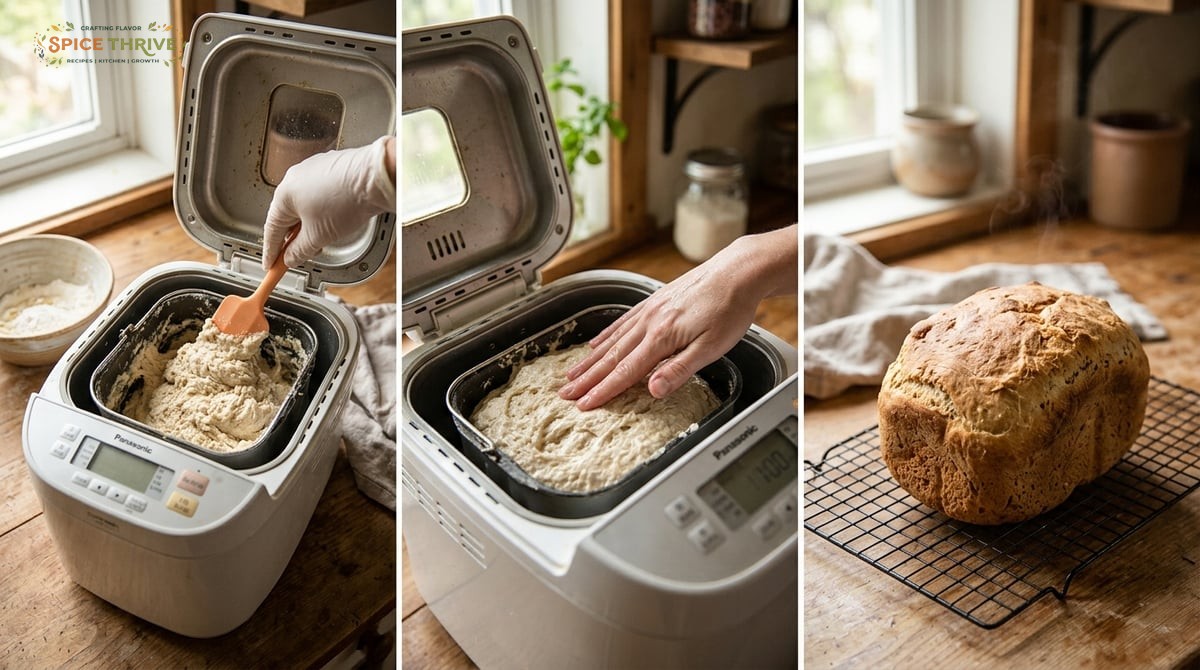
- Check Dough Texture: After 5 minutes, pause to scrape down the sides. Gluten free dough should look thick, like cake batter, not a ball. Add a splash more milk if dry patches remain. When first learning, I’d use a silicone spatula to gently fold in stray flour; never over-mix, as this can lead to a rubbery texture. Texture matters more here than in wheat breads—aim for glossy, thick yet pourable batter.
- Final Rise and Bake: At the start of the bake cycle, smooth the top gently with damp fingers to prevent large air pockets. No kneading needed! Let it bake until golden brown, and listen for a hollow tap on the crust as it cools. If your bread maker bakes a tall loaf, you can tent foil over the pan in the last 10 minutes for even color without over-browning. Let the loaf rest in the pan for 10 minutes before turning out to cool fully on a rack for best texture.
See in-process photos below—these are real shots from my kitchen, so you know exactly what to expect. Pay special attention to the mid-mix and post-bake shots: if your batter looks too stiff or runny compared to the photos, adjust milk by a half tablespoon at a time next batch. This visual reference has helped many readers troubleshoot on their first try!
Personal Pro Tips & Common Mistakes—Tested in My Kitchen
- First Attempts: My first few loaves were dry at the edges and collapsed in the center. I learned that gluten free dough needs more moisture and no vigorous kneading. Gentle mixing only! Early on, I made the mistake of using less oil and milk, thinking a stiffer dough would yield structure—the opposite was true. Unlike wheat bread, where kneading and stiffness develop gluten, gluten free doughs become tough and won’t rise if worked too much or left too dry.
- What Fixed It: I bumped up milk and oil, switched to sorghum flour for a softer crumb, and made sure my eggs and milk weren’t cold from the fridge—this really helps the internal rise. Measuring ingredients by weight, not volume, also dramatically increased my baking consistency: even a few grams extra liquid can make a big difference. Time after time, warm ingredients plus an extra tablespoon or two of plant milk have rescued a potentially dense loaf.
- Avoid Sunken Tops: If the loaf sinks after baking, try reducing liquid by 2 tablespoons and double-check that your yeast is fresh. Too much liquid or old yeast causes collapse. It can help to actually test yeast with a little warm water and sugar before adding if you haven’t baked recently—the yeast should foam in 5-10 minutes if still active. Environmental conditions (like humidity in summer) can also affect your results; sometimes, a small reduction in liquid on muggy days is all that’s needed for a domed loaf.
- Perfect Slicing: Let the bread cool at least 60 minutes before slicing or it will crumble. The texture sets as it cools! To keep slices neat and uniform, use a serrated bread knife and gentle back-and-forth sawing motion. I sometimes wrap the cooled loaf in a clean cloth for 20 minutes before slicing for even tidier results. If you want sandwich-ready bread through the week, slice while just slightly warm, then store per the next section’s guidance.
- Pan Size: Measure your bread maker pan and don’t overfill. This recipe fits most 1.5 to 2 lb machines. For mini loaf pans or ovens, halve this recipe and reduce baking time as needed; the batter can also be portioned into rolls for easy gluten free dinner bread. I’ve found those smaller portions are great for freezing or packed lunches—see my full freezing and reheating tips below.
Every batch I tested tasted better than the last, but my sixth attempt finally nailed the softly domed top, golden crust, and cloud-like crumb. Don’t be discouraged—if a loaf isn’t perfect, tweak the liquid or try a different plant milk. And always check dough texture in the first mix! A kitchen notebook or log of ingredient tweaks and outcomes is incredibly helpful as you dial in your machine’s preferences: one reader shared that her altitude required more liquid than mine at sea level, and her loaves became airy after just one small adjustment. Be patient with this process—success is within easy reach with these tested tricks.
Recipe Variations & Dietary Swaps
- Vegan: Use 2 flaxseed eggs (2 tbsp ground flax + 5 tbsp water, let sit 5 minutes) instead of regular eggs, and a plant-based milk. The finished bread will have flecks of flax and a heartier flavor, but bind well enough to slice or toast. It’s a great way to boost Omega-3s as well.
- Dairy-Free: Any non-dairy milk works. Oat milk makes for a neutral flavor, almond milk adds nuttiness. Cashew milk creates the richest texture, mimicking brioche, while coconut milk results in a hint of sweetness reminiscent of some Southeast Asian bakery breads.
- Nutrient Boost: Swap 3 tablespoons of the brown rice flour for sunflower seed flour for a subtle, toasty backdrop. Sunflower flour is naturally rich in vitamin E and protein, offering not just nutrition but a lovely golden color and deeper flavor that pairs well with savory toppings.
- Seeded Bread: Add 3 tablespoons each pumpkin and sunflower seeds after initial mixing, for crunch and protein. Lightly toast before adding if you want extra nutty aroma. This variation is especially popular for open-faced sandwiches or hearty breakfasts—think avocado or egg salad toppings.
- Sweeter Loaf: Use 3 tablespoons maple syrup instead of sugar for a subtle caramel undertone. Good with breakfast sandwiches! Swapping in maple or honey not only slightly alters the crumb (making it a touch moister) but adds that warm, aromatic flavor excellent for French toast or bread pudding.
No nuts, soy, or wheat in the base recipe. For extra fiber, stir 1 tablespoon whole chia seeds into the dry mix. Chia helps with hydration and improves shelf life, making slices stay soft even on day three. This bread is easy to personalize: some readers have mixed in cinnamon and raisins for a sweet, spiced loaf, or olive tapenade and rosemary for a Mediterranean spin—just fold in extras after the first mixing stage to avoid weighing down the rise.
How to Store, Freeze, and Reheat Your Gluten Free Bread
- Keep It Fresh: Wrap cooled bread in plastic or beeswax wrap and store at room temp for up to 2 days. If you plan to finish the loaf quickly, simply store cut-side down on a wooden board covered with a bowl—this old style helps keep the crust crisp. However, gluten free bread dries out faster than wheat, so for longer freshness, airtight is usually best.
- Longer Storage: For longer than 2 days, wrap tightly and refrigerate up to 5 days. Bring to room temp or lightly toast before eating for best texture. Refrigeration prevents staling, but remember, as with all gluten free bakes, chilling can firm up the crumb—giving slices a quick steam or wrapping in a damp towel before microwaving restores soft texture if needed.
- Freezer: Slice loaf fully, then freeze slices in an airtight bag. Pull slices as needed and toast straight from frozen—texture stays soft inside and crisp on the edges. For sandwiches, let slices thaw 15 minutes, then fill. I sometimes batch bake two loaves just to stock the freezer!
- Reheating: Bread is best toasted—pan toast with a little butter or oil, or use a toaster oven until golden and aromatic. Toasting brings back the just-baked aroma and a satisfying chew. For an indulgent treat, brush slices with olive oil and broil briefly before topping with avocado or chickpea salad—a household favorite for quick lunches.
If you like this, try my Soft Vegan Dinner Rolls or my tender Milky Asian Buns for more bakery results at home. Storing and freezing tips work for those recipes too!
Ready to Bake? Share, Review, and Tag Me With Your Results!
I’d love to see your fluffy gluten free loaves! Drop a comment with your tweaks, tag @spicethrive on Instagram, and let us know how you made it your own. For more bakery-worthy breads and sweet bakes, see my Soft Vegan Dinner Rolls or Crispy Chinese Scallion Pancakes. Happy bread making—your kitchen is about to smell amazing!
Recipe tested and updated by Jessie at Spice Thrive – Updated June 2024. For more on my cooking background, visit my About page.
Common Questions About Gluten Free Bread Maker Recipes
Can I use a store-bought gluten free flour blend?
Yes, but results vary. Some blends are starch-heavy or include gums—reduce or skip the xanthan gum if your blend already contains it. Measure by weight for most consistent texture. If your blend is heavy in potato or tapioca starch, your loaf may turn out chewier and more airy; with more rice flour, expect a sturdier crumb.
My loaf collapsed after baking—why?
Likely too much liquid, old yeast, or letting the dough over-rise. Measure liquids carefully, check yeast freshness, and use the gluten free or basic cycle without ‘punch down’ (gluten free loaves rise once). Also, ensure you’re not using too much sugar or sweetener, which can weaken the crumb structure; stick to the amounts in the recipe.
How can I make this recipe egg-free and vegan?
Use 2 flax eggs (2 tbsp ground flax, 5 tbsp water, mixed and rested 5 minutes). The crumb will be slightly denser but still cohesive and moist. Adding a teaspoon of psyllium husk can further improve binding, especially if your bread tends to be crumbly.
Why do I need xanthan gum?
It acts as a binder to mimic gluten’s elasticity. Without it, slices crumble. Some flour blends already include xanthan or guar gum—adjust accordingly. Guar gum is a possible substitute in a pinch, though some find the texture slightly less springy.
Does this freeze well?
Yes! Cool completely, slice, and freeze in a well-sealed bag. Toast slices straight from the freezer for best, bakery-quality texture. Frozen bread is also perfect for French toast or grilled sandwiches—just cook directly from frozen for excellent results.
Can I double the recipe?
Only if your bread maker holds 3+ lbs. Overfilling prevents proper baking and can make the center doughy or collapse. Check your bread maker’s max loaf size first. For best results, bake two loaves in sequence rather than doubling, so each bakes evenly.
This article was created with the help of AI. Images may also be AI-generated.
")
