
Chuck Eye Steak Recipe: A Comforting Classic Cooked at Home
The first time I spotted chuck eye steak at the butcher, I was drawn to its marbling and value. My favorite memory? Cooking it on a chilly Friday night with jazz playing and a glass of red nearby. After a few trials (and one smoke alarm incident), I unlocked the simple steps to true, juicy perfection — and now it’s a regular treat when I want steakhouse feels at home, minus the price tag. In this recipe, you’ll find sensory, detailed instructions, troubleshooting tips, and ingredient swaps learned from real experiments. Let’s get straight to the flavor.
Why This Chuck Eye Steak Recipe Works
- Ultra-Tender Results: Generous marbling means a juicy, beefy flavor and a tender interior. With my resting and searing method, each slice comes out fork-tender, never tough. Chuck eye steak’s unique blend of muscle and fat melts deliciously in the pan, providing beef lovers with maximum reward for minimal effort. The marbling, while not quite as pronounced as ribeye, closely mimics its cousin — delivering similar satisfaction with less risk of drying out like leaner cuts. The tenderness is especially obvious when sliced correctly, revealing juicy, glistening fibers.
- Budget-Friendly & Versatile: Chuck eye is sometimes called “the poor man’s ribeye” and delivers true steakhouse comfort for less. This recipe gives you a restaurant-worthy meal at home, whether pan-seared or grilled. Compared to other steaks like strip or filet mignon, a chuck eye can often be found for half the price per pound, making it perfect for families or entertaining on a budget. Its versatility also means you can pair it with a wide variety of sides, from classic mashed potatoes to bright salads, and adapt to any season or craving.
- Real-Life Tested Steps: I’ve made this steak five times, tweaking cook times, seasoning ratios, and resting so you don’t have to guess. First try? Overcooked and dry. Now, every time it’s pink in the middle, with that addictive golden-brown crust. Using a cast iron pan consistently produced the deepest sear, while resting periods of at least 8 minutes yielded more juicy slices. The experimentation included both thicker and thinner steaks, as well as variations on basting times, showing that minor details really matter for optimal results.
- Simple Ingredients, Deep Flavor: You need just a few pantry staples: flaky salt, pepper, garlic, unsalted butter, and a hint of fresh herbs. Each one plays a part in building that mouthwatering steakhouse aroma and flavor. For instance, the fresh herbs (like thyme or rosemary) infuse the sizzling fat, sending waves of savory fragrance through your kitchen. Garlic infuses a subtle but unmistakable depth—just two cloves per pan is transformative. Even olive oil has its time and place for a Mediterranean flavor spin.
- Easy to Master: Clear visual cues and sensory tips guide you through. No technical jargon, just straightforward good cooking. Whether you’re a novice or veteran cook, the process demystifies steak preparation—sound cues (the deep sizzle), sights (golden, crisp crust), and smells (buttery, herby aroma) act as your guide, helping build confidence for future steak nights.

Ingredients & Smart Substitutions
- Chuck Eye Steaks (2, 1-1.25 inches thick, 450g total): The star! Look for deep red color and a nice streak of marbling for tenderness. Sirloin or strip serve as the next best swap if you can’t find chuck eye. In a pinch, even a thick-cut top blade steak or Denver steak can be substituted, though adjust cooking time since leaner cuts dry out faster. Always ask your butcher for recommendations — some have “chuck delmonico” steaks, which also work well if prepped with care.
- Kosher Salt (1 tbsp / 15g): Draws moisture for a beautiful, caramelized crust. Compared to table salt, kosher salt’s larger flakes distribute more evenly and reduce risk of over-seasoning. If using fine salt, use about 30% less to avoid a salty result.
- Freshly Ground Black Pepper (1 tsp / 3g): Cracked right before cooking for warmth and a hint of heat. If you love extra kick, try mixing in a pinch of crushed red pepper or smoked paprika before the sear for subtle complexity.
- Neutral Oil (1 tbsp / 15ml): Canola, avocado, or grapeseed for high-heat searing. Olive oil is fine but keep the heat moderate. For a nod to French bistro flavors, clarify butter (ghee) is also an option to reduce burning.
- Unsalted Butter (2 tbsp / 28g): Adds richness and a nutty finish when basted over the steak. If you want deeper flavor, brown the butter slightly before basting to intensify the nutty notes. Ghee or high-quality vegan spreads with 80% fat will also mimic this richness if you’re dairy free.
- Garlic Cloves (2, smashed): Perfumes the butter and adds subtle complexity. For even more pronounced garlic, add a halved head (cut side down) in the pan or sprinkle garlic powder on the steak before searing, though avoid burning minced garlic—it turns bitter.
- Fresh Herbs (2 sprigs thyme or rosemary): Optional, but really deepens aroma. Swap with dried herbs if needed. Oregano or a bay leaf give a Mediterranean twist; sage is tasty for a fall-inspired flavor profile.
Allergic to dairy? Omit butter or use your favorite vegan substitute. Gluten free and egg free by nature. See below for more swaps! For a bolder crust, try finishing with a sprinkle of flaky sea salt or a knob of compound butter (mix soft butter with chopped herbs or horseradish). Don’t forget: the simpler the ingredients, the more important freshness and quality become in the final result.
Step-By-Step: The Foolproof Chuck Eye Steak Method
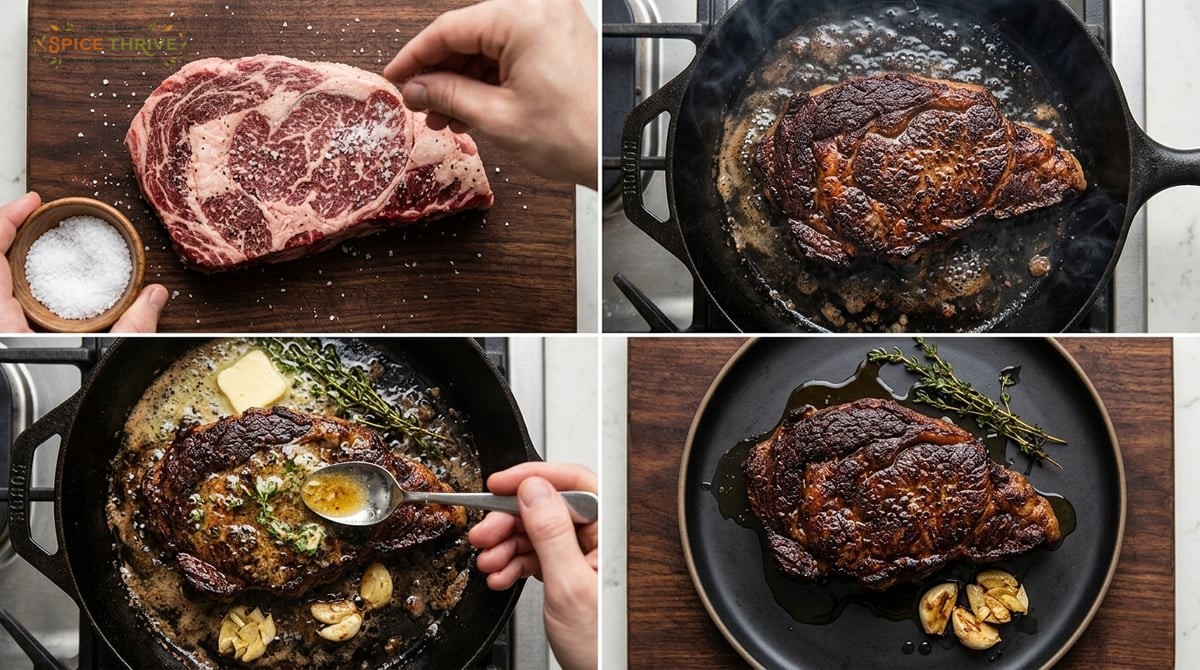
- Prep the Steak: Pat steaks dry with paper towels. Let them sit at room temp for 30–45 minutes — this helps them cook evenly. Bringing the steak to room temperature ensures gentle, uniform doneness instead of a cold center. If cooking from the fridge, the exterior may overcook before the inside is warm, leading to a tough bite.
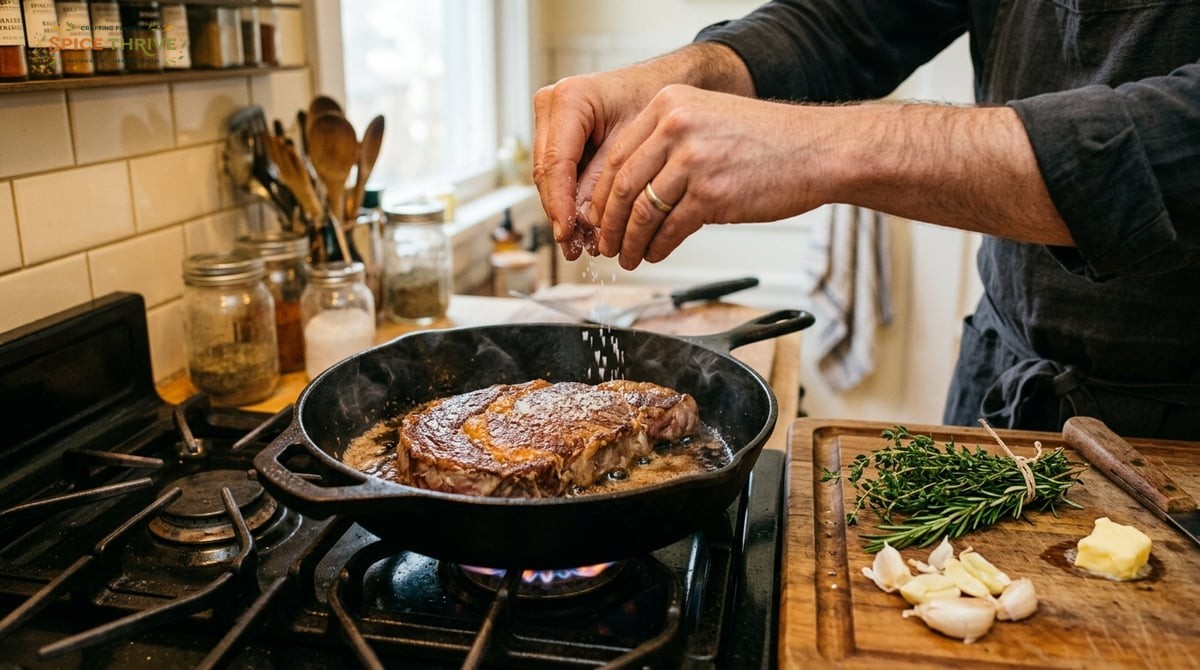
- Season Generously: Right before cooking, sprinkle both sides with kosher salt and freshly cracked pepper. Press lightly so the seasoning sticks. This preps the surface for the coveted crust. Some cooks also rub a little oil onto the steak itself to help the seasoning adhere. For extra depth, add a pinch of onion powder or paprika to your seasoning mix.
- Preheat Your Pan: Place a large cast iron or heavy skillet over medium-high until it’s just starting to smoke. Add the oil and swirl to coat. The pan should be hot enough that a drop of water sizzles immediately—a well-heated pan is key for forming the crust. If your pan isn’t hot enough, the steak will steam rather than brown, sacrificing flavor.
- Sear: Lay the steaks down without moving for 3–4 minutes. Flip when a deep brown crust forms — you’ll hear a satisfying sizzle and smell rich beefy aroma. Press gently with a spatula to ensure even contact. If multiple steaks, don’t overcrowd; cook in batches as needed for the best result. During this step, avoid poking or flipping too often, which can disrupt crust development.
- Baste with Flavor: Add butter, garlic, and herbs. Spoon the bubbling butter over the steak. Tilt the pan if needed to collect butter. Do this for 2–3 minutes. As you baste, listen for the sound to lower into a gentle hiss and watch for foamy, nutty-smelling butter: that’s when flavors deepen. Push the aromatics around so every part of the steak gets kissed by the infused butter.
- Finish & Rest: For medium-rare, check internal temp: 52–54°C/125–130°F. Remove, tent loosely with foil, and rest 8–10 minutes before slicing. This locks in the juices. During resting, the temperature will rise a few degrees, so pull off the heat just short of your target. Resting also gives fibers time to relax so juices redistribute rather than leak out on your board. For thinner steaks, check temp earlier; thicker cuts may require another minute per side on lower heat for medium doneness.
- Slice & Serve: Cut against the grain. Drizzle with the buttery pan juices. The grain is easiest to spot once you turn the steak on its side; short, crosswise slices yield the most tender result. Serve with your favorite sides — think classic mashed potatoes, roasted vegetables, or even a fresh arugula salad with lemon vinaigrette. If desired, top with a pat of herbed butter or sprinkle with finishing salt as a final flourish.
See below for in-process kitchen photos and pro tips! These steps—rooted in traditional steakhouse techniques—turn this economical cut into a crowd-pleaser worthy of any special meal.
Chuck Eye Steak Pro Tips: Tested in My Own Kitchen
- Don’t skip the rest. Resting the steak on a plate (loosely covered) is what keeps it juicy and gives you those steakhouse results. My first time, I sliced too soon — and lost most of the juices to the cutting board. Resting for at least 8 minutes is key, and even longer for larger steaks. The carryover heat gently finishes cooking and redistributes juices so every bite is succulent, not dry.
- High, not max, heat. Use a preheated cast iron or heavy pan, but turn your vent on! The sweet spot is medium-high, not max. On my old electric stove, too high equals burnt bits before a crust formed. Consistent heat ensures the steak browns evenly; if the pan billows smoke before the steak goes in, reduce the flame a notch for better control, especially on electric ranges.
- Check your thermometer. An instant-read thermometer is your friend. My third test, I guessed at doneness and ended up with chewy steak. No shame in checking temp! Insert the tip into the thickest part for an accurate internal reading. If you’re without a thermometer, cut a small slit—slightly pink is medium-rare, redder for rare.
- Butter basting boosts flavor. Don’t rush this gentler step — wait for foamy bubbles before basting, and use a spoon to coat every inch. It’s what really sets this method apart. The butter picks up herb and garlic flavor and imparts a glossy, restaurant-quality sheen. If the butter browns deeply (but doesn’t burn), all the better—it will taste nutty and rich.
- Troubleshooting: Steak tough? May have overcooked or cooked straight from fridge. Forgot to rest? A little broth or a dab more butter while slicing can rescue some moisture. If your steak seems too salty, slice and serve with unsalted mashed potatoes or a squeeze of lemon. For steaks cooked past your target doneness, slice extra thin and serve with a chimichurri or steak sauce to bring back moisture and flavor.
Variations & Dietary Swaps
- Asian-Style Glaze: Whisk 2 tbsp (30ml) soy sauce, 1 tsp (5g) sugar, and 1 tsp (5ml) sesame oil. Brush over steak in the last 1 minute of cooking. Garnish with sliced scallions for a Korean BBQ vibe. (Contains soy, gluten unless using tamari.) For more umami, add a pinch of grated ginger or a splash of rice vinegar before basting. Serve with jasmine rice and sautéed bok choy for a well-rounded meal.
- Garlic-Free: Allergic? Swap in shallots or skip altogether. A squeeze of lemon at the end wakes up flavor. Alternatively, try finishing the steak with chopped chives or a light mustard vinaigrette instead of garlic and herbs—it’s a fresh, tangy substitute.
- Dairy-Free: Use plant butter or olive oil instead of butter. Omit completely for an even lighter taste. Coconut oil brings subtle sweetness, while avocado oil maintains a neutral, high-heat character for delicious searing. For a richer flavor, dairy-free margarine with at least 80% fat content can be used for basting.
- Vegetarian “Steak”: Use these seasoning and basting steps on thick slices of king oyster mushrooms or eggplant rounds — great texture and flavor for plant-based eaters. Marinate vegetables in a mixture of soy sauce, olive oil, and smoked paprika before searing for extra depth. Time the sear until golden brown and basting brings out natural sweetness for a satisfying, steak-like main dish.
- Kosher/Low Sodium: Use a lighter hand with salt or try a salt-free herb blend for seasoning. Add complexity with ground black pepper, garlic powder, or a pinch of citrus zest. Finishing the cooked steak with a drizzle of balsamic reduction is another way to amplify flavor without relying on salt.
Chuck eye is naturally gluten free, egg free, and nut free. Always check brands of butter or seasonings for hidden allergens if you’re sensitive. If you desire even more variety, try making a peppercorn-crusted steak (coat in cracked pepper before searing) or adding a red wine reduction to flavor the pan juices for a special-occasion touch.
How to Store, Reheat, and Make Ahead
- Fridge: Store leftover steak in an airtight container up to 4 days. I like to keep pan juices in the same container for maximum moisture. Recombine any juices that have separated to keep the steak moist and flavorful the next day—just spoon over the steak before reheating.
- Freezer: Freeze cooked steak (sliced or whole) wrapped tightly in foil then in a freezer bag for up to 2 months. Thaw overnight in the fridge. To protect texture, place parchment between slices before freezing so you can remove only what you need later—great for portion control or quick salads.
- To Reheat: For best results, gently reheat steak slices in a skillet with a splash of broth or water, covered, for 2–3 minutes. Or microwave with pan juices in 30-second bursts, watching closely. Avoid overheating — it dries out fast! Alternatively, use a 250°F (120°C) oven, covered with foil, for 10–15 minutes to gently warm without overcooking.
- Make Ahead: You can season steaks up to 24 hours in advance. Store uncovered on a rack in the fridge for a dry-brine that boosts flavor and crust. Let come to room temperature before cooking. This dry-brine technique draws out and reabsorbs some moisture, amplifying beefiness without extra work. Perfect for prepping the night before a dinner party or busy weeknight.
- Meal Prep: Leftover steak is incredible in salads, tacos, stir fry, or rice bowls. Thinly slice while cold for clean edges. Plan simple meal combinations by pairing slices with roasted veggies or sautéed greens, or toss into a sandwich with horseradish sauce for a satisfying lunch. The steak’s robust flavor stands up well to a variety of cuisines, making it ideal for creative leftovers.
Printable Chuck Eye Steak Recipe Card
Prep Time: 40 minutes (includes bringing to room temp)
Cook Time: 10 minutes
Total Time: 50 minutes
Yield: Serves 2 (double for 4 servings)
Ingredients:
- 2 chuck eye steaks (about 1-1.25″ thick, 450g total)
- 1 tbsp (15g) kosher salt
- 1 tsp (3g) freshly ground black pepper
- 1 tbsp (15ml) neutral oil
- 2 tbsp (28g) unsalted butter
- 2 garlic cloves, smashed
- 2 sprigs thyme or rosemary (optional)
Instructions:
- Pat steak dry. Let sit at room temp 30–45 min. This prevents excess moisture from steaming the steak and ensures an even cook throughout.
- Season steaks all over with salt and pepper. For extra flavor, press seasoning in with your hands and let it sit for a few minutes to help the salt penetrate the surface.
- Heat cast iron pan on med-high. Add oil. The pan should be shimmering but not smoking violently. Test by flicking a drop of water — it should sizzle on contact.
- Sear steaks undisturbed 3–4 min per side for crust. You’ll know it’s ready to flip when the steak releases easily from the pan. If it sticks, give it another 30 seconds. For a deeper crust, gently press down with tongs as the steak cooks.
- Add butter, garlic, herbs. Baste with butter 2–3 min. Baste continuously for maximal flavor, swirling the melted butter with herbs and garlic to coat each surface.
- Check temp: 125-130°F/52-54°C for med-rare. Rest 8–10 min. You can tent loosely with foil to retain warmth but not trap steam, which softens the crust.
- Slice against the grain. Serve with pan juices. If desired, add a sprinkle of finishing salt or a squeeze of lemon to brighten the flavors right before serving.
Estimated Nutrition (per serving): 435 kcal, 37g protein, 33g fat, 1g carbs, no gluten or eggs. Dairy from butter (swap for vegan as needed).
Allergen notes: Gluten free, egg free, nut free. Contains dairy (omit or sub vegan butter if needed). For added depth, try finishing with a homemade chimichurri or red wine sauce as a creative twist.
Enjoying Steak Night at Home? Share Your Results!
Few things beat the sizzle and aroma of a perfectly cooked steak in your own kitchen. If you try this chuck eye steak recipe, I’d love to hear how it turned out — and see your kitchen photos! Drop a comment or tag @SpiceThrive on social so others can share in the inspiration. For more global comfort food classics, check out my Asian beef stir fry recipe, or browse the full recipe collection. Keep cooking with confidence and curiosity — your next favorite is just one steak away.
Updated & retested June 2024 by Chris Wells, home cook & recipe writer. Learn more about me.
Chuck Eye Steak FAQs
Can I grill chuck eye steak instead of pan searing?
Yes! Preheat your grill to high. Sear 3–4 minutes per side, lid closed, then baste with butter/herbs if you like. Rest as usual.
What’s the difference between chuck eye and ribeye?
Chuck eye comes from right next to the ribeye. Fewer steaks per animal, but similar marbling and tenderness (for less $!).
How do I know when my steak is done without a thermometer?
Touch test: medium-rare feels like pressing the base of your thumb with a relaxed hand. Or, watch for red juices pooling on top after searing/ resting.
Is chuck eye steak tough?
When cooked and rested properly, it’s juicy and tender. Rushing, not resting, or overcooking are what make it chewy.
Best way to slice steak?
Always cut against the grain (perpendicular to the muscle fibers) for most tenderness.
Can I marinate chuck eye steak?
Absolutely — 1 to 12 hours in your favorite marinade. Dry thoroughly before searing for best crust.
This article was created with the help of AI. Images may also be AI-generated.

