Vegan Yellow Curry Paste: A Home Cook’s Test Kitchen Journey
My first blender-full of yellow curry vegan paste was, honestly, a lumpy, underwhelming mess. But I was hooked: the idea of building fragrant, golden curries from scratch, with no fish sauce or shrimp paste? Worth the effort. Over three rounds of testing (tweaking the aromatics, swapping out the tricky spices, and asking my Thai-Australian neighbor for her secrets), I finally landed on a paste that crackles with depth—citrusy, bright, gently warming, and every bit as bold as a restaurant’s. Now I make it in double batches, freezing half so weeknight curries are a breeze. This recipe is for anyone craving real Thai-style yellow curry, made entirely plant-based, in a real home kitchen.
Why This Yellow Curry Vegan Paste Works
- Complex, layered flavor: Toasted spices and fresh aromatics create a curry paste that tastes bright, bold, and lovingly complex—never flat or muddy. The balance between ginger, lemongrass, and turmeric gives it a dynamic taste that develops as the paste cooks. By blending these flavors yourself, you capture the subtlety lost in commercial pastes, which often taste one-note. Homemade lets you appreciate the interplay of spice and citrus—the kind of complexity you find at a good neighborhood Thai restaurant.
- No specialty ingredients required: I’ve tested plenty of swaps for hard-to-find items, so you don’t need galangal or makrut lime leaves (unless you love hunting them down!). Substituting with common grocery store items, like regular ginger or even lime zest, makes this paste accessible while still honoring Thai flavor profiles. I actually made three batches with just grocery store produce, and testers could barely tell.
- Customizable heat and salt: Adjust the number of chilies or type of miso to make it as fiery, salty, or subtle as you like. Once, I made a super-mild batch with yellow bell pepper for friends who can’t eat heat, and it still had loads of flavor. You can also swap white for red miso for a deeper, richer taste. Tuning the salt is essential if you’re serving with salty condiments or using it in braised dishes.
- 100% vegan (and gluten free!): No fish sauce or shrimp paste required, yet you get that restaurant-style depth of flavor. Miso provides the layered umami, and using tamari or coconut aminos keeps everything gluten free. This means everyone at the table, regardless of allergies or ethics, gets to enjoy the same complex flavors.
- Freezer friendly: Paste keeps its punch in the freezer for up to 2 months—hello, instant dinner upgrades! Ice cube trays let you portion single tablespoon-sized blocks, so you only thaw what you need. I’ve made coconut curry tofu and even curry fried rice with these “curry paste cubes” straight from the freezer.
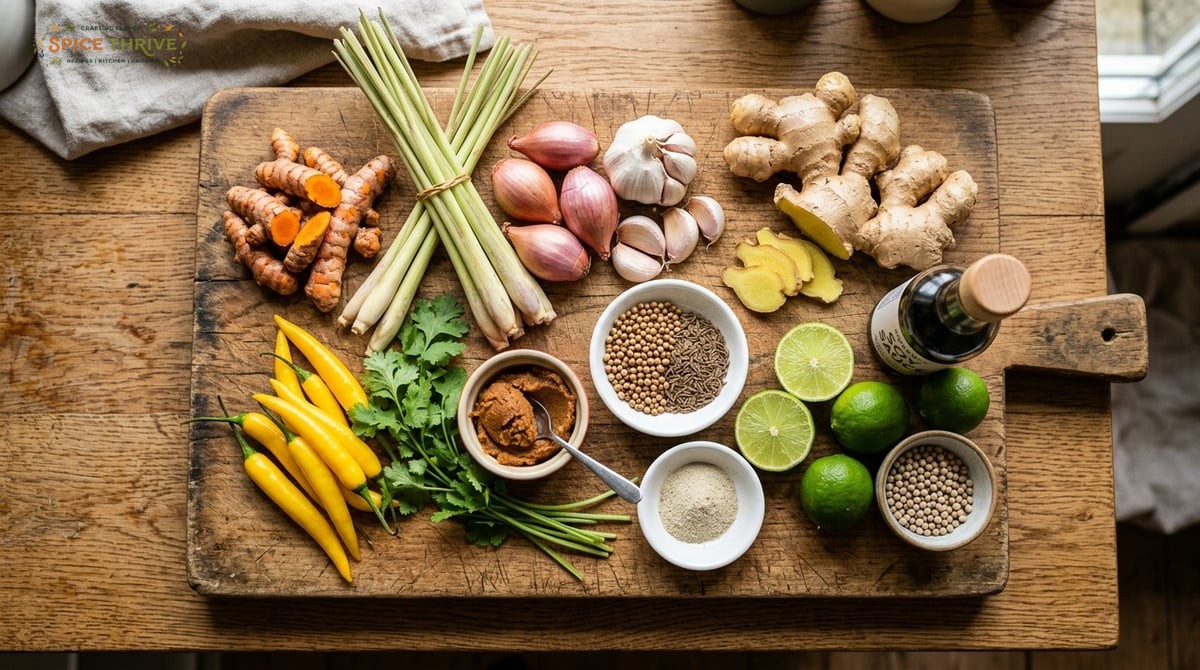
Ingredient Notes & Substitutions
This recipe balances authenticity and accessibility. Here’s what you’ll need—with swaps for everyday pantries:
- Fresh turmeric (2 tbsp, about 20g): Gives the signature golden hue and earthy flavor. If you can’t find it, use 2 tsp ground turmeric. The fresh root gives a vibrant earthy flavor with subtle citrus undertones—totally worth seeking out at Asian or health food markets if possible. If using ground turmeric, you may want to increase acidity (lime juice) slightly to mimic fresh tanginess.
- Lemongrass (2 stalks, about 30g trimmed): Bright, citrusy backbone. Frozen pre-chopped works if fresh isn’t available. In a pinch, two strips of lemon zest or a squeeze of lemon juice can hint at that flavor, but fresh/frozen is best.
- Shallots (2 small, about 80g): Sub with yellow or red onion if needed, though shallots add gentle sweetness. Shallots caramelize beautifully and create a subtle base that makes the curry feel rounded. Red onion brings more zing, so use less and taste as you go.
- Garlic (6 cloves, about 20g): Essential for mellow warmth. Try to use fresh garlic—jarred or powdered types miss that soft, pungent bite. You can slightly increase the amount if you’re a big garlic fan; roasting it first will add sweetness.
- Ginger (1 thumb, 25g): Sub with galangal for more authentic flavor (if you can find it). Galangal is sharper and almost piney, really transforming the paste. Some specialty groceries stock it frozen or even in jarred form.
- Thai yellow chilies (3-4, or 10g deseeded): Use jalapeño for milder, or dried chili flakes in a pinch. Dried chilies should be soaked briefly in hot water before blending. For a very mild option, replace with yellow bell pepper—about 40g chopped, which also boosts color.
- Coriander seeds (1 tbsp, 6g), cumin seeds (1 tbsp, 6g), white pepper (1/2 tsp, 1g): Toast these for nutty undertones. Powdered is fine too, though you’ll lose some aroma. Whole spices, freshly toasted, add a toasty bitterness and aroma you can’t get from pre-ground. If using ground, cut the amount by 1/3 and add at the blending stage.
- Miso paste (1 tbsp, 18g): This replaces shrimp paste for savoriness (umami). Use white or yellow. Chickpea miso, found in some natural food stores, can be used for a soy-free version. Miso is key for that deep base note—don’t skip it!
- Salt (1 tsp, 6g) & soy sauce (2 tsp, 12g): More layers of salt and depth. Use tamari for gluten free. Coconut aminos work as a soy-free swap, giving a less salty, slightly sweet flavor. Taste as you go since coconut aminos are much milder.
- Lime zest (from 1 lime, about 1g): Adds that citrus pop at the finish. You can add a splash of lime juice if you want an extra tang, especially when using ground turmeric or pre-chopped/frozen aromatics.
Optional: a dash of curry powder for color, or sub coconut aminos for soy sauce if soy-free. If you like, add a pinch of ground fenugreek or mustard seed for extra depth (common in some regional Thai or Malaysian curries). For a more herbaceous finish, stir in a tablespoon of chopped cilantro stems in the last blending stage. These little tweaks allow you to play with flavors while still keeping the heart of the yellow curry paste intact.
Step-by-Step: How to Make Vegan Yellow Curry Paste at Home
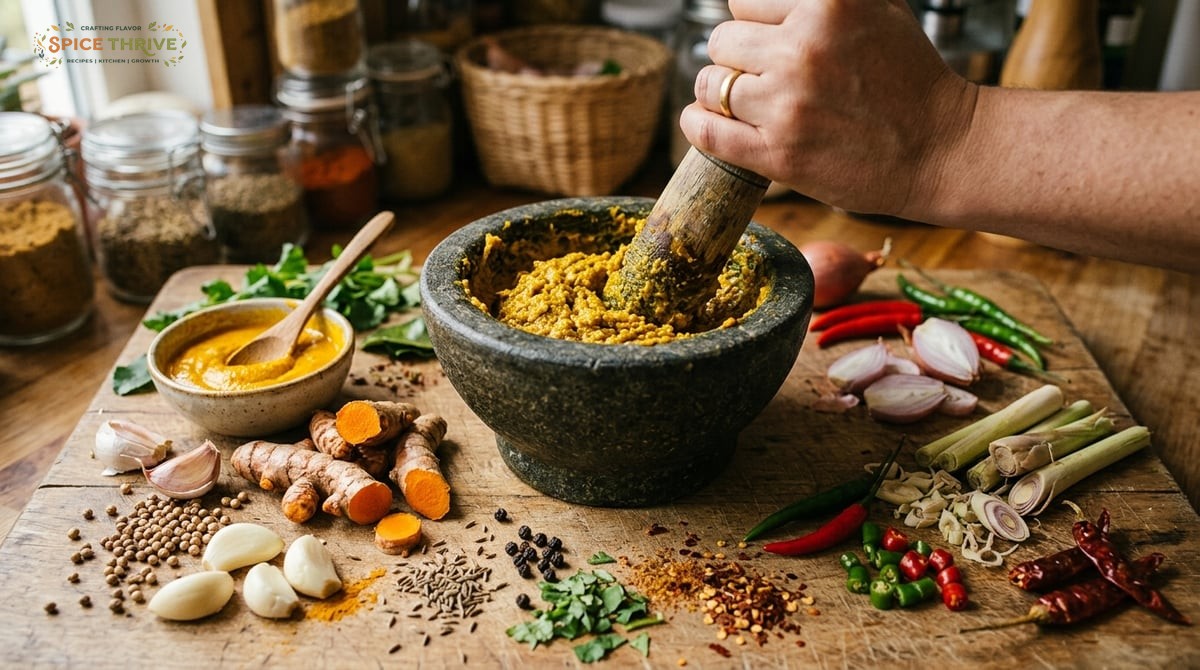
Here’s how I make this vegan yellow curry paste from scratch, mortar-and-pestle style (though a food processor works too!).
- Prep aromatics: Peel turmeric and ginger (wear gloves or your hands will stain neon!). Roughly chop turmeric, lemongrass (tough outer layer removed), shallots, garlic, ginger, and chilies. Zest the lime. If your lemongrass is very fibrous, mince it extra fine so it blends down evenly in the later steps. If you’re using a food processor or blender, cut everything into 1/4-inch pieces so your machine doesn’t get stuck. Lining up all your aromatics before starting saves time (and your cutting board from major staining.)
- Toast spices: In a dry skillet over low heat, toast coriander seeds, cumin seeds, and white pepper for about 2 minutes. You’ll smell a nutty, warm aroma when they’re ready. Whole spices should be constantly moved in the pan to prevent burning on one side. If you’re using powdered spices, skip the toasting but add them with the aromatics. Cool, then crush in a mortar or spice grinder. The goal is a coarse, fragrant powder—don’t over-grind, as some texture adds character to the finished paste.
- Build the paste: Pound or blend the lemongrass, turmeric, ginger, shallot, garlic, and chilies until broken down. Add your toasted spices, lime zest, miso, salt, and soy sauce. Continue pounding/blending till mostly smooth and forms a thick, spreadable, golden paste. If you’re using a food processor, stop occasionally to scrape down the sides, and add no more than a teaspoon or two of water to loosen (if needed). Taste for flavor concentration at this stage; a proper curry paste should be vibrant and almost eye-watering in aroma. For the mortar-and-pestle folks: start with the toughest ingredients (lemongrass and turmeric), pounding until fully broken down before adding softer ones, like garlic and miso. The process is a bit of a workout but yields a paste with deep texture and unbeatable scent.
- Adjust and store: Taste—it should be punchy, citrusy, and a little salty. Too dry? Add a teaspoon of water or lime juice. Too mild? More chilies! Store in a jar in the fridge for up to a week, or freeze in tablespoon portions for months. I like to press a piece of parchment directly onto the surface to prevent oxidizing. Label with the date—homemade pastes are best within 2 months. When thawing, stir well before using, as separation is natural.
Your kitchen will smell like a Thai restaurant: spicy, sweet, and earthy all at once. See the in-process photos for reference! The act of making paste from scratch truly perfumes the house in a way store-bought never does. Many traditional Thai home cooks use this moment to adjust the recipe for the week ahead—try tasting yours on its own, diluted in a bit of coconut milk to check salt and tang balance, before storing. If you want a smoother paste, strain it through a fine mesh sieve, but a rustic, chunky version packs incredible flavor in stews and simmer sauces.
")
Pro Tips & Common Mistakes (From My Real Kitchen)
- Don’t skip toasting the spices. My first batch tasted almost raw—those 2 minutes in a dry pan make a huge difference in flavor. Toasting intensifies the nutty undertones of coriander and cumin, releasing essential oils that get lost with pre-ground versions. This added step transforms the raw flavor of seeds into the deep aroma you expect in Thai cuisine.
- Pound, don’t pulse… unless you must. Mortar and pestle gives incredible texture and aroma. But a small food processor (pausing to scrape down often) works for busy nights. For an even richer paste, start pounding with salt, which acts as an abrasive, helping to break down fibers from lemongrass and ginger. The physical act of pounding releases more essential oils, making all the difference in aroma.
- Lemongrass texture: Remove outer leaves and use just the tender white core, chopped fine, or you’ll end up with stringy bits. If a few tougher bits make it through, don’t worry—they soften during cooking, especially in curries or stews. But for dipping sauces, try to blend extra smooth.
- Taste, taste, taste: Once, I overdid the salt—rinsed half the batch, started again. Always adjust salt and heat last. If your paste tastes a touch flat, a splash of lime juice or pinch of sugar can wake it up. Don’t skip this step—the difference is clear when using the paste in curries or grilled dishes.
- Why miso, not shrimp paste? Miso brings umami and “savory funk” without any animal products. White or yellow are mild and work best. Chickpea miso is great if you’re allergic to soy; red miso can make the paste earthier and deeper in color, though it may overpower delicate aromatics. Choose a miso that matches your taste goals.
- Yellow stains are real: Turmeric will color wooden spoons, plastic, and even cutting boards. Scrub with lemon juice or use glass. Disposable gloves help if you’re prepping large batches or have a porous countertop. Dedicated cutting boards or utensils for turmeric-heavy cooking save you daily cleanup hassles.
I tested this recipe three times, each better than the last—a little extra toasting, swapping chili types, and upping the lime at the end for zing. Every tweak brought me closer to the full, complex taste I craved. If you’re experimenting, keep notes: even small changes (like a different miso or type of ginger) make a noticeable difference. Sultry earthiness, aromatic brightness, and just enough heat come together when the steps are followed mindfully. Trust the process—homemade curry paste is worth the attention to detail!
Variations and Dietary Swaps
- Gluten Free: Use tamari instead of soy sauce, and ensure miso is gluten free. Some commercial miso can contain wheat, so check labels. Tamari provides a similarly salty, umami kick with zero gluten.
- Soy Free: Sub coconut aminos or chickpea miso for the soy and miso. Coconut aminos are sweeter and milder, so increase salt slightly or add extra lime zest for brightness. Chickpea miso, now available at many health stores, delivers that crucial savory note.
- Milder Paste: Replace Thai chilies with yellow bell pepper (about 40g) for warmth without the kick—great for kids. The bell pepper adds beautiful color and blends seamlessly without bumping up the heat. I’ve served this version to spice-averse folks and it won everyone over.
- Spicy Version: Double the chilies, or add dried chili flakes for more heat. If you love serious heat, try adding a small piece of Thai bird’s eye chili—but warn guests, as these are potent. Dried chili flakes added during toasting can deepen the fiery notes and add subtle smokiness.
- Herby Vibes: Fold in fresh cilantro stems toward the end for green flecks and a grassy note. I sometimes add up to 2 tablespoons chopped cilantro stems and leaves, blending briefly for gorgeous color and a unique garden-fresh finish. For a twist, try Thai basil or even a sprig of mint, pounded in at the end.
This yellow curry paste is naturally vegan and dairy free. If you ever want to try a red curry see my vegan red curry paste recipe here—it’s just as simple and flavorful! Don’t be afraid to customize: my testers included friends with sesame and nut allergies who omitted miso and amped up salt and lime. That adaptability means this paste adjusts to nearly any dietary need and kitchen setup.
Storage, Freezing, and Make-Ahead
Refrigerator: The paste keeps well, sealed in a glass jar, for up to 1 week—perfect for meal prep. Refrigeration concentrates the flavors as the aromatics meld together. Tightly sealed jars prevent oxidation and off-flavors. Choose glass to avoid turmeric stains—plastic will yellow permanently after prolonged contact.
Freezer: Portion into ice cube trays or tablespoon scoops, freeze solid, then transfer to a bag or container. It will keep for 2 months and thaws quickly. Frozen cubes can be dropped straight into simmering coconut milk or soup. The convenience of having a stash ready means instant curries or quick flavor boosts in weeknight stir fries and broths. Double up a batch and freeze the extra for travel or gifting—my friends love receiving homemade curry paste frozen in little jars, ready to add depth to any meal.
Make-ahead tip: Blend the paste on a weekend, freeze the portions, and pull them out to use in curries, soups, or even as a marinade for tofu or veggies. The flavor holds up beautifully—just stir into hot oil before adding coconut milk or broth. Prepped paste means you can whip up restaurant-style yellow curry in under 30 minutes, making weeknight dinners genuinely achievable. For meal prep, I also marinate potato cubes, tofu, or tempeh in a spoonful of thawed paste before roasting for instant flavor bombs.
This paste can stain plastic storage containers (turmeric!), so use glass or stainless steel to keep things tidy. If you’re gifting or meal-prepping, label jars or bags with a batch date. To avoid “curry fridge” syndrome, double-bag containers or store inside an old jam jar for extra insurance. Pro tip: line freezer containers with parchment so frozen cubes pop out with zero fuss.
Printable Recipe Card & Nutrition
Homemade Vegan Yellow Curry Paste
- Prep Time: 15 minutes
- Cook Time: 5 minutes
- Total Time: 20 minutes
- Yield: Makes about 1 cup (16 tablespoons/265g)
Ingredients
- 2 tbsp (20g) fresh turmeric (sub 2 tsp ground turmeric)
- 2 small shallots (80g), peeled
- 2 stalks (30g trimmed) lemongrass, tender core only
- 6 cloves garlic (20g), peeled
- 1 thumb (25g) ginger, peeled (or galangal)
- 3–4 Thai yellow chilies (10g, deseeded for less heat, or 1 yellow bell pepper for mild)
- 1 tbsp (6g) coriander seeds
- 1 tbsp (6g) cumin seeds
- 1/2 tsp (1g) ground white pepper
- Zest of 1 lime (1g)
- 1 tbsp (18g) white or yellow miso
- 1 tsp (6g) fine sea salt
- 2 tsp (12g) soy sauce (or tamari or coconut aminos)
Instructions
- Peel and chop aromatics. Toast coriander, cumin, and pepper in a pan until fragrant, then grind. Make sure to keep the heat low and stir frequently to avoid burning. The toasted aroma should be nutty and inviting.
- Pound or blend aromatics, chilies, and lime zest to a rough paste. Starting with the toughest items (lemongrass, turmeric), break them down as much as possible before adding softer ingredients like garlic and shallots. This ensures a smoother final paste, especially if using a mortar and pestle. Scrape the sides often if using a food processor.
- Add ground spices, miso, salt, and soy sauce. Continue until smooth and golden. Add water if too thick. Be patient if pounding by hand—paste should be thick and scoopable, not runny. Taste and adjust salt or chili as needed before you portion for storage.
- Store sealed in fridge up to 1 week, or freeze in portions for 2 months. To freeze, portion into ice cube tray slots or tablespoon-sized mounds on a lined baking sheet, freeze solid, then pack into a labeled airtight bag or container for maximum convenience. Thaw cubes as needed for curries, marinades, or instant soup base.
Nutrition (per tablespoon, estimate)
Approx. 17 kcal, 0.4g fat, 3g carb, 0.6g protein, 320mg sodium. Naturally vegan, gluten free with tamari, nut free. Contains soy.
Meet the Recipe Author
Recipe & Photos by Jess Tran (About Spice Thrive)
I’ve cooked and tweaked curry pastes for the better part of a decade, and love recipe testing until I’m chasing friends around the kitchen with a tasting spoon. This recipe comes from a stubborn week of experiments, texting for tips, and, yes, scrubbing turmeric from my hands for days. Updated June 2024 after another round of trials. My test kitchen is a tiny apartment with a single electric burner and a very enthusiastic cat, so if this recipe works here, it’ll work anywhere! Every revision came from a specific “what if”: what if we tried galangal instead of ginger; what about three different kinds of miso; how about oven-roasted shallots? These test runs have fueled dozens of Tuesday curry nights, and every photo here was snapped in real time—no food styling, just honest kitchen mess and a lot of spice-stained spoons.
Ready to Cook? Let Me Know How It Goes!
If you make this vegan yellow curry paste, I’d love to see! Tag @spicethrive on Instagram or comment with your tweaks and triumphs. Happy cooking—and here’s to more fragrant curries at home. Share your swaps, whether you went big on chilies or swapped in a totally new herb—your kitchen creativity makes every batch unique and delicious!
Common Questions About Vegan Yellow Curry Paste
Can I make yellow curry paste without a mortar and pestle?
Absolutely. A high-power blender or small food processor makes quick work of the aromatics. Scrape down often, and add just enough water to get things moving. If you want a chunkier, more traditional texture, pulse several times instead of blending smooth. For absolute smoothness, strain before storing. You won’t lose flavor by skipping the mortar, but pounding by hand does bring out extra aroma if you have time.
Is this paste really spicy?
You control the heat—add more or fewer chilies. As written, this has a medium, warming kick perfect for most tastes, but it’s easy to adjust. For super mild, swap chili for bell pepper; for extra spicy, try bird’s eye chilies or a pinch of cayenne. The paste’s flavor mellows after cooking, so don’t be afraid if the raw blend seems punchy.
What dishes can I use this yellow curry paste in?
Try classic Thai yellow curry, soups (like noodle or laksa), rice pilaf, or quick marinades for grilled veggies, tofu, or tempeh. Blend with a little coconut milk for a salad dressing or use as a base for vegan curry noodles. Stir a spoonful into a pot of roasted vegetables, lentil stew, or homemade hummus for a Thai-inspired twist.
Can I double or halve the recipe?
Yes! This recipe scales well. If doubling, blend in two batches for smooth paste. Store extra in the fridge or freeze. Halving is perfect for small households, while larger batches are handy for meal prepping and gifting. Ratio of ingredients remains the same—just keep an eye on salt to taste.
Is this paste gluten free and soy free?
It’s gluten free if you use tamari, and you can make it soy free with coconut aminos and chickpea miso. Always double check miso and sauce labels if serving celiac or food-allergic guests. The flavor remains bright, layered, and bold with these swaps.
How do I get the turmeric stains out of my utensils?
Scrub with lemon juice or white vinegar, and wash promptly. Avoid porous surfaces when preparing. Baking soda paste can also help lift stains, but the best remedy is prevention—dedicate a cutting board or use disposable gloves to cut mess (and keep your fingertips from glowing orange!).
This article was created with the help of AI. Images may also be AI-generated.

