
A Family Favorite: The Story Behind Cherries in the Snow
There is something magical about desserts that look as lovely as they taste. The first time I made cherries in the snow, I was standing in my grandmother’s sunny kitchen, her laughter filling the air as she whipped cream by hand. This dish was her holiday showstopper: plush layers of cloud-like cream, cake, and bold, glossy cherries. Even now, every bite takes me back to that laughter and the soft scent of sponge cake mingling with sweet, tart cherries. Over the years, I’ve tested (and tasted!) this recipe at least six times, tweaking the cream and cherry layers for just the right balance. It’s a recipe that celebrates simple ingredients with joy.
My grandmother always insisted the secret to the perfect cherries in the snow was in the details. She would talk about gently folding the cream, so you never lost the airiness, and choosing cherries that had a bit of tartness to cut through the richness of the cream. During holidays, she would garnish the top with a few whole cherries and a sprinkle of grated white chocolate for an extra elegant finish. Sometimes she’d swap in a homemade angel food cake for a lighter touch, especially in spring. Each variation became a new family memory; we’d gather at the kitchen table, admiring the dessert’s festive colors before digging in together.
This dessert’s enduring popularity in our family isn’t just about taste; it’s also about the way it brings people together. Every year, when I serve cherries in the snow, friends ask for the recipe and tell me about their own families’ layered desserts—whether it’s English trifles or Southern banana pudding. There’s something universal about simple, layered sweets that feel both special and effortless. Ready to make your own memories with this classic?
Why You’ll Love This Cherries in the Snow Recipe
- Decadent Contrast: The silky whipped cream paired with juicy, tart cherries and soft cake gives every spoonful a contrast of flavors and textures. The cream’s richness soothes the cherry’s lively brightness, and the tender cake underneath soaks in every drop, creating a spoonful that’s deliciously complex yet completely approachable.
- Approachable Ingredients: No fancy equipment needed, and everything is easy to find at the grocery store. You can use fresh, frozen, or jarred cherries. The cake base can be store-bought or homemade, and most home bakers already have the cream and sugar in their pantry, making this dessert accessible to all skill levels.
- Make-Ahead Friendly: This dessert can be made the night before, letting the flavors mingle beautifully — perfect for gatherings or stress-free entertaining. After a night in the fridge, the cream and fruit meld together, and the cake’s texture improves, making preparation ahead of time not just possible, but preferable.
- Customizable Layers: Choose pound cake, angel food cake, or even vanilla sponge. Play with cherry types, swap for berries, or lighten up the cream for different occasions. Whether you prefer a richer or lighter dessert, or wish to try new fruit variations for different seasons, this recipe flexes to your needs and palate.
- Simply Impressive: The finished dish always looks spectacular, thanks to the red and white contrast. It’s guaranteed to wow at any table without fuss. Even if you make individual trifles in clear glasses or a grand, family-style bowl, cherries in the snow is reliably impressive for birthdays, potlucks, or holidays.
- Kid and Crowd Pleaser: Its familiar ingredients and beautiful appearance mean everyone—from picky kids to grandparents—loves it. The easy layers make it a great project for getting kids involved in the kitchen, letting them help assemble without fear of mistakes.
Ingredients & Ingredient Swaps (with Measures)
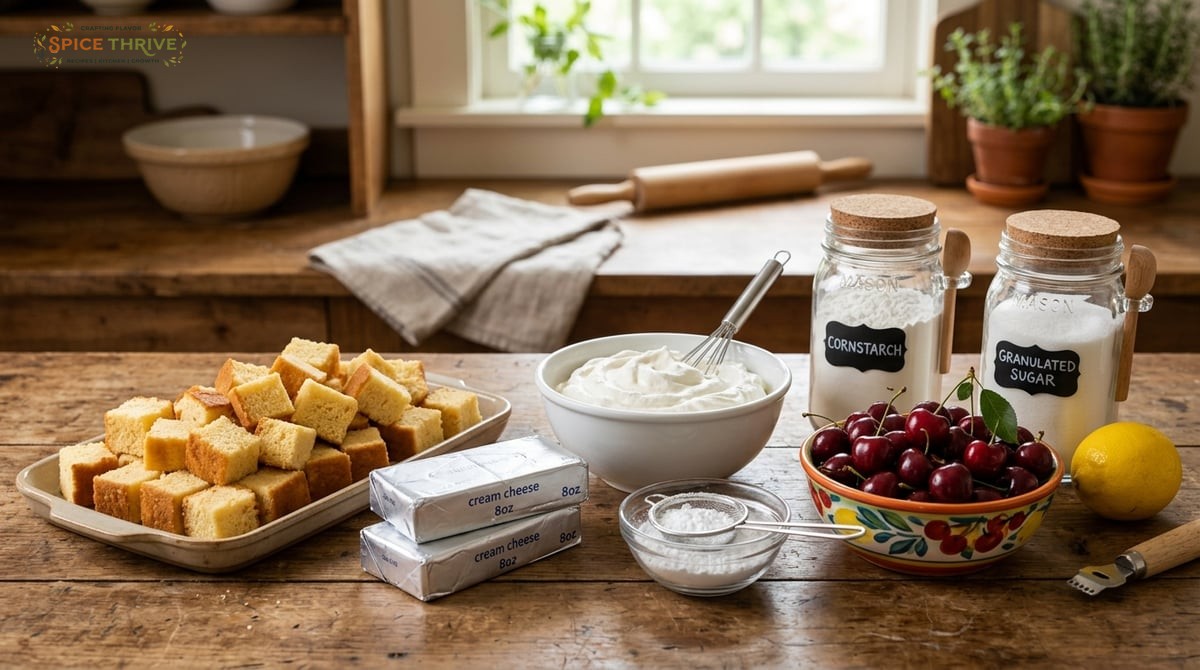
- Cake Base: 4 cups (about 320g) cubed angel food cake or pound cake. Angel food cake makes the layers extra light, pound cake gives a richer, buttery base. For a from-scratch twist, try homemade vanilla sponge or use lemon pound cake for added zing.
- Cream Cheese: 8 oz (225g) full-fat cream cheese, softened. Lends stability and a touch of tang to the cream layer. Can sub with Neufchâtel for a lighter option. For lactose intolerant, swap with equal weight dairy-free cream cheese without altering flavor too much.
- Powdered Sugar: 1 cup (120g). Sifts smooth into the cream, making it lightly sweet without any grit. If you want to cut sugar, use 3/4 cup, or use an alternative sweetener like Swerve for a lower-sugar option.
- Pure Vanilla Extract: 2 tsp (10ml). Adds warmth and rounds out the cream flavor. Almond extract can replace half the vanilla for a delicious twist that pairs especially well with cherries.
- Heavy Whipping Cream: 1½ cups (360ml). Whips up fluffy and adds dreamy texture. Whipping cream labeled 35% fat or higher works best. If hand-whipping, chill your bowl and beaters to make the process easier.
- Cherries: 2 cups (350g) pitted sweet or tart cherries (fresh, jarred, or thawed frozen). Brings color and flavor. Jarred Morello cherries or homemade cherry compote both shine here. For fresh cherries, choose those with deep red color and glossy skin for the best flavor. Can sub with blueberries or strawberries in a pinch. In summer, try blending different varieties for sweet-tart complexity.
- Cornstarch: 2 tbsp (16g), if making cherry topping from scratch. Thickens the cherry sauce so it doesn’t run. If unavailable, arrowroot starch or tapioca starch can be substituted in equal measure for similar results.
- Granulated Sugar: ⅓ cup (65g), for the cherry sauce. Balances the tartness. Adjust to taste if using especially sweet cherries. Brown sugar can give a hint of caramel depth to homemade cherry compote.
- Lemon Juice: 1 tbsp (15ml), for brightness in the cherry sauce. Fresh-squeezed is best, but bottled juice works in a pinch. Orange zest or juice can be a creative extra flavor layer.
Allergen info: Contains dairy (cream cheese, cream) and gluten (most cakes). Use gluten-free cake and vegan cream cheese/whipped topping for swaps. For nut allergies, skip almond extract if using as a flavor variation.
How to Make Cherries in the Snow: Step by Step
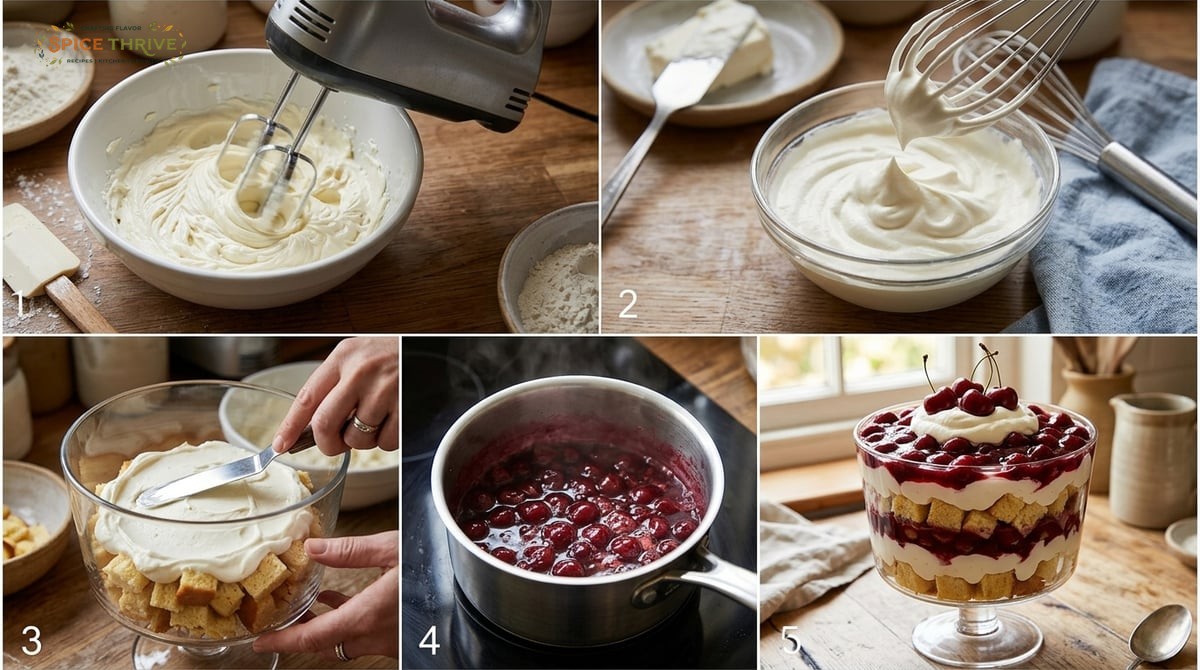
- Prep the Cake Base: Cut cake into 1-inch cubes. Lay out a layer on the bottom of a glass baking dish or trifle bowl. You want enough for a solid base with room for two layers. Take care to cube the cake evenly for consistent layering and attractive presentation, especially if serving guests. A glass dish shows off the beautiful contrast of colors.
- Make the Cream Layer: In a large bowl, beat the softened cream cheese and powdered sugar together until smooth and lump-free (about 2 minutes). Add vanilla extract. In a separate bowl, whip the heavy cream until soft peaks form – look for thick, pillowy ribbons when you lift the beaters. Gently fold the whipped cream into the cream cheese mix until just combined and airy. Be patient—over-mixing can deflate the cream. Use a spatula and sweep from the bottom to keep the mixture light, ensuring a cloud-like texture in the finished dessert.
- Prepare the Cherry Topping: If using jarred or canned cherries in syrup, simply drain off excess liquid. For fresh or frozen, combine cherries, sugar, lemon juice, and cornstarch in a saucepan. Cook over medium heat, stirring, until thickened and glossy (about 6–8 minutes). Let cool slightly before assembling. If you like your sauce extra thick, simmer an additional 1–2 minutes. Taste and adjust sugar if needed. For added depth, try a splash of almond extract or a sprinkle of cinnamon while cooking. Cool the compote just enough so it doesn’t melt the cream layer in assembly.
- Layer the Dessert: Spoon half the cream mixture over the cake cubes and gently spread to the edges. Top with half the cherry sauce. Repeat the layers: cake, cream, then cherries. Use the back of a spoon or an offset spatula for even distribution. For sharp layers, take care to avoid swirling the cherries into the cream unless you want a marbled look.
- Chill and Serve: Cover and refrigerate the assembled dessert at least 4 hours (or overnight). This helps the flavors marry and the textures settle. After chilling, the cake absorbs some cream and cherry juice without getting mushy. Serve in big scoops with extra cherries on top, if you like. For special occasions, dust the finished dessert with shaved chocolate or garnish with mint leaves for color and freshness.
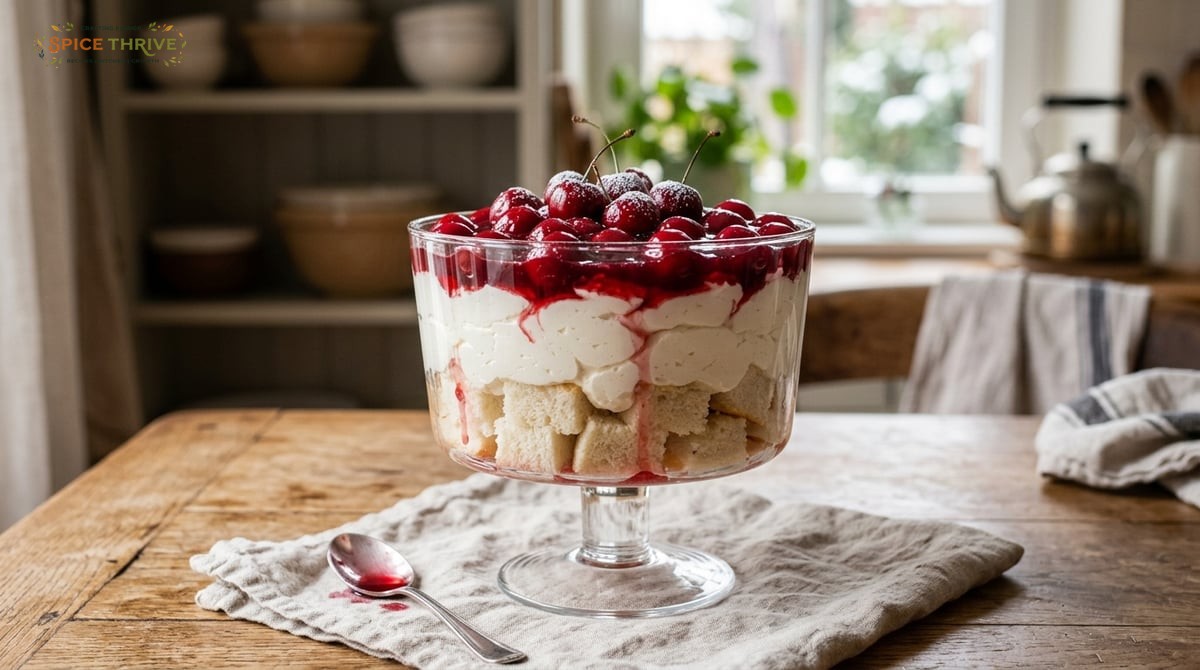
Visual cues: Cake should be completely covered by cream each time. Cherry layer should be jewel-toned and slightly set. Cream layer will be soft, not stiff. The dessert should look festive—white layers with vibrant red cherries, an invitation to dig in!
Pro Tips (Tested and Proven in My Kitchen)
- Softened Cream Cheese: Give it 30 minutes at room temp for a silky, non-lumpy cream layer. Cold cream cheese clumps! For truly luxurious texture, cut it into pieces to speed up softening and mix with sugar first before adding whipped cream.
- Don’t Overwhip the Cream: Stop at soft to medium peaks. Overwhipped cream can curdle and make the dessert dense rather than cloudlike. Watch carefully—peaks should hold their shape but still gently droop at the tip of the beater.
- Layer Neatly: For the prettiest slices, chill for at least 4 hours. Chilling lets the layers firm up enough to scoop cleanly. Use a clear trifle bowl for a showstopping centerpiece, especially for parties. If you want crisp lines, gently spoon each layer and spread with care.
- Fresh Cherry Compote Wins: I’ve tried jarred and homemade — making your own cherry sauce takes 10 extra minutes and tastes deeper and brighter. Homemade compote allows you to control the sweetness, texture, and lets real cherry flavor shine—worth it for special occasions.
- Mistakes Learned: The first time I rushed the cream, it split and turned grainy! Now, I always fold gently and never use reduced-fat cream cheese, which made the texture oddly rubbery. Full-fat works best. If your kitchen is warm, chill your bowl before whipping cream—this simple step improves fluffiness and stability.
- Enhancements: Try adding a teaspoon of liqueur (like Kirsch or amaretto) to the cherry compote for a grown-up twist. Or, shave dark or white chocolate on top before serving for an elegant finish.
Variations and Dietary Swaps
- Gluten-Free: Use a gluten-free vanilla or pound cake (store-bought or homemade). Check your cornstarch is gluten-free. Popular brands like Pamela’s and King Arthur have great gluten-free loaf cakes that hold up well.
- Dairy-Free/Vegan: Use vegan cream cheese and swap heavy cream for coconut cream or a plant-based whipped topping. Make sure your cake base is dairy-free (some vegan pound cakes work beautifully). For a lighter flavor, use a blend of coconut cream and almond milk-based whipped topping. Let the coconut cream chill overnight so it whips easily.
- Fruit Swaps: Swap out cherries for blueberries, raspberries, or a mixed berry blend for a twist. Try thinly sliced kiwi or mango for a tropical flair. Layer peaches or apricots in summer for a stone fruit celebration. For a wintery version, use cranberries stewed in orange juice and a touch of honey.
- Less Sweet: Reduce powdered sugar in the cream layer, or leave unsweetened if you prefer the tart cherries to shine. You can also use plain Greek yogurt blended with whipped coconut cream for a tangier, less-sweet filling.
- Individual Servings: Build in mason jars or cups for easily portable desserts perfect for picnics or parties. These mini trifles make pretty party favors and allow guests to take the treat home. For a stunning finish, top each with a whole cherry and sprig of mint.
- Nutty Crunch: Sprinkle toasted sliced almonds or crushed pistachios between layers for flavor and texture—especially good if you add almond extract to the cream.
Storage, Reheating, and Make-Ahead
- Storage: Cherries in the snow keeps covered in the fridge for up to 3 days. The cream layer sometimes loosens a bit but a quick stir brings it back. Store leftovers in an airtight container to prevent the dessert from absorbing fridge odors. If making in advance for a party, assemble in a container with a tight-fitting lid for easy transport and freshness.
- Make-Ahead: This dessert is better made the day before, giving layers time to meld and firm up. The cake drinks in some cherry juice and cream, enhancing flavor without becoming soggy.
- Freezing: Not recommended. The whipped cream and cream cheese layers tend to separate or weep when thawed, which affects texture. Freezing can also dull the fresh cherry flavor, and the cake becomes mushy.
- Reheating: Serve chilled, straight from the fridge. If you prefer a slightly softer cream, let it sit at room temp for 15–20 minutes before serving. Do not microwave. If transporting during warm weather, use an insulated bag with an ice pack to keep the cream stable and safe.
- Leftover Variations: If you have leftover cherries, use them to top pancakes, oatmeal, or swirl into yogurt for breakfast. Any extra cream mixture can be piped onto cupcakes or served alongside cookies for a bonus dessert bite.
Printable Cherries in the Snow Recipe Card
Cherries in the Snow
- Prep Time: 30 minutes
- Cook Time: 10 minutes (for homemade cherry compote)
- Total Time: 4 hours 40 minutes (includes chill)
- Yield: Serves 8-10
Ingredients
- 4 cups (320g) cubed angel food or pound cake
- 8 oz (225g) cream cheese, softened
- 1 cup (120g) powdered sugar
- 2 tsp (10ml) pure vanilla extract
- 1½ cups (360ml) heavy cream
- 2 cups (350g) pitted cherries (fresh, jarred, or thawed frozen)
- 2 tbsp (16g) cornstarch (if using fresh/frozen cherries)
- ⅓ cup (65g) granulated sugar (for cherry topping)
- 1 tbsp (15ml) lemon juice
Instructions
- Cube the cake and spread half into your serving dish. Trim browned edges if appearance matters for a neater layer.
- Beat cream cheese and powdered sugar until smooth. Add vanilla. Whip cream separately to soft peaks, then fold into the cheese mix. Chill the bowl for best results; scale up recipe for layered trifle bowls.
- For cherry compote: Combine cherries, sugar, cornstarch, and lemon juice in a saucepan. Cook and stir over medium heat until thick and glossy. Cool slightly. For even more flavor, stir in a splash of almond extract or use a pinch of ground cinnamon; cool until just warm for optimal layering.
- Layer: cake, half the cream, half the cherries. Repeat. Cover and chill at least 4 hours or overnight. Garnish with extra cherries, chocolate shavings, or toasted almonds just before serving if desired.
- Scoop and serve. Garnish with extra cherries if desired. For perfect presentation, use a large spoon or spatula and serve in clear dessert cups for single portions.
Nutrition (per serving, estimate): 300 calories, 17g fat, 35g carbs, 4g protein
Allergen notes: Contains dairy and gluten. For swaps, see the Variations section. Can be made nut-free depending on ingredient choices.
Retested and updated June 2024 for best results.
Final Thoughts: Make Cherries in the Snow Your Own
Cherries in the snow is the kind of nostalgic, comforting dessert I come back to every year. Whether you stick to the classic or put your own spin on the layers, it always brings a little brightness to the end of a meal. If you try this recipe or adapt it with your favorite fruits, leave a comment and share what you made! For more comforting desserts and kitchen-tested global recipes, learn more about Spice Thrive here. Happy cooking!
Cherries in the Snow FAQ
Can I use canned cherry pie filling?
Yes, you can! It’s a quick shortcut, but homemade cherry compote gives a fresher flavor and more control over sweetness.
How do I make this dessert ahead for a party?
Layer everything the day before and cover tightly with plastic wrap. Add fresh cherries or an extra swirl of compote just before serving for the prettiest look.
Can I make this gluten free?
Absolutely. Swap in your favorite gluten-free cake and double-check the cornstarch label.
What should the cake texture be like?
Cake should be soft but not soggy — firm enough to hold up under cream, but tender when you scoop it.
How long does cherries in the snow last in the fridge?
Up to 3 days, covered. The cream may loosen slightly, but the flavors get even better.
Can I use other fruits?
Definitely! Blueberries, strawberries, or a mix all work well. Adjust sugar if your fruit is extra sweet or sour.
This article was created with the help of AI. Images may also be AI-generated.

