
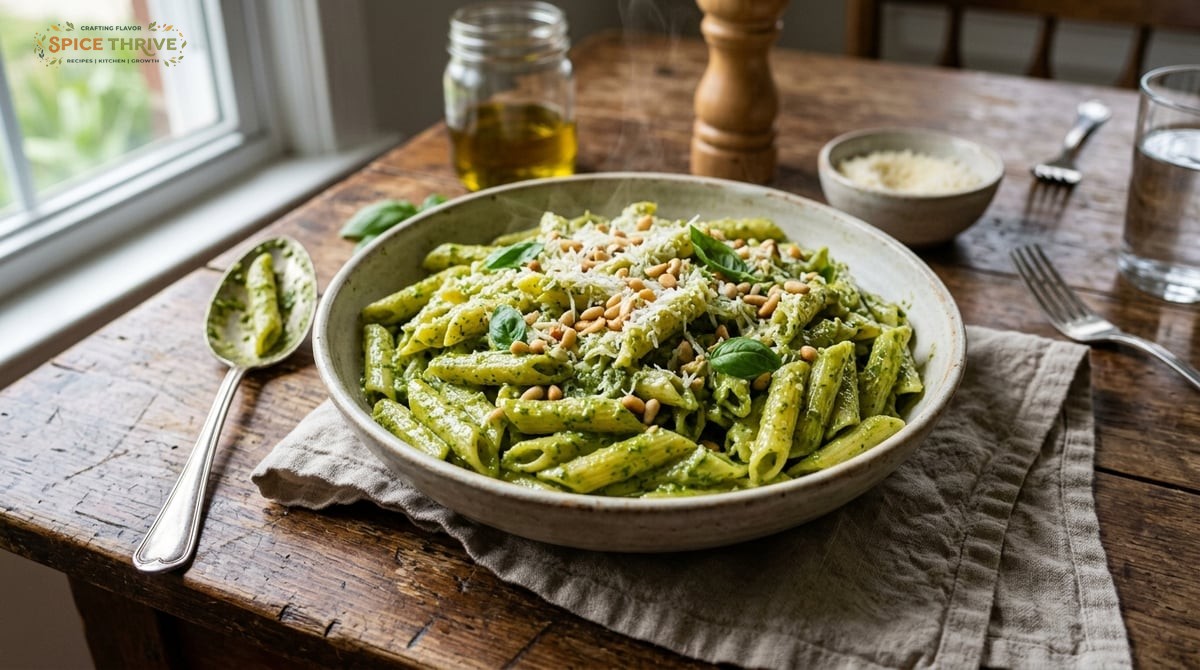
Homemade Costco Pesto Pasta: A Comforting Classic
If you’ve ever grabbed that big, vibrant tub of Kirkland pesto at Costco and wondered, “Can I make pasta as good as their food court or the classic deli sample?”—I’m with you. I first made this recipe on a slow Sunday, inspired by a craving for something both weeknight-easy and “treat yourself” delicious. Three tests later, I cracked the exact ratio of saucy, creamy, and herby flavors, using the real ingredient lineup you’d find at Costco.
What drew me to this recipe is how it brings sunlit summer basil into a molten, comforting pasta bowl—without fuss. My family’s hooked, and with every test I learned something new (including not to skimp on toasting those pine nuts). There’s something magical about how this pesto clings to every pasta spiral, the richness balancing the brightness of fresh lemon zest and the finishing sprinkle of cheese.
It’s a dish that satisfies the kid in you (think top-tier deli pasta salad) but feels elevated enough for a dinner guest, especially with a side of roasted vegetables or a quickly tossed salad. I’ll show you every step, from glossy pesto ribbons to chewy hot noodles, using the Kirkland pesto you already have at home. Let’s get started—this is one you’ll crave and share. Whether you’re making it for a cozy solo night or feeding a table of friends, you’ll find it’s the kind of meal that invites seconds (and sometimes, thirds).
Why This Costco Pesto Pasta Recipe Works
- Restaurant flavor, ready fast: This method pairs fresh basil-forward Costco pesto with just the right creaminess, closely matching the best deli counter versions, but without requiring any specialty cooking skills or fancy tools. By balancing out the robust flavor of the pesto with neutral, starchy pasta and a hint of cream, you mimic the texture and silkiness of restaurant sauces at home.
- Tested for texture: I adjusted pasta water, cream, and pesto until the sauce clung perfectly but didn’t drown the pasta. No oily puddles, just silky, full-bodied flavor in every bite. During recipe tests, I observed how the sauce texture changes as it cools—my best batches still held that glossy, creamy look even 15 minutes after plating, proving the ratios work whether you serve immediately or let the pasta rest briefly.
- Kid- and crowd-pleaser: My young taste testers loved this at the table, and leftovers were devoured cold from the fridge (the true measure in my family!). Testers of different ages noted the dish’s gentle garlic, herby notes, and satisfying texture. Even for those who are sometimes pesto-wary, the mellow richness converted skeptics, especially with extra pine nuts on top.
- Flexible and forgiving: Missed a step? Overcooked the pasta? No worries—this pesto pasta bounces back with a little hot water and a dash more pesto. Tips for every skill level below. Whether your pasta’s on the softer side or you want it al dente, this technique keeps the dish forgiving at every stage—simply adjust with your reserved water and taste again before serving.
- Big flavor, minimal work: With Costco pesto as your flavor base, even a Monday dinner can shine. The sauce comes together in minutes while your pasta cooks. You don’t need to prep a long list of herbs or hand-crush garlic—the hard work is already done by the pesto tub, letting you have dinner on the table in under half an hour, with very little cleanup.
Ingredients & Easy Swaps
- Short pasta (400g, about 4 cups dry): Fusilli, penne, or farfalle grab the pesto well, with their ridges and twists locking in the flavorful sauce. Fusilli holds creamy sauce in its spirals, while penne’s tubes offer a bite and great chew. If gluten free, use chickpea or brown rice pasta—each brings a slightly different texture (chickpea is denser and packs extra protein, brown rice is lighter but holds sauce well).
- Costco Kirkland Basil Pesto (120g, about 1/2 cup): Star of the show! Bright, herby, cheesy. The Costco pesto is notably chunkier and richer than many jarred brands—expect visible bits of basil and pine nut. Homemade pesto works if you have it, especially if you want to control salt or dairy. For nut allergies, try a nut free pesto (jarred or homemade) made from seeds or beans like pumpkin or edamame.
- Heavy cream (60ml, 1/4 cup): Adds a lush, silky feel—think Alfredo meets pesto. For dairy free, use cashew cream (blend soaked cashews and water) or full fat coconut milk (just a splash—taste as you go). Cashew cream provides thickness without a strong flavor; coconut milk lends a subtle sweetness.
- Grated Parmesan (40g, about 1/2 cup): For a deeper umami, aged Pecorino works, and Parmigiano-Reggiano is always a winner. Vegan? Sub nutritional yeast for a similar nutty note or a plant parmesan for saltiness and texture.
- Toasted pine nuts (30g, about 1/4 cup): Adds crunch and buttery richness. Swap with toasted walnuts for a heartier, slightly earthy crunch, or omit if nut-free. Sliced almonds (lightly toasted) also work in a pinch.
- Lemon zest (from 1/2 lemon): Brightens everything and cuts the richness. Organic lemons are preferred, as you’re using the zest. A dash of lemon juice as well as zest makes it pop even more, especially for cold leftovers.
- Reserved pasta water (start with 120ml, 1/2 cup): The secret sauce-maker, helps everything cling together. Don’t skip—even when using gluten free pasta, the starchy water brings the sauce together.
- Salt and cracked pepper: For finishing and depth. Taste before salting heavily, as pesto and cheese both pack salty punch.
See my notes below for ingredient swaps that keep the texture just right even if you’re out of pine nuts or want it fully plant based. Frozen basil cubes or pre-spiralized zucchini also make creative substitutions if you want to experiment and aren’t strictly following tradition.
Step-by-Step: From Pasta Pot to Creamy Pesto Bowl
- Salt your water well (think broth-level salty) and bring a large pot to a rolling boil. Add your pasta shape. Stir occasionally. Taste 1–2 minutes before the box says it’s done—you want chewy, not mushy. For extra flavor, you can toss in a garlic clove or bay leaf as the water boils, though this is optional. Stir the pasta often so it doesn’t stick and cooks evenly.
- Meanwhile, toast the pine nuts in a dry skillet over medium heat, shaking the pan every 30 seconds. They’ll go from pale to golden-buttery in about 3 minutes. Watch closely—they love to burn at the end. I ruined my first batch. Remove them as soon as most are golden. It’s worth the patience: properly toasted pine nuts are aromatic and provide a deeply nutty flavor that elevates each bite. Cool slightly before adding to the pasta so they stay crisp.
- Set aside about 1/2 cup (120ml) of pasta water. Drain your pasta, but never rinse it—starch helps the sauce coat every noodle. If your kitchen is chilly or you’re serving later, briefly reserve the pasta in the pot with a lid to keep it warm. Pasta water is crucial—it loosens thick pesto and cream for that flowing, restaurant-style texture, and revives the sauce if it thickens while plating.
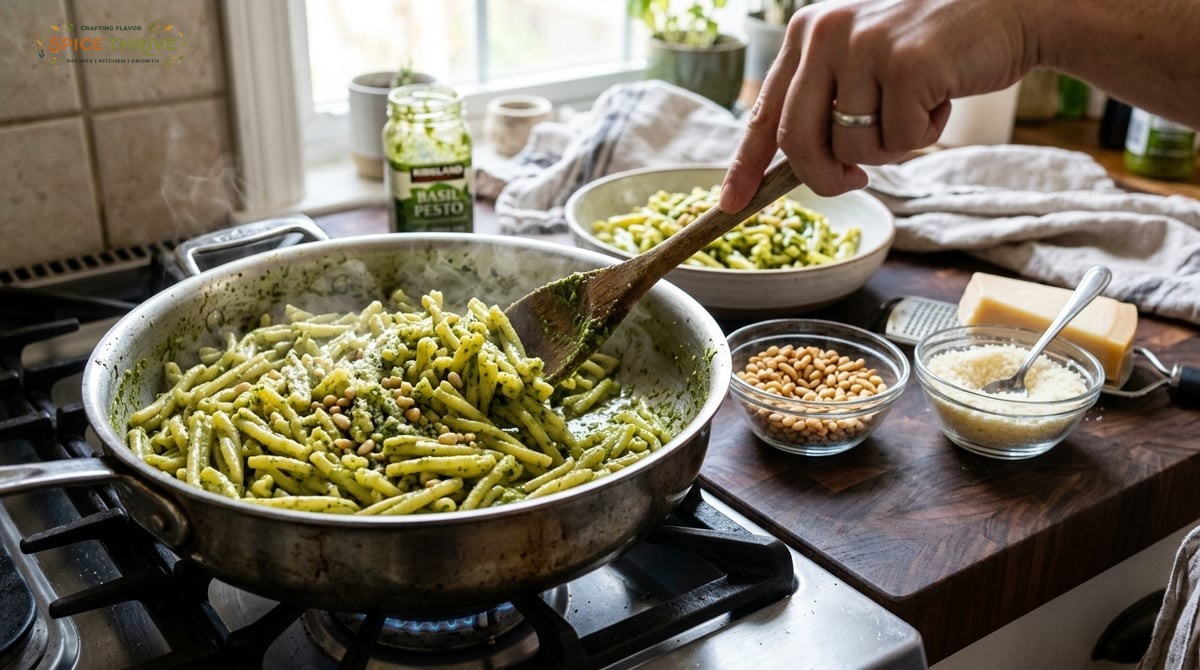
- In the hot pot, stir together pesto, cream, and 1/4 cup pasta water. The mixture should look glossy and just loose enough to coat—like heavy cream in texture. Add the drained pasta and toss. Add more water splash by splash as needed, until the sauce hugs every curve and spiral. This technique lets the sauce cling rather than pool at the bottom, helping every noodle absorb maximum flavor. If making a double batch or using whole wheat pasta, you might need an extra splash or two of reserved water.
- Add parmesan, half the pine nuts, and lemon zest. Toss again. Taste. Add salt or more pesto if bolder flavor is needed, plus black pepper to finish. Tasting at this stage is key—parmesan and pesto saltiness varies widely. If you want a little extra zing, squeeze in a few drops of lemon juice or grate in more zest.
- Spoon into wide bowls. Scatter remaining pine nuts and extra cheese on top. Eat immediately, while it’s steamy and lush. For a fun twist, top with halved cherry tomatoes or torn basil leaves before serving. Extra virgin olive oil drizzled at the end creates a glossy finish and a richer mouthfeel. If prepping ahead, reserve some garnish to freshen up bowls after reheating.
Pro Tips From Recipe Testing: What Went Wrong and How I Fixed It
- Don’t overcook the pasta: My first test went soft and gluey—watch that last minute. When in doubt, undercook by a minute, then finish in sauce for best bite. Pasta continues to cook in the hot sauce, so err on the side of al dente for ideal results. If using a gluten free pasta, check often, as it can go from firm to mushy much faster than wheat varieties.
- Emulsify, don’t fry: If you dump pesto into screaming hot oil, you’ll lose freshness and get a greasy puddle. Toss pesto, cream, and water off heat for maximum aroma and that clinging, saucy gloss. I found waiting a minute after draining pasta before combining helps retain that vivid green color and prevents separation.
- Save your pasta water: It’s liquid gold for adjusting the sauce. If the sauce thickens up before serving, a warm splash revives everything. For leftovers, always add a bit before reheating—this restores the sauce to its just-cooked consistency, making even next-day portions creamy and fresh tasting.
- Layer your garnishes: Adding lemon zest and half the pine nuts in the toss, then finishing with fresh cheese and more nuts, makes the dish taste multi-dimensional instead of flat. The contrast of warm, melty cheese and cool zest just before serving is a small detail that delivers big flavor.
- Taste and adapt: Kirkland pesto batches do vary in salt and garlic. Taste before final seasoning—one batch was nearly perfect, another needed extra lemon and cheese. Don’t hesitate to adjust for your family’s preferences, increasing lemon zest, pepper, or nuts as you go. Over several tests, I found this pasta is endlessly tweakable and recovers well from minor mistakes.
Dietary Swaps and Creative Variations
- Gluten free: Use your favorite gluten-free pasta (I had good luck with Barilla’s chickpea rotini). Don’t skip the pasta water—its starch is especially crucial for GF sauces. For best texture, cook GF pasta just barely al dente and let it finish in the sauce (if overcooked, it can fall apart during mixing). Corn-based fusilli is another favorite for a lighter taste.
- Dairy free/vegan: Sub coconut cream or cashew cream for the heavy cream and a plant-based parmesan/nutritional yeast. Try a store-bought vegan pesto if you can’t find a nut-free, dairy-free Kirkland style. You can also stir in a handful of fresh baby spinach or arugula at the end for extra color and brightness. For a nut free take, sunflower seed-based pesto pairs surprisingly well with the same creamy technique.
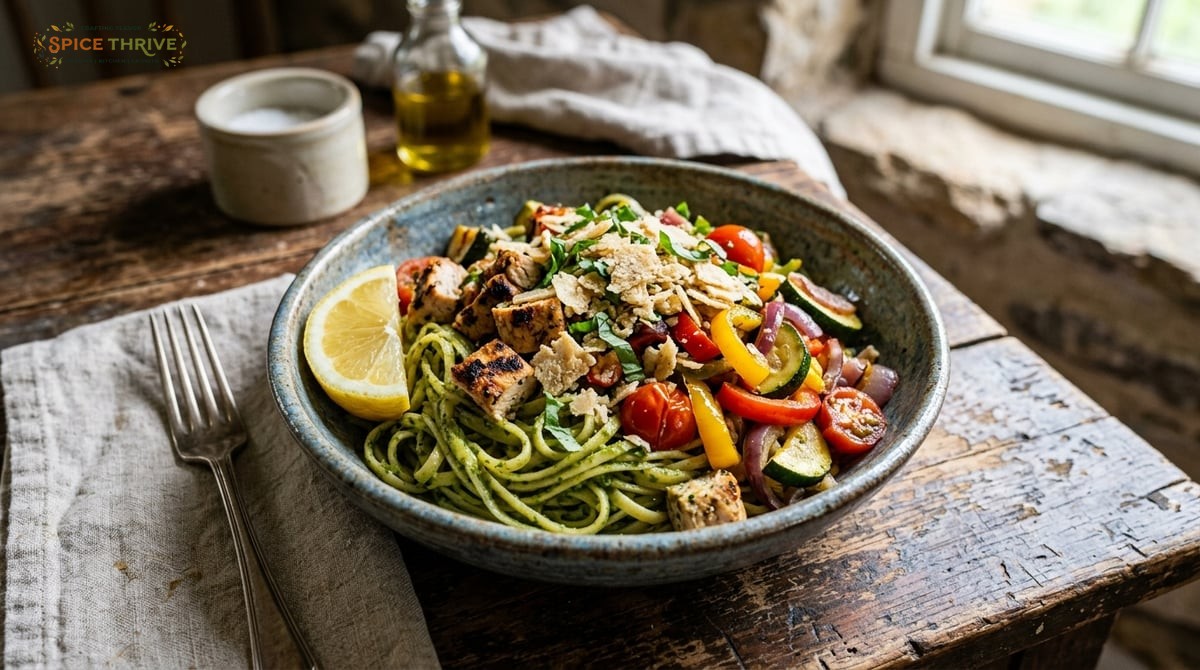
- Add-ins: Grilled chicken, roasted vegetables (zucchini, spinach, tomatoes), or frozen peas create a more complete meal. Stir them in with the pasta. Shredded rotisserie chicken, microwaved broccoli florets, or slow-roasted cherry tomatoes can each turn the dish into a full meal that’s weeknight-fast but vibrant and satisfying. Even sautéed mushrooms or roasted peppers work beautifully as mix-ins.
- Make it spicy: Add a pinch of red pepper flakes as you toss, or serve at the table. If you enjoy heat, stir a spoon of Calabrian chili paste into your pesto before mixing with the pasta—this brings an Italian deli kick everyone will crowd around.
- Zestier finish: Go big on lemon or a splash of balsamic for extra tang. A few capers, chopped, can lend briny zip to bite through the creaminess if you’re feeling adventurous.
Mix and match what you have on hand. This pasta loves a little creativity. Its adaptability makes it a healthy, easy base—perfect for utilizing leftover roasted veggies, extra greens, or even last night’s protein for a totally new meal. Don’t be afraid to riff; this recipe thrives on personalization and encourages you to tweak based on whatever’s in the fridge.
Smart Storage, Reheating, and Make Ahead Tips
- Storing: Cool completely, then store in an airtight container in the fridge up to 3 days. The sauce thickens, but a splash of water or cream loosens it back up when reheating. For best results, store pasta and extra garnishes separately, adding cheese, nuts, and fresh zest just before reheating or serving to keep contrast in flavor and texture.
- Reheating: Warm gently in a nonstick pan over low heat with a small splash of water or cream, stirring, until just heated through. Microwave works for single servings, too—cover to keep moisture in. Stir halfway through reheating so the sauce distributes evenly and doesn’t dry around the edges. For microwave, start with 30-second increments and check texture between rounds.
- Freezing: Not ideal (pesto can turn dark and lose punch), but leftovers can be frozen in a pinch, tightly wrapped for up to 1 month. Thaw overnight in the fridge before reheating. If freezing, skip garnishes (cheese, nuts) and add them after reheating for fresher taste and texture. Soupy sauce is normal after freezing—just stir vigorously and add a dash of fresh lemon or cream to revive.
- Make ahead: You can cook and sauce the pasta ahead, spread it out on a tray to cool, and then reheat just before serving—great for parties or meal prep. If prepping for a gathering, keep some extra pesto on hand to stir in after reheating, which refreshes color and flavor. Pasta actually absorbs flavor as it sits, so the taste can grow even richer by day two!
I tested storing both tossed and untossed pasta: sauce-to-order gives the freshest results, but fully tossed holds up pretty well, especially with added lemon and cheese when reheating. Serving it at room temperature also works for picnics or lunchboxes—just bring a little olive oil or lemon to loosen the pasta if needed when ready to eat.
Recipe Card: Costco Pesto Pasta (Printable)
Prep time: 10 minutes
Cook time: 15 minutes
Total time: 25 minutes
Yield: 4 hearty servings
- 400g (4 cups) short pasta (fusilli, penne, farfalle or GF)
- 120g (1/2 cup) Costco Kirkland basil pesto
- 60ml (1/4 cup) heavy cream (or coconut/cashew cream for dairy free)
- 40g (1/2 cup) Parmesan, grated (or vegan sub)
- 30g (1/4 cup) pine nuts, toasted (or omit/swap)
- Zest of 1/2 lemon
- Salt and pepper, to taste
- Bring a large pot of salted water to boil. Cook pasta until al dente, stirring a few times. Reserve 1/2 cup (120ml) pasta water and drain. Use a timer to help prevent overcooking if you’re distracted, as timing is key for a perfect bite.
- While pasta cooks, toast pine nuts in a dry skillet. Remove as soon as golden and fragrant. Cool pine nuts on a plate in a single layer for maximum crunch and store extra in a jar for salad toppers later in the week.
- In the hot pot (off heat), stir together pesto, cream, and 1/4 cup pasta water. Add drained pasta, tossing to coat. Add more water if needed for a creamy sauce. If your sauce looks too thin, just let the pasta sit, uncovered, for 1–2 minutes; it will thicken up as it absorbs liquid and cools.
- Add parmesan, half the pine nuts, lemon zest, and toss. Taste and add salt, pepper, or more pesto if needed. Feel free to adjust according to batch saltiness and your preference for tanginess or richness. Don’t forget the final black pepper for an aromatic punch.
- Spoon into wide bowls. Top with extra nuts and cheese. Serve hot, or room temp for picnic fare. For added presentation and a pop of color, scatter small fresh basil leaves or halved cherry tomatoes over each bowl. A drizzle of olive oil can also add gloss and body to the surface, enhancing mouthfeel.
Nutrition estimate (per serving): 550 kcal, 18g protein, 23g fat, 55g carbs.
Allergen notes: Contains tree nuts, dairy, wheat/gluten (unless GF/dairy free swaps used). To further customize, see variations above for nut free/vegan/GF options.
Ready to Try This Costco Pesto Pasta? Let Me Know How It Goes!
I’d love to hear if you make this Costco pesto pasta at home—drop a comment with your tweaks, tips, or photos! Cooking should be joyful and approachable, not fussy. If you try one of the variations (vegan, GF, spicy, extra lemony), let your fellow home cooks know how it turned out.
Hungry for more weeknight wins? Browse my easy vegetarian pasta roundup or explore Asian noodle recipes for more quick flavor boosts.
This dish has become a standby at our house—quick enough for busy evenings, yet fancy enough for when you need to impress (or just treat yourself). Whether you make the classic version or riff with all sorts of add-ins, I promise it’ll hit the spot. Your feedback on sauce thickness, flavor tweaks, and creative adaptions helps this recipe evolve. Share your pictures or modifications and inspire others to enjoy every bite.
— Jamie from Spice Thrive (about me)
Last updated: June 2024. Recipe and photos retested after reader feedback on sauce thickness—use pasta water generously!
Costco Pesto Pasta FAQ
How do I keep pesto pasta from turning oily or clumpy?
Always toss pesto with hot pasta and a splash of pasta water off the heat. This creates an emulsion, keeping it creamy and coating the pasta. Adding cold pesto to hot pasta or overheating pesto causes oil to separate.
Can I use a different store-bought pesto if I run out of Costco’s?
Yes, most refrigerated pesto will work, though flavors and saltiness will vary. Taste and adjust. Shelf-stable jarred pesto is usually more intense—use a tablespoon less then add more to taste.
Is this dish nut free or gluten free?
The original Kirkland pesto contains pine nuts (tree nuts) and most pasta contains wheat. For nut-free, use a suitable pesto alternative. For gluten free, use GF pasta and check your pesto label.
How long does this pasta last in the fridge?
Kept in an airtight container, pesto pasta stays good for up to 3 days. The sauce will thicken, so reheat gently with a splash of water or cream to restore its texture.
Can I serve this pasta cold?
Absolutely! It makes a fantastic cold pasta salad—just add a bit more lemon, extra veggies, and an extra swirl of olive oil right before serving.
Can I double the recipe for a party?
Yes, easily. Boil pasta in batches if needed and toss with sauce just before serving. Warm in a large pot with a splash of pasta water so it stays creamy.
This article was created with the help of AI. Images may also be AI-generated.

