

A Family Ritual: My Connection to Shell Steak Roast
Shell steak roast brings back lively memories from my family kitchen. My dad was the first to introduce me to this special cut—on weekend afternoons, he’d let the meat sit at room temperature while prepping a simple garlic-herb rub. The ritual was always the same: Dad would pat the beef dry, sprinkle his favorite spices, and let the aroma of rosemary and garlic hang in the air. He’d show me how to test the oven and the feel of a perfectly seared crust. I’ve cooked this shell steak roast five times for everything from Sunday family dinners to neighbor potlucks; the first time, I overcooked it (rookie mistake!), but after a few tweaks, it consistently comes out juicy, deeply savory, and beautifully rosy inside. My siblings always request it for birthdays, and I love how everyone gathers to watch the slicing, oohing at the pink center. There’s something about presenting a platter of glistening, herby steak, sliced just right, that genuinely feels like a moment to celebrate. Now, cooking shell steak roast feels like a celebration—one that fills the kitchen with irresistible aromas and always gets rave reviews around the table. This recipe below is exactly how I make it now, with each step and tip learned from my own kitchen experience. Even my dad admits the tweaks make this roast even better than he remembers!
Why This Shell Steak Roast Recipe Works
- Tested and Tweaked to Perfection: I roasted shell steak five times to find the right oven temp, resting time, and seasoning for juicy, tender slices every time. For example, roasting at a low 250°F (120°C) prevents overcooking and helps the beef’s natural juices stay locked in. I experimented with both higher and lower temps; the slow-roast method delivered the best tenderness, and keeping the roast covered for resting ensured every bite was moist.
- Easy for Home Cooks: No fancy equipment. You likely have everything on hand already—just a sheet pan, meat thermometer, and basic pantry spices. Even if you don’t have a wire rack, you can improvise by resting the steak on halved onions or carrots on the pan, which adds natural flavor and allows air to circulate underneath for even cooking.
- Customizable: This base recipe works with all sorts of seasoning blends, from classic garlic-herb to Asian-style soy and ginger. Swaps and changes are easy. For example, I’ve tried crusting the outside with ground coriander and cumin for a Middle Eastern touch, or finishing with a squeeze of lemon and fresh parsley for a Mediterranean vibe. The technique makes it easy to mix up your seasonings depending on your menu or taste.
- Perfect for Gatherings: Shell steak roast feels restaurant-fancy but is low-stress: the process is hands-off after the sear, and the aroma brings everyone to the kitchen. At my last dinner party, this roast became the showpiece—while it slow-roasted, I could prepare sides and chat with guests, confident everything would finish together.
- Delivers Sensory Appeal: Expect a crackly outer crust, juicy pink middle, and irresistible garlic-herb aroma filling your kitchen as it roasts. The sound of sizzling during the sear and the sight of beads of juice glistening on each slice make this roast a true treat for all the senses.
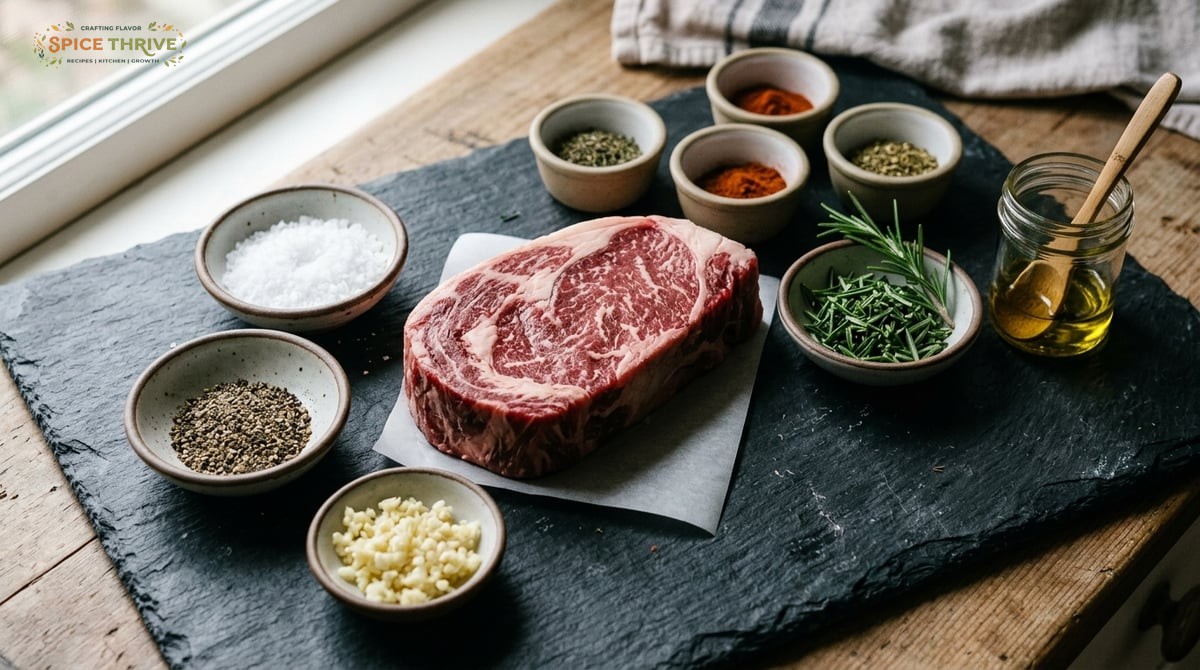
Ingredients for Shell Steak Roast (with Substitutions)
Main Ingredients:
- Shell steak roast (2–2.5 lb / 900–1130 g): For 4–6 servings. This cut is also called striploin roast or boneless strip steak; look for good marbling. If you can, ask your butcher to trim excess fat and tie the roast for a tidier presentation and even cooking. When shopping, pick a piece with lots of white streaks (intramuscular fat), as that melts during roasting and yields incredible succulence.
- Kosher salt (1 1/2 tbsp / 27 g): Helps flavor the beef and draw out moisture for a beautiful crust. You can use sea salt if preferred. Coarse salt works best—it adheres well to the meat’s surface and helps create that sought-after savory crust.
- Freshly ground black pepper (2 tsp / 4 g): Adds bite and aroma. Grinding fresh just before applying releases more flavor oils versus pre-ground pepper.
- Fresh garlic (4 large cloves, minced): For depth and fragrance. Sub 1 1/2 tsp garlic powder if fresh isn’t available. Rubbing minced garlic directly onto the roast gives both flavor and beautiful caramelized bits on the exterior after roasting.
- Fresh rosemary (2 tbsp chopped / 4 g): Brings brightness and warmth. Thyme or parsley work great too. Feel free to use a combination—rosemary and thyme are an especially aromatic duo that complement beef.
- Olive oil (3 tbsp / 45 ml): For coating the meat and helping seasonings stick. Can sub avocado oil or neutral vegetable oil. A richer extra-virgin olive oil will lend a subtle, fruity finish to your roast.
Optional Add-ins:
- Smoked paprika (1/2 tsp / 1.5 g) for an extra roasty flavor. Smoked paprika also gives a subtle red hue to the crust—especially pretty for presentation.
- Dried thyme (1/2 tsp / 1 g) for earthiness. Mix into your rub if you love more herbal punch.
- Soy sauce (1 tbsp / 15 ml) for a touch of umami—especially if leaning Asian-inspired. It helps caramelize the crust and deepens the beef flavor without overt saltiness.
Other possible additions: For extra depth, add 1 tbsp Worcestershire sauce to the rub, or scatter cracked black peppercorns on top before roasting for an added textural pop. Feel free to mix and match—this roast is built for flexibility.
Allergen notes: This recipe is gluten free and dairy free as written. Double-check any optional sauces for hidden ingredients if you’re serving guests with food allergies.
Step-by-Step: How to Roast Shell Steak Like a Pro
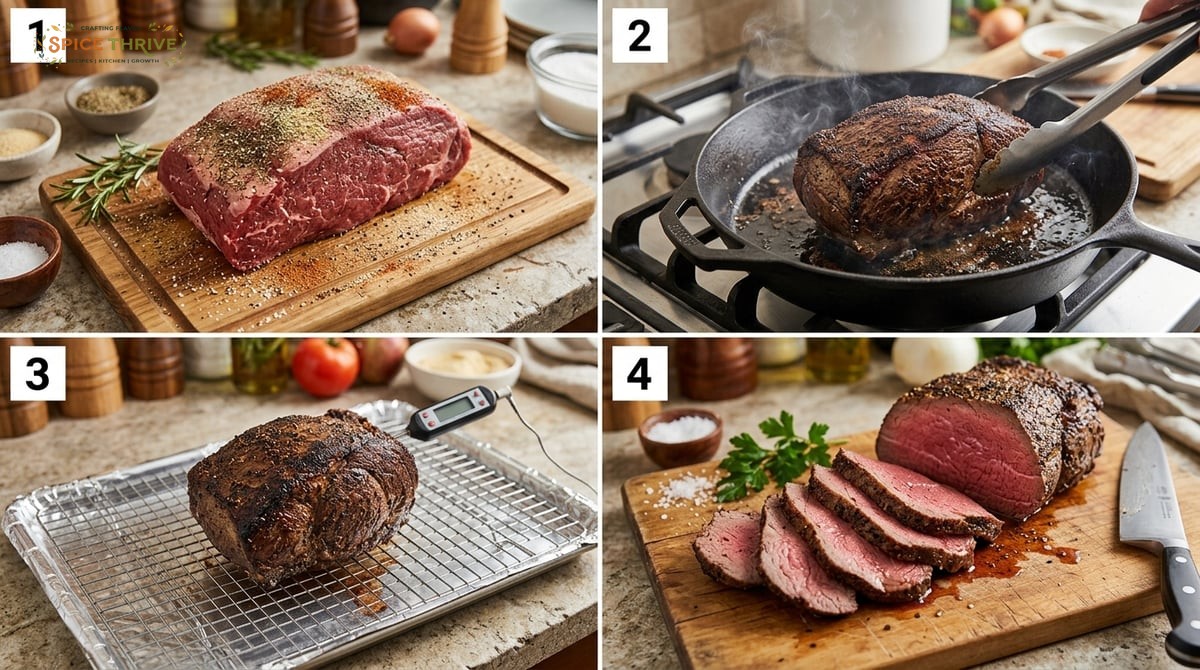
- Bring to Room Temperature: Let the steak sit out for 30–45 minutes so it cooks evenly. Pat dry with paper towels for a better crust. This step is crucial—cold meat straight from the fridge can lead to a tough, unevenly cooked roast. Letting it temper also lets salt and seasonings penetrate deeper for fuller flavor.
- Season Generously: Rub the steak with olive oil. Mix salt, pepper, minced garlic, and rosemary, then massage this blend all over the meat. Get every nook and cranny coated. Be thorough with your hands—the more evenly seasoned, the more consistent the taste. For even deeper flavor, you can let the seasoned roast sit uncovered (or loosely covered) in the fridge for several hours or overnight. This “dry brining” method not only boosts flavor, it dries the surface, which helps the crust form quickly during searing.
- Preheat and Sear: Heat your oven to 250°F (120°C). While it heats, sear the steak in a heavy pan (cast iron is best) over medium-high with a splash of oil—about 2 minutes a side until deep golden brown. It should sizzle and get a crisp edge. Searing locks in juices and builds layers of flavor from caramelization (the Maillard reaction). Pay special attention to the short ends—if you like, use tongs to stand the roast briefly on those sides to brown all surfaces. Don’t skip this step! Searing is the secret to that irresistible, steakhouse-quality crust.
- Roast Slowly: Place steak on a wire rack set over a rimmed baking sheet. Bake until a thermometer in the thickest part reads 125°F (52°C) for rare, 135°F (57°C) for medium rare—usually 30 to 50 minutes, depending on roast size. If your piece is thin, check temp early to avoid overcooking. For best accuracy, insert your thermometer horizontally from the side so it’s centered in the thickest section. If roasting vegetables alongside, toss them with oil and spread around (not under) the rack to catch drippings and absorb flavors.
- Rest and Slice: Tent loosely with foil. Let rest 10–15 minutes before slicing. Juice will redistribute, keeping every bite moist and pink. Slice against the grain into 1/2-inch-thick pieces for maximum tenderness. Gather the family to admire the color gradient before serving—revealing the rosy center is always a crowd-pleaser.
How to Recognize Doneness: The crust turns deep brown and the kitchen fills with savory, roasted aromas. When you slice, the center should be rosy and juicy, not gray or dry. If in doubt, err on the side of undercooking—steak can be briefly returned to the oven. Remember: you can cook more, but you can’t uncook!
Pro Tips from My Kitchen: What I Learned (and Fixed)
- First Test: I overcooked and didn’t rest the meat—result: chewy slices. Now, I pull it 5 degrees lower than target temp (carryover heat matters!) and always rest. I learned this by comparing slices side by side: rested slices remained juicy and had that luscious pink band throughout; the unrested ones shed their juices and looked gray at the edge.
- Salt Early: Salt the beef at least 30 minutes ahead. This draws out surface moisture, helping seasonings stick and forming a better crust in the oven. If you have time, salting hours ahead or overnight (dry brining) works wonders; the meat absorbs seasoning more deeply, and the exterior roasts up even more crisp.
- Use a Wire Rack: Elevating the steak ensures even heat circulation and browning. Direct-on-pan gives uneven roasting. If you don’t own a wire rack, resting the steak on thickly sliced onions or carrots is a brilliant trick—they both elevate the meat and add aromatic flavor to the drippings.
- Don’t Rush the Sear: Sear until the crust is deeply golden and smells nutty. If rushed, the outside stays pale and flavor is lost. It’s tempting to flip early, but a proper sear makes a world of difference. Moving the piece with tongs—carefully pressing it down into the hot pan—makes sure all surfaces brown evenly, and the meat doesn’t stick.
- Let the Roast Rest: Tent with foil and wait at least 10 minutes for juices to settle back into the meat—it makes the difference between juicy and dry. Try cutting a slice too early, and you’ll see pink juices puddle out onto the board. Waiting ensures every serving is tender and flavorful.
Each of these tweaks transformed my roast from “fine” to truly memorable. For example, when I started salting the beef ahead, the difference in flavor depth and crust was immediately noticeable. If you’re new to roasting beef, trust your thermometer and enjoy the aroma. The change in texture and juice after resting is jaw-dropping every time. And don’t toss the pan juices! They’re liquid gold—drizzle over slices or whisk into a quick pan sauce for extra impact.
Flavor Variations and Dietary Swaps
- Asian-Inspired: Swap rosemary for chopped scallions and minced ginger, sub 1 tbsp soy sauce for half the olive oil, and add a drizzle of toasted sesame oil after roasting. You can also sprinkle with toasted sesame seeds and serve alongside pickled cucumber salad for a full themed meal.
- French-Style: Use thyme and a pat of butter (or vegan butter) to baste during searing. Add a few crushed juniper berries for a unique twist. Finish with a splash of dry white wine into the pan after roasting for a quick jus, and scatter fresh parsley atop for restaurant flair.
- Spicy Take: Rub with smoked paprika and chili flakes before roasting. Serve with a chimichurri or roasted pepper sauce to highlight the heat. I’ve added a touch of cayenne and it wakes up the flavor without overpowering the beef.
- Vegetarian Option: Try the seasoning on thick portobello mushrooms or cauliflower slices, roasted as described. Same great flavors, no beef. Mushrooms deliver a meaty bite especially when roasted at high heat; cauliflower caramelizes and soaks up those savory spices equally well.
- Dairy Free/Gluten Free: Recipe is naturally free from dairy and gluten (double-check soy sauce if using, as some brands contain wheat). For guests with allergies, swapping in coconut aminos (soy-free) is a tasty, safe bet for the umami note.
This roast can wear many hats—don’t be afraid to play! When I hosted a “build your own roast” dinner, guests loved testing both classic and Asian-inspired rubs side by side. If you try a swap, share your twist in the comments or tag Spice Thrive on socials. I love seeing your creations! And if you invent a new flavor combo that works, let me know so I can try it, too.
How to Store, Reheat, and Prep Ahead
- Store: Cool roasted steak, wrap tightly, and refrigerate up to 4 days. Best texture is within 2 days—after that, the meat may dry. I recommend storing in an airtight container or tightly wrapped in foil to retain maximum moisture and prevent any fridge odors from tainting the meat.
- Reheat: Slice only what you’ll serve. Warm gently, covered, in a 275°F (135°C) oven or in a skillet with a splash of broth to keep it juicy. Microwaving can toughen steak, so low, slow heat is best. For sandwiches or salads, serve cold or at room temperature to preserve texture.
- Freeze: Slice, wrap portions tightly in plastic and foil, and freeze up to 3 months. Thaw overnight in the fridge before reheating. Flash-freezing slices on a parchment-lined tray before packing prevents sticking and makes grabbing single servings easy later on.
- Make Ahead: Can season and sear the steak up to 1 day before roasting. Store seasoned, seared meat wrapped in the fridge; finish in the oven before serving. Doing this in advance is ideal for dinner parties or holidays—getting the work done ahead lets you enjoy more time with guests and ensures perfectly timed roast beef.
Pro move: Reserve pan juices and drizzle over sliced leftovers for even more flavor! If you’re storing juices, skim fat once chilled and whisk the juices into a vinaigrette or quick gravy for another meal. Leftovers make stellar steak sandwiches, wraps, or can be tossed with roasted veggies and grains for an easy lunch the next day.
Ready to Roast? Share Your Shell Steak Results!
If you try this tested shell steak roast recipe, I want to see your results—snaps, swaps, and all. Drop a comment below or tag Spice Thrive on social. Restaurant-worthy roast at home is totally doable with the right steps, and every cook tweaks a classic. Your feedback helps me keep refining and retesting, so don’t be shy! Happy roasting!
— Jess, Spice Thrive (about me)
Common Questions About Shell Steak Roast
What is shell steak?
Shell steak, also called strip steak or New York strip roast, comes from the short loin of the cow and is known for its rich, beefy flavor and moderate marbling. Unlike ribeye, it’s usually leaner with a firm bite. When roasted, the even marbling makes it juicy but not overly fatty.
Can I use this recipe for other cuts?
Yes! The seasoning and slow roast technique work with ribeye roast, top sirloin, or even tri-tip. Adjust oven timing for thicker or thinner cuts. Keep a close eye on doneness with a thermometer, as some cuts (like ribeye) have more fat and may cook more quickly or taste best at a slightly lower final temperature.
How do I tell when it’s done without a thermometer?
Gently press the roast: rare feels soft, medium springs back, and well-done is firm. For accuracy, a meat thermometer is highly recommended. If you don’t have one, make a small V-shaped cut in the thickest part and peek at the center color. Be sure to let the meat rest—the color will deepen while it sits.
Is this recipe gluten free or dairy free?
Yes, as written. To keep it gluten free with soy sauce, use a certified gluten free brand or tamari. No dairy involved unless basting with butter. Always read labels for seasoning blends or prepared sauces if allergies are a concern.
How do I prevent my roast from drying out?
Don’t overcook, and always rest the meat after roasting. Slicing against the grain also helps keep slices juicy. For even more moisture, use pan drippings or a splash of broth when reheating, and wrap sliced leftovers tightly before storing.
Can I cook this on the grill instead of the oven?
Absolutely! Sear over direct heat, then move to a cooler side to finish, covered, until it reaches your desired doneness. Use a meat thermometer to check accuracy, and tent with foil to rest after grilling. The smoky flavor from the grill pairs wonderfully with classic garlic-herb blends.
This article was created with the help of AI. Images may also be AI-generated.

