
A Memory in Every Crust: Why I Swear by This Crisco Pie Crust Recipe
Some recipes are a bridge to the past, and this Crisco pie crust is one of them for me. Growing up, my grandmother baked every holiday pie with a swirl of Crisco and gentle hands. She taught me to listen for the rustle of pastry as it comes together, and to trust my fingers, not just the recipe card. Over years of baking (and plenty of imperfect pies), I’ve tested and tweaked this recipe at least a dozen times in my own kitchen. My first attempts were crumbly or tough, but with practice—and a lot of family taste tests—I found the balance for a crust that’s actually easy and forgiving, with a golden color and rich, flaky texture. Here’s the full walk-through, photos included, so you can bring a little kitchen comfort to your own table.
What always strikes me about this recipe is how it’s more than a sum of its parts. I remember the sound—the gentle snap when a perfectly baked edge breaks off, the subtle hiss as the rolling pin presses into chilled dough, and the laugh of my grandmother when I accidentally rolled a circle that looked nothing like a circle. That’s the secret joy of home baking: every crust tells a story, sometimes of triumph, sometimes of small disasters that become inside jokes. Pie days in my family meant counters dusted with flour, everyone jockeying for dibs on leftover scraps (which Grammy fried up in a skillet with a sprinkle of cinnamon sugar: frugal magic!). There’s a reason so many of us return, again and again, to these reliable classics. I hope you find your own stories—new or echoing the past—in the folds and flakes of each homemade crust you roll out.
Why This Crisco Pie Crust Recipe Works (and Why You’ll Love It)
1. Flaky, reliable texture every time: Crisco (vegetable shortening) doesn’t melt as quickly as butter, so it’s easier for home bakers to get that signature flake, even if your kitchen’s a bit warm. The dough is less likely to grow tough from overhandling, and the distinct layers you see when you cut through a slice of baked pie—that’s the hallmark of Crisco’s effect.
2. Simple ingredients, endless uses: Just flour, salt, Crisco, and water—plus options for flavor boosts. This pie crust is your base for everything, from fruit pies to pot pies. I’ve used it for apple pies at Thanksgiving, savory quiches for brunch, and even rustic galettes with late-summer berries. A good crust means you can improvise endlessly—fold it around leftover stew or bake up hand pies as lunchbox treats.
3. No fancy equipment required: All you need is a bowl, fork (or pastry blender), rolling pin, and your own two hands. Unlike food processor crusts (which risk overmixing in a flash), this method is tactile and approachable, letting you adjust as you go. It’s ideal for beginners, kids learning to bake, or anyone who wants to bake without extra fuss.
4. Easy to fix if you mess up: Too dry? Add a splash more water. Too sticky? Dust with flour. This recipe forgives, and I’ll share exactly what to look for at each step. As you shape and roll, it’s normal for the edges to crumble—just press them together again. Homemade crust isn’t about perfection; it’s about delicious results you can depend on.
5. Make ahead or freeze: The dough holds beautifully in the fridge or freezer, so you can always have pie crust ready when the craving strikes. Having a dough disk tucked in the freezer means impromptu dessert (think peach pie after a good farmer’s market haul) is just minutes away from reality. The ability to prep ahead can turn an intimidating baking project into a breezy, rewarding ritual—no stress, just anticipation.
There’s a reason generations of bakers trust this basic crust: it’s consistently good, flexible with your schedule and ingredients, and always ready to shine beneath any filling you can dream up.
Pie Crust Ingredient Guide: What You Need and Why It Works
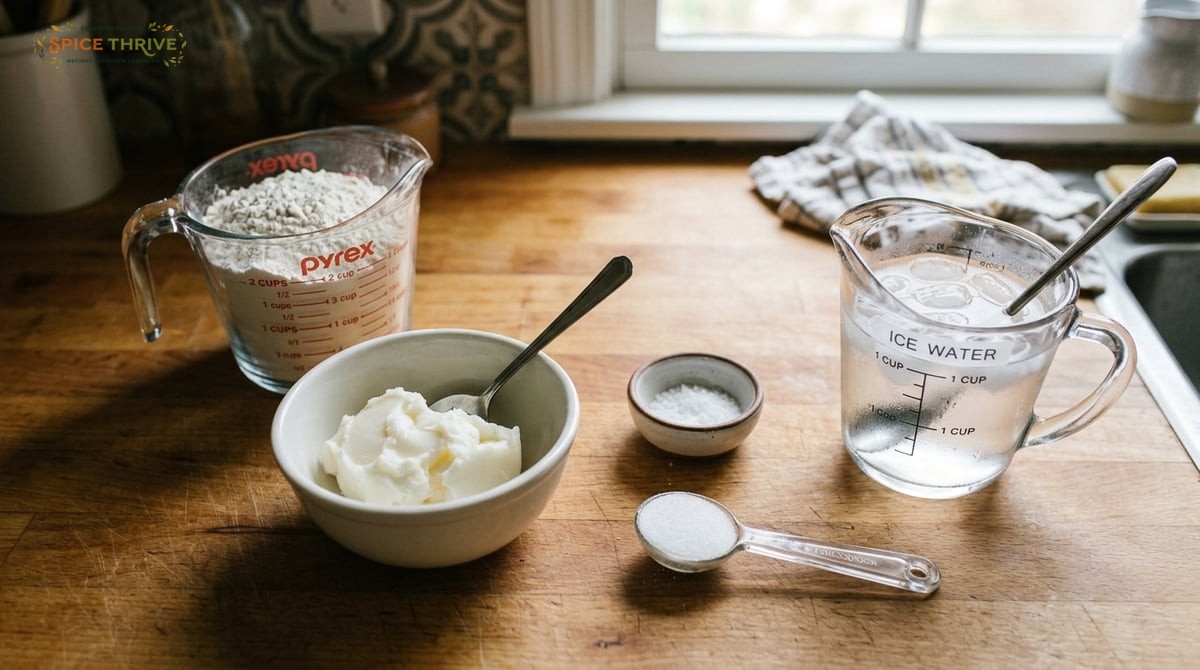
All-Purpose Flour: 2 1/2 cups (315 g). Provides structure. For ultra-tender crust, you can swap up to 1/4 of the flour for cake flour. The slightly lower protein content of cake flour makes for a more delicate crumb, perfect if you want something closer to a tart shell.
Salt: 1 teaspoon (6 g). Adds flavor and balances the richness. Don’t skip it—even a scant amount goes a long way in preventing bland dough. I prefer fine sea salt, but kosher salt works, too (increase just a pinch if using kosher).
Crisco (Vegetable Shortening): 1 cup (200 g). The star of this crust. Shortening has a high melting point, so the fat stays in little pockets as you mix, giving beautiful flakes. The result is a lighter crust compared to all-butter versions—tender, but not greasy. For best results, use Crisco chilled (pop it in the fridge for 10 minutes before starting).
Ice-Cold Water: 6 to 8 tablespoons (90–120 ml). Cold water keeps the fat from melting; add it a tablespoon at a time until the dough just comes together. Too much water can weigh down your dough, but too little will make it crack. I fill a glass with water and ice and measure out tablespoons as I go, stirring gently after each addition. The amount you need varies with the weather and humidity.
Optional Flavor Boosters: 1 teaspoon sugar for sweet pies, or 1/2 teaspoon vinegar or vodka for even more tenderness. I’ve tested all of these and will share suggestions in the tips. Sugar rounds out pie fillings like cherry or apple, while a splash of vinegar or vodka chemically shortens gluten strands during mixing for ultimate flakiness.
Possible Swaps: Use half butter and half Crisco for rich flavor plus flake, or try plant-based shortening for a vegan version. Gluten-free notes in the swaps section below. If you don’t have Crisco, butter alone (unsalted, cold and cubed) will produce a delicious, if slightly less tender, pie; work it in quickly to keep those flecks of fat distinct. Gluten-free flours require slightly more binding—look for blends with xanthan gum, or add a half teaspoon yourself.
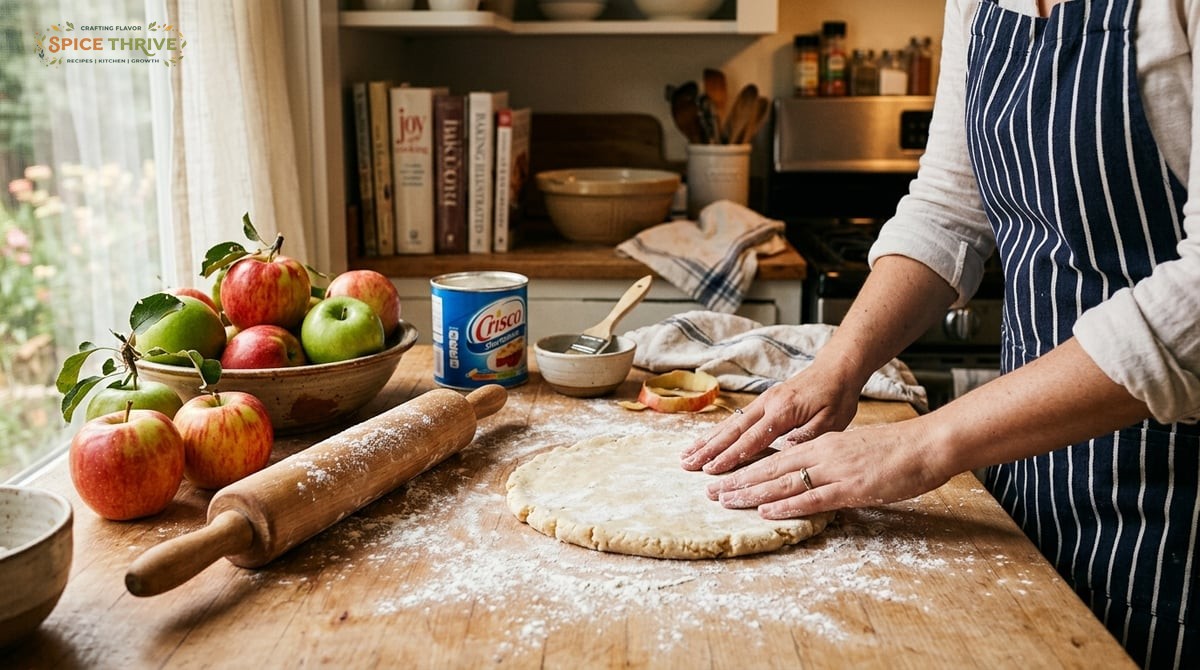
Step-by-Step: How to Make Flaky Crisco Pie Crust (with Photos)
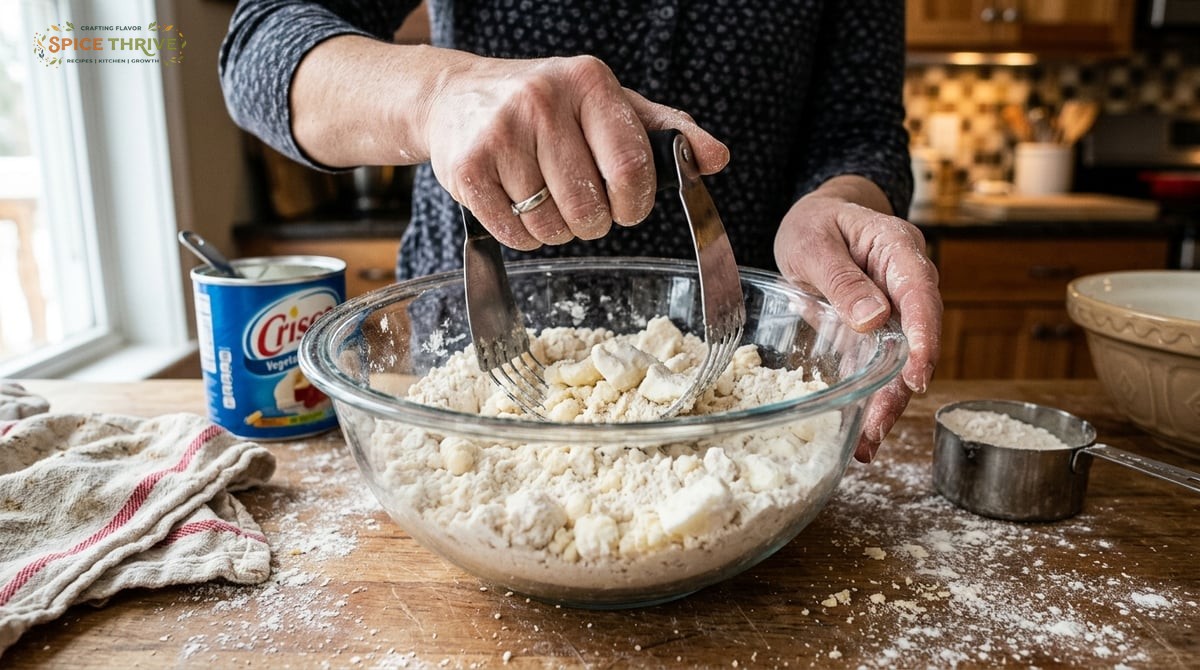
- Prep your station. Place flour and salt in a large bowl. Mix with a fork until combined. (Photo: dry ingredients in a bowl.) Make sure all ingredients are measured and chilling—especially the Crisco and ice water. A pastry scraper or bench knife can come in handy for transferring dough later, especially if your hands are warm or you work in a small kitchen.
- Add Crisco. Scoop in the shortening. Use a pastry blender or fork to cut it into the flour until it looks like coarse crumbs with a few pea-sized bits. (Photo: crumbly mixture.) The mixture should feel mostly sandy, but you want to see some uneven chunks. Those pockets are what turn into flake during baking. If using a fork, be patient—it takes extra time to work in the fat. Don’t use your fingers too much, as body heat can melt the shortening.
- Add ice water. Drizzle 6 tablespoons of ice water over the mixture, tossing with a fork. The dough should start clumping. Add 1-2 more tablespoons if needed, but only a bit at a time. It’s ready when it holds together when pinched but isn’t wet. (Photo: dough clumping together.) If you have a little left-over dry flour at the bottom, that’s okay—press it gently into the main dough ball. Weather, brand of flour, and humidity all change how much water is needed. It’s normal for each batch to need a slightly different amount.
- Gently bring it together. Working quickly, press the dough into a shaggy ball, then split in half for two crusts. Flatten each half into a disk, wrap in plastic, and chill at least 1 hour (or up to 3 days). Chilling hydrates the flour and firms up the fat, making rolling easier and baking flakier. Disks should be roughly one inch thick—this prevents cracking later. For extra precision, weigh each half so your top and bottom crusts bake evenly.
- Roll and use. Roll out on a lightly floured countertop, using gentle even pressure, until 1/8-inch thick. If cracks appear, repair them by pressing the edges together. (Photo: rolling the dough.) I like to roll from the center outward, turning the dough a quarter-turn every few strokes to keep a round shape. Before transferring to your pie dish, dust off excess flour. If the dough sticks, slide a thin spatula under it and add more flour beneath.
- Fit and bake. Lift into your pie dish. Crimp edges and follow your pie recipe for blind baking or filling. The crust should look golden and layered after baking. To blind bake, prick the bottom with a fork, line with parchment, and weigh down with beans or pie weights—about 15 minutes, then uncover and bake until golden. For filled pies, add filling and bake per your recipe, but check halfway and cover the edge if it’s browning fast.
Pro tip: An egg wash (beaten egg, sometimes thinned with a splash of water or milk) brushed on the crust before baking gives gorgeous color and shine.
Real-World Pro Tips and Troubleshooting (From Dozens of Test Batches)
- I’ve baked this at least 15 different times to nail down flaws. My first crusts were too tough (overmixed) or dry. Don’t overwork the dough: mix gently just until clumps form, then press together lightly. If it looks streaky or patchy, that’s right—it’ll bake up flaky. Imagine the striations in a croissant; you want to see similar unevenness in your pie dough before chilling.
- If the dough crumbles when rolled, it’s too dry. Sprinkle with a little ice water and gently knead just until combined. Too much kneading will toughen the crust, so use a light touch. Think of pressing sand together at the beach—gentle pressure is all you need for it to hold without becoming compacted.
- Butter-Crisco blend? Try half unsalted butter and half Crisco for more flavor—but chill the butter cubes first. Results: flakier crust, richer taste, slightly less tender but still excellent. Testers in my family always pick this variation for fruit pies, while my grandmother swears by all-Crisco for classic pumpkin or chess pies where the subtle flavor really shines.
- Over-browning edges? Cover just the rim with foil for the last 15 minutes of baking. This saves the crust from burning while letting the bottom finish. A simple ring of foil (or a store-bought pie shield) works wonders and is reusable across bakes.
- Crust shrinks while baking? Chill the rolled dough in the pan 20 minutes before baking and avoid stretching it to fit the pan. This prevents shrinkage. Press the dough down gently into edges, letting any extra pastry hang over the rim, then trim only after fitting—but never pull the dough tight.
- Visible white spots? Totally normal with Crisco — not a problem unless the spots are dry. Rub with a finger to blend or brush lightly with milk before baking for a more even finish. If you notice uneven coloring after baking, don’t worry—flavor is unaffected, and a dusting of powdered sugar (for sweet pies) makes everything look picture-perfect.
Bonus troubleshooting: If your dough tears mid-transfer, patch it with a small piece of dough and a little water as glue. Nobody will notice after baking—and the patch will dissipate into the golden, flaky layers.
Variations, Dietary Swaps, and Flavor Twists
- Gluten-Free: Swap all-purpose flour for a 1:1 gluten-free baking blend (I like Cup4Cup or King Arthur’s). You may need a tablespoon or two extra water. Gluten-free dough is more fragile when rolling, so consider rolling between sheets of parchment for easy transfer. Handle gently—gluten-free crusts tend to crack more, but they bake up beautifully if pressed back together.
- Vegan: Use plant-based shortening and double check your flour is vegan (most are). For extra flavor, try adding a pinch of nutritional yeast or a teaspoon of vegan butter flavor—for savory pies especially, this gives fantastic depth.
- Butter Blend: Use half Crisco, half cold unsalted butter for more flavor. Follow the same mixing steps but work quickly to keep the butter pieces cold. The result is the best of both worlds: flakiness from the shortening, deep taste from the butter. This version is my go-to for company and special occasions.
- For Savory Pies: Add 1 teaspoon dried herbs (thyme, rosemary) or a pinch of black pepper to the flour. Freshly cracked pepper adds visual appeal and bites of savory heat, excellent with fillings like mushroom, chicken, or root vegetable. Try a sprinkle of grated sharp cheese (like Parmesan or aged cheddar) for extra flavor in the crust, ideal for quiches or hand pies.
- Sugar for Sweet Crusts: Add 1–2 teaspoons sugar to the dry mix for fruit pies or tarts. Brown sugar works too, for a deeper flavor. For a dessert twist, add 1/4 teaspoon ground cinnamon or cardamom to blend with apple or pear fillings.
- Vodka or Vinegar: Replace 2 tablespoons of water with cold vodka or 1/2 teaspoon apple cider vinegar for extra tender crust—alcohol bakes off, leaving nothing behind but a tender flake. This works because vodka doesn’t develop gluten like water does, so you can add moisture without risking toughness.
Try experimenting: I’ve swapped lemon zest into the dough for blueberry pies, or a pinch of smoked paprika for tomato tarts. The base recipe’s neutrality means you can adapt for nearly any filling or occasion.
Storing, Freezing, and Make-Ahead Tips for Crisco Pie Crust
- Make-Ahead: Dough disks wrapped tightly keep in the fridge for up to 3 days. Chill until firm, then let stand 10 minutes at room temperature to soften before rolling. If you prefer to roll in advance, you can stack rolled crusts between layers of parchment and refrigerate them flat; just wrap well to keep out fridge odors.
- Freezing: Double-wrap dough disks in plastic and foil. Freeze for up to 3 months. Thaw overnight in the fridge before using.
Rolled crust can also be frozen in the pie dish for a ready-to-bake option. Fill straight from frozen (add 5 more minutes to baking time). If you like making mini pies or tarts, roll and cut dough rounds, stack between parchment, and freeze airtight—perfect for quick assembly when guests are on the way.
- After baking: Baked crust, unfilled, will keep tightly covered at room temperature for 1 day or refrigerated for 3. Filled pies: Follow your filling’s specific storage. Fruit pies can generally rest covered at room temperature for a day, while custard or cream pies need refrigeration. Label your dough disks by date and whether they’re for a single or double crust to save guesswork later.
- Reheating: Warm slices in a low oven (275°F/135°C) for 10 minutes to refresh the flake. Avoid microwaving if possible—it can make the crust soggy. If you must reheat quickly, put a wedge in a dry skillet over low heat for a few minutes; the bottom crispness will surprise you!
- Practical extra tip: If you have leftover dough scraps, reroll once for decorative cutouts or cinnamon twists—don’t waste them! Sprinkle with sugar and bake for the cook’s treat.
Ready to Bake? Share Your Pie Adventure!
If you try this Crisco pie crust recipe, I would love to see your creations! Leave a comment or tag your pie photos with #SpiceThriveKitchen for a chance to be featured. For more cozy, kitchen-tested comfort foods and pastry basics, browse our pie and tart recipes or head to the about page to learn more about my cooking adventures. Happy baking!
Every baker has a signature touch—maybe it’s an extra crimp on the crust or a sprinkle of cinnamon on top. Share your tweaks, fillings, and family lore. Your kitchen may become the place someone else remembers years from now when they roll out their own perfect crust. Here’s to many flaky memories ahead!
Crisco Pie Crust FAQs
Can I use butter instead of Crisco?
Yes! Substitute some or all of the Crisco with cold, unsalted butter. I like a half-and-half mix for a flakier, richer crust.
Why is my pie crust tough instead of flaky?
Usually from overmixing or adding too much water. Mix gently and only add water until the dough holds when squeezed but is not sticky.
How do I keep the edges from burning?
Cover the crust edge with foil or a pie shield during the last 15 minutes of baking.
Can I make this crust gluten-free?
Absolutely. Use a 1:1 gluten-free flour blend and add a little extra cold water if needed.
What’s the best way to store leftover dough?
Wrap tightly and refrigerate for up to 3 days, or freeze for up to 3 months. Let thaw in the fridge overnight before using.
How can I use this crust for savory pies?
Leave out any added sugar, and consider mixing in dried herbs or cracked pepper with the flour for a savory boost.
This article was created with the help of AI. Images may also be AI-generated.

