

Homemade Cat Food: How My Kitchen Became My Cat’s Favorite Restaurant
It all started with my tabby, Minou. She stopped eating her usual store-bought kibble and only perked up if I was making salmon for dinner. After plenty of vet consultations and lots of research, I tried making my own recipes. That first batch was a little too dry, but after four test rounds and some help from friends with feline taste testers, I found a formula that works for both picky and sensitive cats. If you love experimenting in your kitchen and want your cat to share in that homemade magic, this post is for you. I’ll walk you through my tried-and-true recipes as well as the hard-won tips I wish I’d known from the start.
Minou taught me that every cat has preferences — not just in flavor, but in texture, aroma, and even temperature. What surprised me most was how much her energy and mood improved after switching to homemade. Her litter box habits normalized, her coat became glossier, and she started greeting me at the kitchen door at mealtime. These little changes kept me motivated through those early missteps, like a batch that turned out too sticky or another that ended up far too bland. I also discovered just how much bond-building happens in the kitchen. Now, whenever I pull out the poaching pan or open a can of unsalted sardines, Minou is front and center, chirruping for a taste.
Through group chats with other cat owners, I stole great ideas — like switching up proteins to avoid boredom, or using safe, simple herbs (catnip, dried parsley) to tempt finicky eaters. Trying homemade isn’t just about control over ingredients. It deepened my understanding of feline nutrition and the sense of partnership between human and cat. If you’ve ever watched your cat snub dinner with a look of withering judgment, or felt anxiety about weird by-products in pet food, I promise: there’s something empowering, and fun, about making it yourself.
Why You’ll Love These Homemade Cat Food Recipes
- Customizable for your cat’s tastes and allergies: Every recipe is easily adjusted for sensitive stomachs, food intolerances, or just plain picky eaters. For cats with allergies, I learned to swap out single ingredients or cook two batches side by side. A friend’s cat can’t tolerate chicken, so I showed her how to make the same recipe using poached turkey thigh with a dash of salmon oil, which won over even her suspicious senior feline.
- Fresh, high-quality ingredients: You control the protein, fat, and moisture. No by-products, fillers, or mystery “meal” powders. The first time I bought fresh turkey from the butcher for Minou, it was clear within days she was more energetic and had a noticeably shinier coat—her vet was even impressed at her improved muscle tone and hydration.
- Real kitchen-tested guidance: Every recipe here was made (and tweaked) in my own kitchen, mostly with Minou nearby. I share all my mistakes and what worked in the end. I even polled three friends to have their cats test modified batches; thanks to a neighbor’s diabetic cat, I’ve included notes on managing carbs and sugar when needed.
- Rich, savory, and appealing: Think lightly poached chicken, shredded salmon, gentle broths, and soft grains. The aroma even tempted my husband to ask, “Are you sure that’s for the cat?” I now make extra broth for both Minou and as a base for my own soup, cutting down on waste. Texture is critical—the recipe’s final mash should be moist but not gluey, aromatic but not overwhelming.
- Simple steps for busy cooks: Most recipes are ready in under 40 minutes and require no special equipment beyond standard kitchen basics. My slowest process, from chopping to cooling, is never more than an hour, and I built a habit of prepping double on weekends to freeze small portions for fast weeknight meals.
Ingredients: What Goes Into Great Homemade Cat Food?
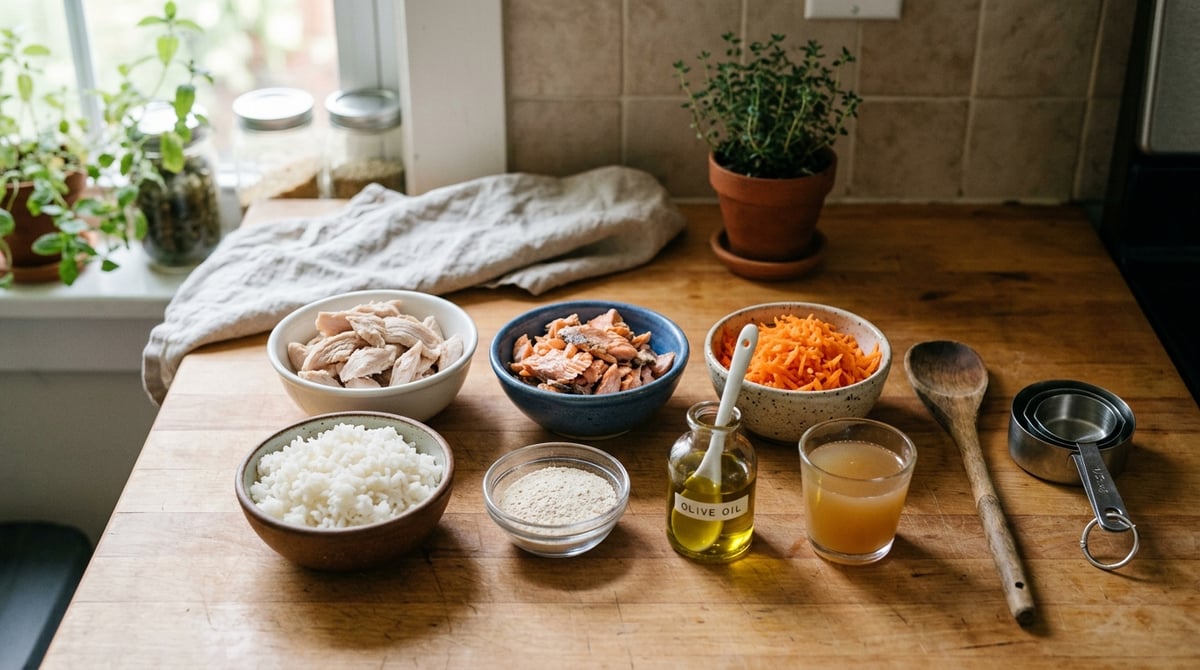
Here’s what you’ll need for a balanced, delicious homemade cat food. I’ve given both cups and grams — and included swaps I tested. Always double-check what’s safe for your cat: consult your vet, especially if your cat has health problems.
- Protein (1 cup/140g cooked chicken breast, turkey thigh, or salmon): Cats are obligate carnivores. Quality protein is the star. If using fish, rotate with poultry for variety. I often use chicken thigh for more flavor and extra moisture, and sometimes mix in dark turkey meat for its richer iron content. High-quality fish, like wild-caught salmon, offers omega-3s that keep coats shiny, but should only be used in rotation to avoid heavy metal buildup (such as mercury).
- Carbohydrate (1/4 cup/35g cooked rice or pumpkin): Supports digestion. I use plain, unseasoned rice or fresh mashed pumpkin. Omit for strict grain-free needs. Sometimes I use organic sweet potato in small amounts, which tends to make the food hold together better for freezer storage and gives a boost of vitamin A (but always in moderation, as excess can lead to stomach upset).
- Healthy Fat (1 tbsp/15ml olive oil or salmon oil): Adds flavor, helps skin and coat. Don’t use garlic oil; it’s unsafe for cats. On special occasions, I add a few drops of sardine oil for an especially tempting aroma that brings even shy or ill cats out from hiding.
- Vegetables (2 tbsp/18g shredded carrot or zucchini, cooked and cooled): Adds fiber and gentle nutrients. Avoid onions, garlic, and leeks. I usually steam carrots or zucchini so they’re soft and easy to mash—raw veg tends to pass right through uneaten. For cats with no vegetable tolerance, a pinch of spirulina (a blue-green algae powder that some vets recommend) gives a gentle nutrient boost but is totally optional and best cleared with your vet.
- Calcium source (1/4 tsp/1g ground eggshell or commercial feline calcium, optional): Essential for homemade-only diets. I dry eggshells, grind them, and store in a jar. Some vets prefer commercial calcium powder, which can be more precisely dosed and prevents unbalanced phosphorus in the diet. For recipe batches prepared in large amounts, I measure out eggshell with a tiny kitchen scale to stay accurate.
- Water or sodium-free broth (up to 1/4 cup/60ml): For moisture and texture. My early batches were crumbly before I added extra broth. Homemade veggie or chicken broths not only add aroma but helps tempt finicky cats who often turn up their noses at dry food. Avoid using store-bought broths unless you are certain they contain no onion or garlic powder.
Swaps: Sub sweet potato for pumpkin, switch up proteins, or add sardines (packed in water, no salt). For senior cats, I sometimes fold in a teaspoon of plain yogurt for probiotics, but be sure your cat isn’t lactose intolerant.
Step-by-Step: My Go-To Chunky Chicken & Pumpkin Cat Food Recipe
This is the recipe that finally got Minou eating with gusto. I’ve made it seven times, tweaking the carrot, moisture, and texture until even my picky tabby cleaned her bowl. Taste, smell, and texture matter so much to cats. Here’s my method, with tips so yours won’t turn out too dry or bland:
- Prep protein: Gently poach 1 cup (140g) boneless chicken breast in water until just cooked through (juices run clear, but no golden crust). Let cool, then dice into very small, pea-sized pieces or shred gently with your fingers. For cats with sensitive mouths or missing teeth, try pulsing the protein quickly in a food processor for a finer mince. Never use bones — even small, cooked bones can splinter and pose a choking risk.
- Cook grains & veg: In a separate pot, simmer 1/4 cup (35g) plain white rice with 2 tbsp (18g) finely shredded carrots or pumpkin. Cover with water just to coat. Cook until rice is very soft, not chewy, and carrots are tender enough to mash. If you want extra fiber or to improve batch consistency for freezing, add a teaspoon of mashed sweet potato here. For especially anxious or recovering cats, I sometimes add a sprinkle of powdered slippery elm bark for digestive soothing (clear with your vet).
- Combine: Mix the chicken, rice, carrots, 1 tbsp (15ml) olive oil, and 1/4 tsp (1g) ground eggshell gently in a wide bowl. The cooked mix should be moist but not soupy. Add water or sodium-free broth (up to 1/4 cup/60ml) if needed. For shy eaters, drip in a little of the reserved poaching liquid to boost the aroma — I find even cats with low appetite respond to the mild chicken scent.
- Taste/texture check: Pinch a bit between your fingers. It should mash easily, not crumble or clump. Adjust with more broth if too dry or sticky. Some cats prefer a chunkier texture, while others lap up smoother meals—observe what your cat leaves behind in their bowl and tweak the consistency for your next batch.
- Cool: Let cool to room temperature before serving. Store leftovers in airtight containers.
You can refrigerate for up to 2 days, or freeze in individual portions. Always serve at room temperature (never straight from fridge). If reheating, I float the closed container in a bowl of lukewarm water rather than use the microwave (which can create hot spots or odd odors). If you have a multicat household, consider portioning out each cat’s share to avoid squabbles and allow monitoring of each cat’s intake.
Tips and Troubleshooting: What I Learned From My Recipe Tests
- Moisture matters: My first batch was dry and crumbly — cats need moist food and are turned off by a dry texture. Always add broth or water as needed. I eventually started saving some of the poaching liquid and using it to achieve just the right consistency. Not only does this keep the mix softer, but it also adds subtle aroma that even my lazier cat can’t resist from across the room.
- Protein size: If my pieces were too big, Minou left them behind. Cut or shred everything smaller than a pea. If you’re feeding a senior or dental-sensitive cat, smaller pieces are essential, and sometimes a quick pass with a fork or potato masher is the best way to minimize waste and maximize eating.
- Gentle cooking: High heat and browning = tough protein and strange smells that put cats off. Keep poaching low and slow until just done. For cats who refuse strongly scented kibbles or canned food, poaching in plain water preserves the natural flavor and makes it easier on delicate digestive systems. If you have to batch-cook quickly, consider using a slow cooker on the “low” setting—just skip seasonings entirely.
- Introduce new ingredients slowly: The batch with zucchini caused an upset stomach for Minou the first time. Start with your cat’s favorite protein and add only one small new ingredient per batch. When first introducing small amounts of a new veg, watch for changes in stool or appetite and be ready to revert to previous tried-and-true combos. I keep a mini food diary for new combinations to track what works (and what isn’t worth repeating!).
- Storing & serving: Cats love food at “mouse body” temp — take it out early or warm gently, never microwave hot. Serving it too cold can make the aroma less enticing; I set individual portions out for 20 minutes before serving, or sometimes run the bottom of the sealed container under a little warm tap water.
Mistakes fixed: I stopped overcooking, always cut proteins small, and started adding more moisture. The improvement was instant! Keeping a kitchen notebook helped me tweak texture and moisture quickly. The most eye-opening tip: don’t be afraid to toss an unsuccessful batch and start again—your cat’s palate will thank you long-term.
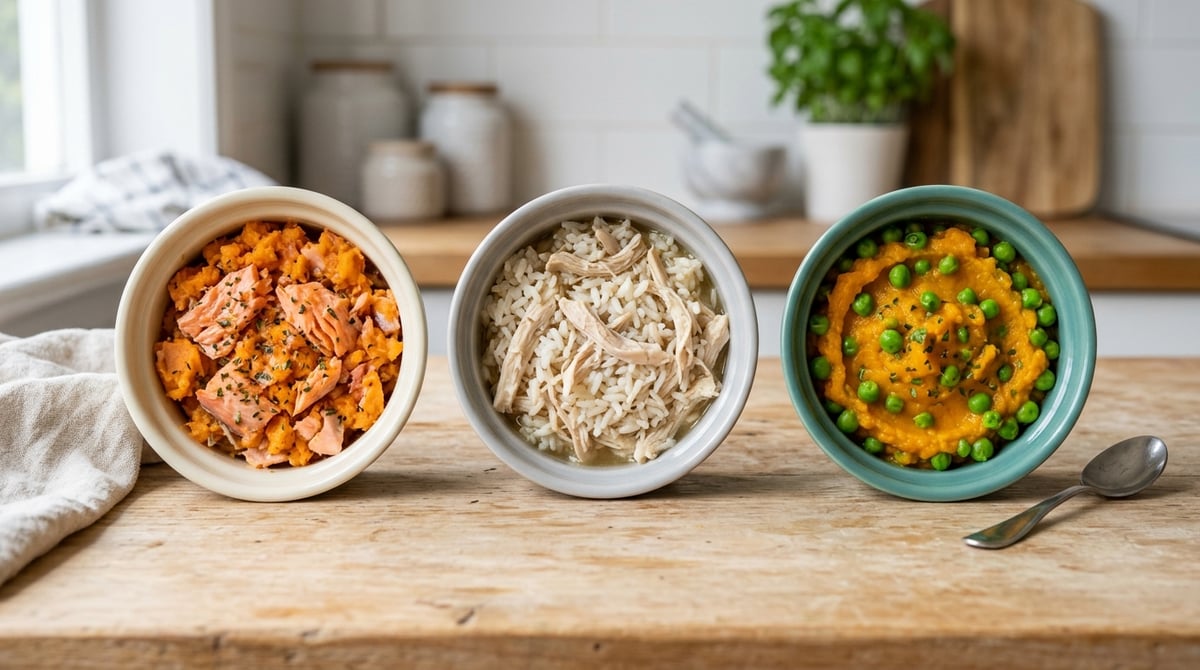
Variations: Cat Food for Special Diets
Every cat is different, and sometimes you need a recipe to match. Here are some tasty ways to switch things up, all tested on my own kitchen crew.
- Fish-First Recipe: Swap chicken for flaked salmon or sardines (packed in water, no salt). Add a splash of salmon oil for irresistible aroma. Pair with mashed sweet potato instead of rice. When I made this for a friend’s older tomcat, the addition of sweet potato improved both the flavor and palatability—and a sprinkle of chopped, cooked green beans (no seasoning) added extra fiber without changing the taste too much.
- Grain-Free Version: Use pumpkin or butternut squash (steamed and mashed, 1/4 cup/35g) and zero grains. Helps sensitive stomachs or cats on carb-restricted diets. My neighbor’s Siamese, notorious for his food sensitivities, finally found relief from loose stool after switching to a pumpkin-based batch with finely crumbled turkey cooked gently and cooled.
- More veggies: Stir in steamed green peas or finely chopped spinach (both cooked and cooled) for extra fiber. If you use spinach, ensure it’s provided in small quantities as cats don’t require much and too much oxalate isn’t ideal. To tempt veggie-averse cats, I sometimes blend the cooked veggies with the broth before mixing—this keeps the mixture smooth and prevents any veggie “chunks” from being picked out.
- Vegan or egg allergy: Cats are obligate carnivores and need animal protein, so vegan isn’t advised. Skip eggshell and use commercial feline calcium if your cat has an egg allergy. When swapping for commercial calcium, always start with the lowest recommended dose, and consult with your vet on brand and amounts. For cats with extreme allergies (like to chicken or most grains), careful single-protein batches and long ingredient lists tracking are crucial.
Allergen note: Never use onions, garlic, chives, grapes, raisins, or chocolate. Always check with a vet for safe swaps if your cat has medical needs. Cross contamination with human foods can also happen easily — I have a dedicated silicone spatula and cutting board I only use for Minou’s meals.
Storage, Reheating & Make-Ahead: Keep It Fresh and Safe
Once your homemade cat food cools to room temp, divide it into single-serve containers or ice cube trays and freeze. Here’s how I store and serve for best flavor and safety:
- Fridge: Keep covered leftovers 1-2 days max. Always toss after 48 hours, even if it looks and smells fine. If you notice any separation or odd odor, go ahead and discard—cats have a much keener sense of smell than humans and will refuse food that’s even slightly off. I use glass containers to keep batches from picking up fridge odors (which can ruin feline appetite).
- Freezer: Freeze in small containers or silicone trays. Thaw overnight in the fridge or just before serving, set portions in sealed baggies under cool running water. Labeling each container with date and main ingredients ensures you don’t lose track of older batches—especially important if you batch-cook several types at once for multiple cats. I sometimes keep a color-coded system for various recipes, so I can quickly grab fish, poultry, or “special diet” meals at a glance.
- Do not microwave to reheat, as hotspots can form. Instead, let it reach room temp, or set the (sealed) container in warm water for a few minutes. Stir well before serving to check for even temperature. If you accidentally make a batch too dry, adding just a splash of warm (not hot) broth while warming will help bring back the correct consistency.
- Label everything with batch and date. Don’t risk old portions. Use a waterproof marker or simple stickers. If you’re juggling multiple cats, record each cat’s preferences or sensitivities on the label, which helps avoid mistakes early mornings or when someone else is feeding them.
If prepping ahead, you can make a double batch and freeze up to a month. Single-serve containers make mornings simpler — I always keep a small stash ready! For long weekends or if pet-sitting, a labeled batch in the freezer makes it easy for others to help out without confusion. A kitchen timer reminder to check the fridge for old portions saves on waste—and keeps your feline safe.
Get Cooking: Share Your Cat’s Favorite!
I hope you and your cat find these homemade cat food recipes as rewarding (and crowd-pleasing) as Minou and I did. Trying, failing, and tweaking is part of the fun, and you’ll learn what works best for your own feline friend. If you try this recipe — or craft your own version! — leave a comment or share a photo. Read more about me and Spice Thrive’s tested recipes. Happy cooking and happy (safe) snacking to your whiskered family members!
At the end of the day, there is no one-size-fits-all recipe, and that’s part of the adventure. The process isn’t just about what goes in the bowl — it’s about the conversations you’ll have with your vet, the new discoveries about your cat’s changing needs, and the small rituals you create around mealtimes. I encourage you to explore, trust your cat’s feedback, and take pride when you land on that “magic batch” that earns a purr of approval. Even if you’re just trying a single meal a week or baking up a freezer stash for special occasions, the effort brings you closer to your cat—and that’s the real treat. Don’t forget to bookmark this guide and check back for updates, as I regularly experiment with new protein-vegetable combos and share them for the benefit of fellow cat lovers. Here’s to more kitchen adventures with joyfully empty bowls!
Common Questions About Homemade Cat Food
Can I use only one type of protein?
Yes, but for the best nutrition and to avoid boredom, try rotating proteins like chicken, turkey, and salmon over weeks. Switching up proteins helps prevent sensitivity from developing and can keep your cat more interested at mealtime. Some cats even prefer alternating between fish-based and poultry-based recipes for variety. Be mindful not to use raw fish exclusively, as this can interfere with vitamin B1 metabolism.
Do I need special supplements in homemade cat food?
If homemade is only a treat (not their main diet), you usually don’t need extras. For cats exclusively on homemade, talk to your vet about adding a feline multi-vitamin and a calcium or taurine supplement. I use ground eggshell in mine. Some commercially available supplements are tailored for home-cooked cat diets—ask your vet which brands are best and avoid generic human multivitamins, which can be harmful.
Why does my cat turn up their nose?
Texture or temperature are usually to blame. Serve food at room temperature, dice meats tiny, and add more broth to increase aroma and appeal. Also, some cats need repeated exposure to new scents or tastes—try mixing a spoonful of homemade with their usual food and increasing the amount gradually over days. Avoid heavily aromatic human foods, which can repel many cats rather than attract them.
Can I freeze it? How?
Absolutely. Cool the food, portion out, then freeze in tightly sealed, single-serve containers for up to one month. Thaw gradually in the fridge before use. Label your containers with the date and ingredients to track batches, especially if you’re making several varieties. Freezing in small amounts also allows for quicker thawing and reduces waste.
Is homemade cat food safe for kittens or seniors?
With extra care, yes. Consult your vet because kittens and older cats may have specific needs. You may need extra calcium, fat, or softer textures. Kittens require more calories and frequent meals, so recipes may need adjustment for protein and added fats. Seniors may benefit from softer consistencies or fine mashes. Always check with your vet about additional supplements for these life stages.
Are onions, garlic, or other spices OK for cats?
No! Never add onion, garlic, chives, grapes, raisins, salt, or chocolate. Keep recipes simple, and when in doubt, check with your vet. Even small amounts of certain spices or flavorings can be toxic to cats, so err on the side of plain, unseasoned meals. If you want to enhance aroma, use safe options like a touch of catnip or a splash of water-packed sardine liquid.
This article was created with the help of AI. Images may also be AI-generated.

