")
Homemade Gluten Free Bread Machine Recipe: Soft, Golden, and Seedy
My quest for the perfect gluten free bread machine recipe started last spring when my best friend, gluten sensitive and ever the bread-lover, came to stay with us. Every loaf I tried was either dense or dry—until I cracked the formula after nine tries. Each batch taught me something new (and filled my house with the most comforting aroma). Now, I make this loaf every week, and you’d never guess it’s gluten free. If you’ve struggled with dense slices or crumbling edges, you’re in good company—and you’re about to bake a loaf you’ll crave all week. Let’s get into it!
Why You’ll Love This Gluten Free Bread Machine Recipe
- Truly Soft and Fluffy: No more heavy or gummy gluten free bread. This loaf slices beautifully and stays fresh for days. Unlike many packaged options that can turn stale within hours, I’ve found this recipe maintains its springy crumb, making it ideal for sandwiches, toast, or even French toast up to three days after baking. Friends who aren’t gluten free routinely ask for extra slices to take home, not realizing it’s GF!
- Doughy Aroma: It fills your kitchen with that warm, nostalgic scent of rising bread—no yeasty off-notes. You’ll notice the scent as soon as the machine starts mixing, with hints of toasted grain and subtle sweetness in the air, a sensory reminder of bakery visits or Sunday mornings.
- No Kneading: The bread machine does all the work. Just mix, pour, and press start. There’s no need to wrestle with sticky dough or tire out your arms—this hands-off method means you can clean up the kitchen or prep other dishes while your bread rises and bakes, making homemade bread truly doable on busy weeknights.
- One-Bowl Simplicity: Minimal mess with a straightforward ingredient list you can find at most supermarkets. Even if you’re new to GF baking, there’s no mysterious ingredients or lengthy shopping trips. I chose staples you probably already have—making this accessible for everyone, even in a pinch.
- Customizable: Easily adapt with your favorite seeds, herbs, or dairy-free swaps for everyone at your table. From rosemary and flaky salt for a savory spin, to cinnamon and raisins for a breakfast loaf, this recipe’s flexibility is one of its biggest strengths. I encourage experimenting with add-ins based on your family’s preferences.
I’ve tested this recipe over ten times with different flour blends and settings to make sure it works—each round guided by stubbornness (and taste-testers at brunch). Whether you’re new to gluten free baking or have a machine gathering dust, this one is a keeper. You’ll gain confidence with every loaf.
Ingredient Notes and Smart Swaps
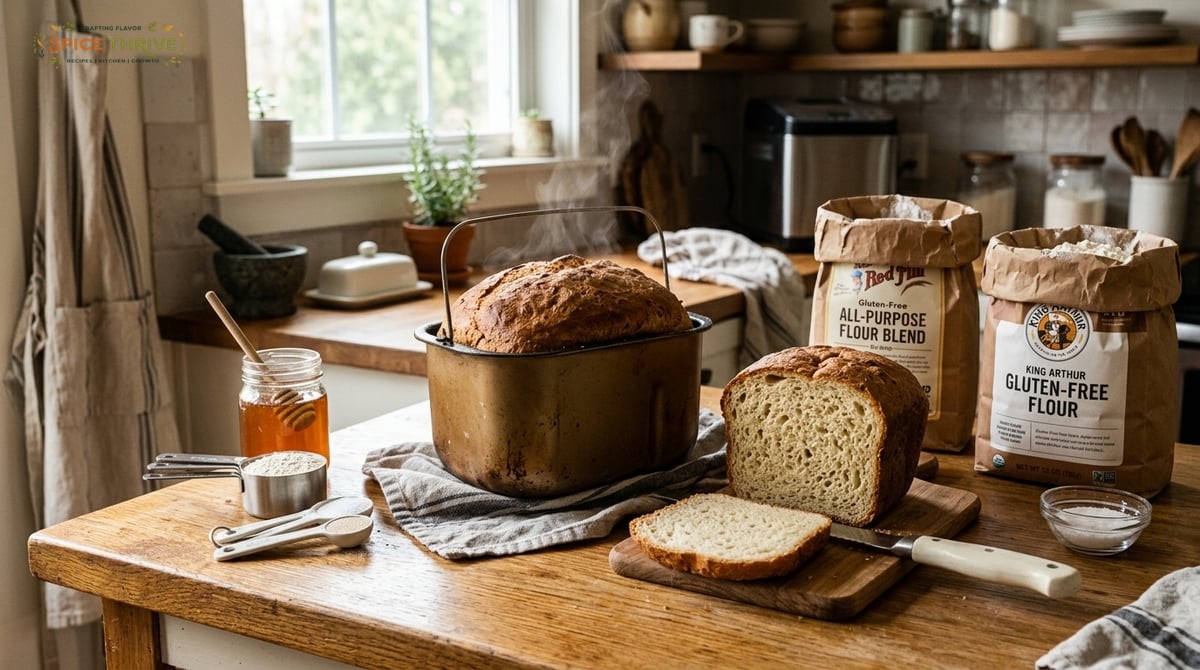
- Gluten Free Flour Blend (3 cups / 420g): Use a high-quality all-purpose blend with xanthan gum. I’ve had the best texture with Cup4Cup or King Arthur Measure for Measure. If your blend has no xanthan gum, add 1 ½ tsp separately. For a homemade blend, try 40% whole grain flour (like brown rice or sorghum), 40% starch (potato or tapioca), and 20% white rice flour, then whisk in xanthan gum for structure. Avoid single-flour blends—they’ll yield heavy, dense bread that doesn’t rise well.
- Milk or Dairy-Free Milk (1 cup / 240ml): Adds moisture and tenderness. I’ve tested with both unsweetened oat milk and whole milk—either works well. For extra richness, substitute part of the milk with plain yogurt (about 2 tablespoons), which lends a softer crumb and slightly tangy flavor. For nut allergies, rice or soy milks work, but add a splash more oil for moisture.
- Eggs (3 large): These bind and help the loaf rise. Vegan? Use 3 chia “eggs” (1 tbsp ground chia + 3 tbsp water per egg, mixed and rested for 5 min). Eggs also boost protein content and provide that familiar springy structure found in wheat breads. For egg-free versions, try flax eggs, but note that the loaf will be slightly more dense.
- Oil (¼ cup / 60ml): Keeps the crumb soft. Neutral oils like light olive or avocado are best. Melted butter is great too. If you prefer coconut oil, be sure it’s fully melted and mixed in well, as clumps can lead to uneven texture. Olive oil offers a subtle, earthy flavor ideal for savory add-ins.
- Sugar (2 tbsp / 24g): Feeds the yeast and adds subtle sweetness. Maple syrup works for a deeper flavor. I sometimes use honey—just reduce the milk by 1 tablespoon to offset the extra moisture. For a savory loaf, drop the sugar to 1 tablespoon or omit it entirely, but expect a less brown crust.
- Salt (1 ¼ tsp / 7g): Brings all the flavors together. Don’t skip it! Kosher salt is ideal for even seasoning, but fine sea salt dissolves quickly if that’s what you have on hand. Salt also helps control yeast activity, preventing over-rising.
- Instant Yeast (1 ½ tbsp / 13g): Provides a high, airy rise. Use instant (bread machine) yeast for best results. If using active dry, dissolve it first in part of the milk with a pinch of sugar before adding. Instant yeast is reliable, but make sure it’s not expired for the best lift.
- Sunflower Seeds or Pumpkin Seeds (2 tbsp / 20g, optional): Scatter on top for crunch and major snack vibes. I love mixing sesame, poppy, or chia seeds into the batter and topping with pepitas for a harvest-style loaf. Toasting seeds briefly before adding intensifies their flavor.
Nut free, gluten free, and can be dairy free or egg free with simple swaps. If preparing for allergies, always double-check all packaged ingredients for cross-contact information. For an ultra-tender bite, try adding 2 teaspoons of apple cider vinegar along with the liquids to help structure and rise (especially in egg-free/dairy-free versions).
Step by Step: Bread Machine Gluten Free Bread (Photos!)
- Add Wet Ingredients First: Pour milk, oil, and eggs into the bread machine’s pan. This helps the mixing paddle reach everything and prevents sticking. For best results, allow wet ingredients to come to room temperature—cold milk or eggs can slightly slow the yeast, making the rise less dramatic.
- Add Dry Ingredients: Gently spoon in your gluten free flour blend, sugar, and salt. Sprinkle yeast on top, keeping it dry (this really matters for a strong rise). If you’re adding spices or herbs, whisk them into the flour before layering it in. Layering the dry over the wet prevents clumping and maximizes hydration.
- Set Your Machine: If you have a gluten free cycle, select it. Otherwise, use the “Basic” or “White” bread setting. Choose medium crust for a golden edge. Most bread machines default to a 2-lb loaf—this recipe fits those pans, but check your machine’s guidelines if you have a smaller model. For a lighter crust, choose the lightest setting, but medium usually provides the best combination of golden color and tender edges.
- Pause and Scrape: About 10 minutes into mixing, pop the lid and use a rubber spatula to scrape any flour off the corners. (Gluten free dough needs more help blending.) Unlike wheat doughs, which form a stretchy ball, gluten free batters stay thick and sticky—scraping ensures everything gets incorporated for even crumb without dry pockets.
- Top and Finish: After the machine’s last knead, scatter sunflower or pumpkin seeds on top. Let it bake all the way. When done, open the lid right away and carefully lift the pan out. (It smells amazing!) If your machine has a “keep warm” function, avoid using it for this bread; excess heat can dry the gluten free crumb.
- Cool Before Slicing: Let the loaf rest in the pan for 10 minutes, then remove and finish cooling on a rack. The bread will firm up as it cools, keeping the crumb springy and tender. Slicing while hot can cause the interior to gum up, so resist the temptation even as the aroma calls your name! For tidier slices, use a serrated bread knife and gentle sawing motion.
Real Pro Tips: Lessons I Learned Testing This Gluten Free Bread Machine Recipe
- Scraping Matters: Even if your machine claims to be nonstick, gluten free doughs stick to corners. Scraping early prevents floury pockets and ensures an even dough. I use a silicone spatula for best reach—it’s flexible and easy to clean. Missing this step is one of the main causes of uneven texture or marbled flour streaks inside your bread.
- Weigh Ingredients: Cup measures can pack differently, especially with GF flours. A digital scale (in grams) makes results consistent every single bake. For instance, 1 cup of packed flour can weigh up to 25% more than fluffed and spooned flour, affecting hydration and rise. Once I switched to weighing, I noticed every loaf turned out with the same open crumb and rise.
- Troubleshooting Dense Loaves: If your bread is heavy, check your yeast freshness and cycle—sometimes switching to a longer “Basic” bread setting helps. If your loaf still comes out dense, try adding an extra tablespoon of milk for additional moisture, or increasing rising time (if your machine allows it). Also, avoid using only whole grain blends, which often weigh down the loaf.
- Keeping It Moist: Gluten free bread dries quickly. I store the sliced loaf in a zip-top bag, squeezing out as much air as possible. A slice reheated for 10 seconds in the microwave tastes just-baked. Alternatively, slide a small piece of apple in the bag for extra humidity—just check and replace it every two days to prevent spoilage.
- Ingredient Temps Matter: Let eggs and milk come to room temp before mixing. Cold ingredients slow yeast growth and make the loaf dense. On winter mornings, I set them on the counter for 20-30 minutes, or dip cold eggs (in their shells) in warm water for 5 minutes for speedier warming.
- Crumbly Edges: Adding a half teaspoon of xanthan gum (even if your flour blend already has it) can improve structure if you find your bread falls apart. Sometimes, gluten free blends are inconsistent—this small adjustment dramatically boosts sliceability.
After my third loaf sank in the middle, I switched yeast brands and let my ingredients warm up—results were stellar. Don’t be afraid to tweak for your machine! If your kitchen runs cold or your altitude is high, you might also try turning off the bread machine’s fan (if possible) during the rise. For crispier crust, leave the finished loaf in the machine with the lid propped open for 10 minutes before transferring to a rack.
Easy Variations and Dietary Swaps
- Dairy Free: Use unsweetened oat, almond, or soy milk. Swap butter for avocado or canola oil. Rice milk is another choice, though a little extra fat (add 1 tablespoon oil) helps yield a plush crumb. For deep flavor, try unsweetened coconut milk—just shake well before measuring.
- Egg Free/Vegan: Substitute 3 chia “eggs”: 3 tablespoons ground chia seeds plus 9 tablespoons water, mixed and rested 5 minutes until gelled. For a less seedy texture, use ground flax instead; either adds healthy omega-3s and fiber.
- Seedy or Nutty: Add 1/3 cup (40g) pepitas, sunflower, or lightly toasted chopped nuts for crunch. Fold extra seeds into the dough for each bite to have texture, or swirl in a tablespoon of hemp hearts for protein. Toast seeds lightly before adding to bring out their aromatic oils and elevate the loaf.
- Herb Bread: Mix in 2 teaspoons dried herbs (rosemary, basil, oregano) for a herbed loaf—perfect for savory toast. For ultimate freshness, finely chop a tablespoon of fresh chives or parsley to add after baking, or use garlic powder for a Mediterranean-style bread. For a cheesy note, sprinkle dairy-free or regular parmesan on top in the last 10 minutes of baking.
- Sweet Version: Stir in 1/2 cup (80g) raisins or dried cranberries and up the sugar to 1/4 cup (48g) for a breakfast treat. Add a dash of cinnamon or a half teaspoon pure vanilla extract to fill your kitchen with a bakery-worthy aroma. For a dessert-like loaf, swirl in mini chocolate chips or chopped dates just before the final rise.
This recipe is naturally gluten and nut free. Check your flour blend for potential allergens (some blends use milk powder or almond meal—read the label!). For more gluten free baking, check out my soft gluten free buns recipe too. If you’re making bread for guests, always share which swaps you used—they’ll appreciate the care and know it’s safe for them!
Storage, Reheating, and Make Ahead
- Fresh Storage: Cooled, unsliced bread keeps 2-3 days wrapped in a clean tea towel, then sealed in a plastic bag. Sliced bread dries out faster, so wrap tightly after slicing. For very humid climates, consider storing bread in a paper bag one day, then plastic the next to balance moisture and avoid soggy crusts.
- To Freeze: Slice cooled loaf, wrap in plastic, and freeze in a zip-top bag. Defrost slices at room temp or toast straight from frozen. I often package two slices together for quick workday sandwiches—open, toast, and you’re ready. For best flavor, enjoy within one month of freezing.
- Reheating: A quick 10–15 second zap in the microwave revives even day-old slices to pillowy softness. Toasting also brings out a nutty aroma and crunch. For a softer bite, cover with a damp paper towel before microwaving—great for those who love squishy sandwich bread! Try griddling slices with butter for a golden grilled cheese.
- Make Ahead: Batter can be mixed and refrigerated for up to 3 hours before baking if you want to prep ahead. Just let it come to room temp before starting your bread machine cycle. Planning brunch? Mix up the batter after breakfast and start the bake mid-morning for fresh bread at noon. Refrigerated dough may rise a bit more slowly but still bakes beautifully.
Gluten Free Bread Machine Recipe (Printable & Easy)
Prep Time: 8 minutes
Cook Time: 2 hours 10 minutes
Total Time: About 2 hours 20 minutes
Yield: 1 loaf (about 12 slices)
Ingredients
- 3 cups (420g) gluten free all-purpose flour blend with xanthan gum
- 1 cup (240ml) milk or unsweetened dairy-free milk
- 3 large eggs (room temperature)
- 1/4 cup (60ml) neutral oil or melted butter
- 2 tablespoons (24g) sugar or maple syrup
- 1 1/4 teaspoons (7g) salt
- 1 1/2 tablespoons (13g) instant yeast (bread machine yeast)
- 2 tablespoons (20g) sunflower or pumpkin seeds (optional, for topping)
Instructions
- Pour milk, oil, and eggs into the bread machine pan. Let come to room temperature for best results. Using cold liquids may slow your rise.
- Add gluten free flour blend, sugar, and salt. Sprinkle yeast on top, keeping it dry. For a sturdier loaf, add an additional 1/2 teaspoon xanthan gum if your blend feels especially light or crumbly.
- Select “gluten free” or “basic/white bread” cycle. Set for medium crust. If substituting active dry yeast, dissolve it in half the milk for 5 minutes before adding.
- After the first mix (about 10 minutes in), open the lid and use a spatula to scrape down the corners for even mixing. Make sure to push any flour on top into the liquid to avoid dry streaks in the finished bread.
- Scatter seeds on top after last knead, if using. Press them in gently so they stick.
- Bake through. When done, let the loaf cool 10 minutes in the pan, then fully on a rack before slicing. Slice with a serrated knife for the cleanest edges.
Nutrition Estimate (per slice, 1/12):
- Calories: 155
- Carbs: 29g
- Protein: 4g
- Fat: 3g
- Fiber: 2g
Allergen Notes: Gluten free, nut free as written. Dairy free and egg free options included above. Nutrition values are estimates and can vary depending on brands of flour and add-ins. For lower sodium, reduce salt to 3/4 teaspoon, but flavor may be milder.
Last retested June 2024. Recipe and testing photos © Spice Thrive.
Ready to Bake? Let’s Make Bread Together!
You don’t have to settle for store-bought, crumbly gluten free bread ever again. I hope this recipe brings that fresh-from-the-oven joy to your kitchen—the kind you want to share. If you make it, tag your photos #SpiceThrive and tell me how it turned out, or let me know your questions right in the comments. Happy baking!
— Written by Celia Zhang, recipe tester, home cook, and the voice behind Spice Thrive. Learn more on my About Page.
Common Questions
Can I use homemade gluten free flour?
Yes, but results will vary by recipe. Choose a blend with a mix of whole grain and starches—plus xanthan gum for structure. Test and adjust liquids as needed.
Do I need a gluten free setting on my bread machine?
It helps, but isn’t essential. Use the “basic” or “white bread” cycle if your machine doesn’t have a GF setting. Check after mixing and scrape sides for best results.
Why did my gluten free bread collapse in the middle?
Usually over-proofing, too much liquid, or old yeast. Try using fresh yeast, measuring precisely, and shortening the preheat/rise time.
Can I double this recipe?
Most bread machines can’t handle more than one loaf per bake—it will overflow or bake unevenly. Make two separate loaves if feeding a crowd.
Is this bread good for sandwiches?
Absolutely! The crumb structure is sturdy but soft, and the flavor is neutral enough for both sweet and savory fillings.
Can I use active dry yeast instead of instant?
Yes. Bloom it in warm milk (not hot) for 5-10 minutes before adding, then proceed as written. The rise may be slightly longer.
This article was created with the help of AI. Images may also be AI-generated.

